Difference between revisions of "D-Xhird"
From Sega Retro
(moves) |
|||
| Line 26: | Line 26: | ||
==Gameplay== | ==Gameplay== | ||
{{ScreenThumb|D-Xhird Saturn, Character Select.png|width=200|Character select}} | {{ScreenThumb|D-Xhird Saturn, Character Select.png|width=200|Character select}} | ||
| − | The game is a 3D fighting game and a spiritual successor to the ''[[:Category:Battle Arena Toshinden|Battle Arena Toshinden]]'' games, which were ported to the Saturn by the same developer. Matches are fought to the best of three | + | {{ScreenThumb|D-Xhird Saturn, Gameplay.png|width=200|Gameplay}} |
| + | The game is a 3D fighting game and a spiritual successor to the ''[[:Category:Battle Arena Toshinden|Battle Arena Toshinden]]'' games, which were ported to the Saturn by the same developer. It has similar mechanics but a new cast of characters. Matches are fought to the best of three rounds. A round is won by depleting the other fighter's health, having more health than the opponent if time runs out, or knocking the opponent out of the arena. Most stages are open arenas (where ring-outs are possible), as before, but the game also introduces stages that are fought in closed cages, similar to ''[[Fighting Vipers]]'', where fighters can be damaged by being knocked against the walls. | ||
| − | Characters walk with {{left}} and {{right}}. They crouch with {{down}} and walk while crouched with {{downleft}} and {{downright}}. Normal movement is slow, but characters can backstep or dash with {{left}} {{left}} or {{right}} {{right}}. When dashing, the direction can be held to continue running. Characters jump upward with {{up}} and jump behind and ahead with {{upleft}} or {{upright}}. They can jump off the sides of the caged arenas by pressing a kick button upon contact with the wall. They can sidestep to dodge attacks by stepping forwards (toward the screen) with {{R}} or stepping backwards (away from the screen) with {{L}}. | + | Characters walk with {{left}} and {{right}}. They crouch with {{down}} and walk while crouched with {{downleft}} and {{downright}}. Normal movement is slow, but characters can backstep or dash with {{left}} {{left}} or {{right}} {{right}}. When dashing, the direction can be held to continue running. Characters jump upward with {{up}} and jump behind and ahead with {{upleft}} or {{upright}}. They can jump off the sides of the caged arenas by pressing a kick button upon contact with the wall. They can sidestep to dodge attacks by stepping forwards (toward the screen) with {{R}} or stepping backwards (away from the screen) with {{L}}. Characters attack by slashing with their weapon with {{X}} for a weak slash or {{Y}} for a heavy slash, or they can kick with {{A}} for a weak kick or {{B}} for a heavy kick. Weak attacks are faster, but heavy attacks do more damage. Each character has his or her own unique set of basic moves and special moves performed with special button combinations. Characters can attack while dashing or sidestepping. |
| − | + | Some attacks knock a fighter down. Characters can attack a downed fighter by pressing {{up}}+{{X}} for a short-distance pounce or {{up}}+{{Y}} for a long-distance pounce or stomp a downed opponent by holding {{downright}} (or {{downleft}} when facing left) and pressing a kick button. When knocked down, characters can roll backwards or forwards by holding {{left}} or {{right}} or roll into the background or foreground by holding {{up}} or {{down}} to avoid attacks. | |
| − | |||
| − | Some attacks knock a fighter down | ||
Characters can guard against attacks by holding the D-Pad in the opposite direction of the opponent or by holding {{C}} or {{Z}}. Guarding can be done while standing or crouching but not while jumping. Each fighter has a Guard Power meter that is depleted every time the character guards against an attack. When the meter is empty, attacks can still be blocked but inflict partial damage. Some special moves cost part of the Guard Power meter, and some special moves can only be performed when the health bar, Guard Power meter, or both are low and red. Characters can grab and throw opponents by pressing the D-Pad away from the opponent while pressing a heavy punch or kick button, which cannot be blocked. Characters also have special command grabs and maneuvers that can be done after repelling off a wall (in caged arenas). | Characters can guard against attacks by holding the D-Pad in the opposite direction of the opponent or by holding {{C}} or {{Z}}. Guarding can be done while standing or crouching but not while jumping. Each fighter has a Guard Power meter that is depleted every time the character guards against an attack. When the meter is empty, attacks can still be blocked but inflict partial damage. Some special moves cost part of the Guard Power meter, and some special moves can only be performed when the health bar, Guard Power meter, or both are low and red. Characters can grab and throw opponents by pressing the D-Pad away from the opponent while pressing a heavy punch or kick button, which cannot be blocked. Characters also have special command grabs and maneuvers that can be done after repelling off a wall (in caged arenas). | ||
| − | After dashing, the player can press the weak slash and kick buttons together or the heavy slash and kick buttons together to empower the character. While in this state, the character can chain moves together quickly for an aggressive combo. If the sequence is interrupted, the character is momentarily stunned and vulnerable. If the sequence is performed completely, the enemy is knocked back, and the character does a victory pose. The Guard Power meter drains on every hit of the combo. | + | After dashing, the player can press the weak slash and kick buttons together or the heavy slash and kick buttons together to empower the character. While in this state, the character can chain moves together quickly for an aggressive combo. If the sequence is interrupted, the character is momentarily stunned and vulnerable. If the sequence is performed completely, the enemy is knocked back, and the character does a victory pose. The Guard Power meter drains on every hit of the combo. When the Guard Power meter is red, the character can also perform special moves by pressing the weak slash and kick buttons together while backstepping or sidestepping. |
===Modes=== | ===Modes=== | ||
| − | + | These modes are initially available: | |
*'''1P Mode:''' A single-player mode where the player chooses any character and fights a series of matches against computer-controlled opponents. After defeating every playable character in the game, the player faces the bosses Venus and Izanagi. If the player makes it to this point and defeats the bosses without using a continue on at least the default difficulty setting, an additional fight against Shadow Boy is unlocked. If the player defeats Shadow Boy without using a continue, a final fight against Eiji (from ''[[:Category:Battle Arena Toshinden|Battle Arena Toshinden]]'') is unlocked. The game can be continued an unlimited number of times if the player is defeated by an opponent. A second player can join at any time to challenge the first to a match by pressing {{Start}}. | *'''1P Mode:''' A single-player mode where the player chooses any character and fights a series of matches against computer-controlled opponents. After defeating every playable character in the game, the player faces the bosses Venus and Izanagi. If the player makes it to this point and defeats the bosses without using a continue on at least the default difficulty setting, an additional fight against Shadow Boy is unlocked. If the player defeats Shadow Boy without using a continue, a final fight against Eiji (from ''[[:Category:Battle Arena Toshinden|Battle Arena Toshinden]]'') is unlocked. The game can be continued an unlimited number of times if the player is defeated by an opponent. A second player can join at any time to challenge the first to a match by pressing {{Start}}. | ||
*'''Vs Mode:''' A two-player mode where both players can choose any character and any stage and fight against each other. | *'''Vs Mode:''' A two-player mode where both players can choose any character and any stage and fight against each other. | ||
| − | *'''Time Limit Mode:''' | + | *'''Time Limit Mode:''' A single-player mode where the player chooses any character and tries to defeat all ten normally playable characters (no bosses) within a time limit of 20 minutes and 10 seconds. Individual rounds have no time limit. If successful, the player unlocks the Team Edit Mode. The game cannot be continued if the player loses a match. |
| − | *'''Practice Mode:''' A training mode where the player can choose any character and any opponent. Both fighters have unlimited health and Guard Power, and there is no time limit. The second fighter is a dummy who does not fight back but can be moved with a second control pad. The player can open a move list for the current character by pressing {{Start}}. | + | *'''Practice Mode:''' A training mode where the player can choose any character and any opponent. Both fighters have unlimited health and Guard Power, and there is no time limit. The second fighter is a dummy who does not fight back but can be moved with a second control pad. The player can open a move list for the current character by pressing {{Start}}. Moves that normally require red health or Guard Power can always be performed in this mode. |
| − | *'''Real Fight Mode:''' | + | |
| − | *'''Unlimited Mode:''' | + | These modes can be unlocked: |
| − | *'''Team Edit Mode:''' | + | |
| − | *'''Mini Ring Mode:''' | + | *'''Real Fight Mode:''' A two-player mode. Players choose any character and any stage. Instead of having health bars, characters can take unlimited damage but are defeated when they are knocked down by any attack. Unlocked by completing the 1P Mode with any character. |
| + | *'''Unlimited Mode:''' A single-player endurance mode. The player chooses any character and fights an unlimited number of matches with the goal of surviving as long as possible. The game ends after losing a match. Unlocked by completing the 1P Mode and watching the introduction [[FMV]]s and demo sequences. | ||
| + | *'''Team Edit Mode:''' A two-player mode. Each player chooses three characters and fights a single match on any stage. When one character is defeated, the player plays the next selected character in the next round. The match is decided when all of a player's characters have been eliminated. Unlocked by completing the Time Limit Mode. | ||
| + | *'''Mini Ring Mode:''' A variant of the 1P Mode that follows the same rules, but all stages are much smaller. Unlocked by completing the 1P Mode with all of the unlockable boss characters. | ||
| + | |||
| + | The game saves unlocked modes and high scores (including the best time in the Time Limit Mode and the most matches survived in the Unlimited Mode) to the Saturn's internal memory or a [[Saturn Backup Memory|backup cartridge]]. | ||
| − | There are three difficulty levels for computer-controlled opponents (Easy, Normal, Hard). Players can also change the amount of time per | + | There are three difficulty levels for computer-controlled opponents (Easy, Normal, Hard). Players can also change the amount of time per round (30, 45, 60, or 90 seconds or unlimited, with a default of 60) and the number of wins needed to win a match (between 1 and 5, with a default of 2). |
===Characters=== | ===Characters=== | ||
| Line 59: | Line 63: | ||
| title=Boy | | title=Boy | ||
| sprite={{sprite | D-Xhird Saturn, Characters.png | crop_width=128 | crop_height=120 | crop_x=0 | crop_y=0}} | | sprite={{sprite | D-Xhird Saturn, Characters.png | crop_width=128 | crop_height=120 | crop_x=0 | crop_y=0}} | ||
| − | | info1name=Weapon | + | | info1name=Height |
| − | | | + | | info1=172 cm |
| − | | desc= | + | | info2name=Weight |
| + | | info2=62 kg | ||
| + | | info3name=Age | ||
| + | | info3=18 | ||
| + | | info4name=Weapon | ||
| + | | info4=Cannon Blade | ||
| + | | info5name=Origin | ||
| + | | info5={{flag|UK}} | ||
| + | | desc=A British drifter who is avenging the assassinations of his mother and his lover. | ||
{{MoveListTable | desc=Special moves | | {{MoveListTable | desc=Special moves | | ||
{{MoveListRow | | {{down}} {{right}}+{{LS}} | Boy points his sword ahead and launches a cone-shaped projectile across the battlefield from it, which knocks over opponents on impact. This is a high projectile that can be ducked under. This move drains the Guard Power meter.}} | {{MoveListRow | | {{down}} {{right}}+{{LS}} | Boy points his sword ahead and launches a cone-shaped projectile across the battlefield from it, which knocks over opponents on impact. This is a high projectile that can be ducked under. This move drains the Guard Power meter.}} | ||
{{MoveListRow | | {{HCF}} {{LS}}+{{LK}} | Boy points his sword ahead and launches a cone-shaped projectile across the battlefield from it, which knocks over opponents on impact. This is a low projectile that can hit crouching opponents and can only be blocked standing. This move drains the Guard Power meter.}} | {{MoveListRow | | {{HCF}} {{LS}}+{{LK}} | Boy points his sword ahead and launches a cone-shaped projectile across the battlefield from it, which knocks over opponents on impact. This is a low projectile that can hit crouching opponents and can only be blocked standing. This move drains the Guard Power meter.}} | ||
{{MoveListRow | | {{HCF}} {{HS}}+{{HK}} | Boy points his sword ahead, creating two orbs of energy that hover in the air, then shoots them across the battlefield as a cone-shaped projectile. This move has a longer startup than the other projectiles but cannot be blocked (but can be jumped over). This move drains the Guard Power meter.}} | {{MoveListRow | | {{HCF}} {{HS}}+{{HK}} | Boy points his sword ahead, creating two orbs of energy that hover in the air, then shoots them across the battlefield as a cone-shaped projectile. This move has a longer startup than the other projectiles but cannot be blocked (but can be jumped over). This move drains the Guard Power meter.}} | ||
| − | {{MoveListRow | | {{down}} {{right}}+{{LS}}+{{LK}} | Boy points his sword ahead | + | {{MoveListRow | | {{down}} {{right}}+{{LS}}+{{LK}} | Boy points his sword ahead and it grows in size, knocking back opponents that come in contact with it. This move drains the Guard Power meter.}} |
{{MoveListRow | | {{down}} {{down}}+{{LK}} | Boy hops into the air while kicking in a circle.}} | {{MoveListRow | | {{down}} {{down}}+{{LK}} | Boy hops into the air while kicking in a circle.}} | ||
{{MoveListRow | | {{down}} {{down}}+{{HK}} | Boy kicks back and forth, then leaps into the air with a spiraling kick. This move can only be performed when the character's health is in the red.}} | {{MoveListRow | | {{down}} {{down}}+{{HK}} | Boy kicks back and forth, then leaps into the air with a spiraling kick. This move can only be performed when the character's health is in the red.}} | ||
| Line 77: | Line 89: | ||
{{MoveListTable | desc=Command throws | | {{MoveListTable | desc=Command throws | | ||
{{MoveListRow | | {{left}}+{{HS}}+{{HK}} (close) | Boy pulls his opponent down to the ground and bashes them with the hilt of his sword.}} | {{MoveListRow | | {{left}}+{{HS}}+{{HK}} (close) | Boy pulls his opponent down to the ground and bashes them with the hilt of his sword.}} | ||
| − | {{MoveListRow | | {{downright}}+{{LK}}+{{HK}}+{{guard}} (close) ( | + | {{MoveListRow | | {{downright}}+{{LK}}+{{HK}}+{{guard}} (close) (without weapon)}} |
}} | }} | ||
{{MoveListTable | desc=Combos | | {{MoveListTable | desc=Combos | | ||
| Line 87: | Line 99: | ||
{{MoveListRow | コンビネーション6 | {{LS}} {{LS}} {{LS}} {{LK}} {{LK}}}} | {{MoveListRow | コンビネーション6 | {{LS}} {{LS}} {{LS}} {{LK}} {{LK}}}} | ||
{{MoveListRow | コンビネーション7 | {{LS}} {{LS}} {{HS}} {{LS}} {{LS}}}} | {{MoveListRow | コンビネーション7 | {{LS}} {{LS}} {{HS}} {{LS}} {{LS}}}} | ||
| − | {{MoveListRow | コンビネーション8 | {{LS}} {{HS}} ( | + | {{MoveListRow | コンビネーション8 | {{LS}} {{HS}} (without weapon)}} |
| − | {{MoveListRow | コンビネーション9 | {{LS}} {{LS}} {{HS}} {{HS}} ( | + | {{MoveListRow | コンビネーション9 | {{LS}} {{LS}} {{HS}} {{HS}} (without weapon)}} |
}} | }} | ||
}} | }} | ||
| Line 94: | Line 106: | ||
| title=Lucifer | | title=Lucifer | ||
| sprite={{sprite | D-Xhird Saturn, Characters.png | crop_width=128 | crop_height=120 | crop_x=128 | crop_y=0}} | | sprite={{sprite | D-Xhird Saturn, Characters.png | crop_width=128 | crop_height=120 | crop_x=128 | crop_y=0}} | ||
| − | | info1name=Weapon | + | | info1name=Height |
| − | | | + | | info1=190 cm |
| − | | desc= | + | | info2name=Weight |
| + | | info2=60 kg | ||
| + | | info3name=Age | ||
| + | | info3=25? | ||
| + | | info4name=Weapon | ||
| + | | info4=Scythe | ||
| + | | info5name=Origin | ||
| + | | info5=Unknown | ||
| + | | desc=An executioner. | ||
{{MoveListTable | desc=Special moves | | {{MoveListTable | desc=Special moves | | ||
{{MoveListRow | | {{up}}+{{slash}} | Lucifer flips upside-down and hovers in the air while spinning his scythe. He spins in place with {{LS}} and moves forward with {{HS}}.}} | {{MoveListRow | | {{up}}+{{slash}} | Lucifer flips upside-down and hovers in the air while spinning his scythe. He spins in place with {{LS}} and moves forward with {{HS}}.}} | ||
| Line 125: | Line 145: | ||
{{MoveListRow | コンビネーション6 | {{LK}} {{LS}} {{HS}} {{HS}}}} | {{MoveListRow | コンビネーション6 | {{LK}} {{LS}} {{HS}} {{HS}}}} | ||
{{MoveListRow | コンビネーション7 | {{LS}} {{LS}} {{down}}+{{HS}}}} | {{MoveListRow | コンビネーション7 | {{LS}} {{LS}} {{down}}+{{HS}}}} | ||
| − | {{MoveListRow | コンビネーション8 | {{LS}} {{HS}} ( | + | {{MoveListRow | コンビネーション8 | {{LS}} {{HS}} (without weapon)}} |
}} | }} | ||
}} | }} | ||
| Line 131: | Line 151: | ||
| title=Sanjuroh | | title=Sanjuroh | ||
| sprite={{sprite | D-Xhird Saturn, Characters.png | crop_width=128 | crop_height=120 | crop_x=256 | crop_y=0}} | | sprite={{sprite | D-Xhird Saturn, Characters.png | crop_width=128 | crop_height=120 | crop_x=256 | crop_y=0}} | ||
| − | | info1name=Weapon | + | | info1name=Height |
| − | | | + | | info1=174 cm |
| − | | desc= | + | | info2name=Weight |
| + | | info2=67 kg | ||
| + | | info3name=Age | ||
| + | | info3=38 | ||
| + | | info4name=Weapon | ||
| + | | info4=Kotetsu | ||
| + | | info5name=Origin | ||
| + | | info5={{flag|JP}} | ||
| + | | desc=A Japanese fencer. | ||
{{MoveListTable | desc=Special moves | | {{MoveListTable | desc=Special moves | | ||
{{MoveListRow | | {{down}} {{right}}+{{LS}}+{{LK}} | Sanjuroh slashes his sword, causing a wave to roll across the ground, knocking over opponents on impact. This move can only be blocked crouching. This move drains the Guard Power meter.}} | {{MoveListRow | | {{down}} {{right}}+{{LS}}+{{LK}} | Sanjuroh slashes his sword, causing a wave to roll across the ground, knocking over opponents on impact. This move can only be blocked crouching. This move drains the Guard Power meter.}} | ||
| Line 152: | Line 180: | ||
{{MoveListRow | | {{left}}+{{LS}}+{{LK}} (close) | Sanjuroh grabs his opponent's arm and throws them.}} | {{MoveListRow | | {{left}}+{{LS}}+{{LK}} (close) | Sanjuroh grabs his opponent's arm and throws them.}} | ||
{{MoveListRow | | {{left}}+{{HS}}+{{HK}} (close) | Sanjuroh stabs his sword into his opponent, then throws them with it.}} | {{MoveListRow | | {{left}}+{{HS}}+{{HK}} (close) | Sanjuroh stabs his sword into his opponent, then throws them with it.}} | ||
| − | {{MoveListRow | | {{right}} {{left}}+{{LK}}+{{HK}}+{{guard}} (close) ( | + | {{MoveListRow | | {{right}} {{left}}+{{LK}}+{{HK}}+{{guard}} (close) (without weapon)}} |
}} | }} | ||
{{MoveListTable | desc=Combos | | {{MoveListTable | desc=Combos | | ||
| Line 168: | Line 196: | ||
| title=Sabrina | | title=Sabrina | ||
| sprite={{sprite | D-Xhird Saturn, Characters.png | crop_width=128 | crop_height=120 | crop_x=384 | crop_y=0}} | | sprite={{sprite | D-Xhird Saturn, Characters.png | crop_width=128 | crop_height=120 | crop_x=384 | crop_y=0}} | ||
| − | | info1name=Weapon | + | | info1name=Height |
| − | | | + | | info1=170 cm |
| − | | desc= | + | | info2name=Weight |
| + | | info2=45 kg | ||
| + | | info3name=Age | ||
| + | | info3=26 | ||
| + | | info4name=Weapon | ||
| + | | info4=Stun Stick | ||
| + | | info5name=Origin | ||
| + | | info5={{flag|US}} | ||
| + | | desc=An American secret agent. | ||
{{MoveListTable | desc=Special moves | | {{MoveListTable | desc=Special moves | | ||
{{MoveListRow | | {{down}} {{right}}+{{slash}} | Sabrina swipes her baton downward, which throws a giant shuriken across the battlefield. This is a high projectile that can be ducked under. This move drains the Guard Power meter.}} | {{MoveListRow | | {{down}} {{right}}+{{slash}} | Sabrina swipes her baton downward, which throws a giant shuriken across the battlefield. This is a high projectile that can be ducked under. This move drains the Guard Power meter.}} | ||
| Line 184: | Line 220: | ||
{{MoveListRow | | {{right}}+{{LS}}+{{LK}} (close) | Sabrina spins around her opponent, then drops them with a suplex. This move can only be performed when the character's Guard Power meter is in the red.}} | {{MoveListRow | | {{right}}+{{LS}}+{{LK}} (close) | Sabrina spins around her opponent, then drops them with a suplex. This move can only be performed when the character's Guard Power meter is in the red.}} | ||
{{MoveListRow | | {{DPF}} {{LS}}+{{LK}} (close) | Sabrina grabs her opponent and does two rolling suplexes. This move can only be performed when the character's health and Guard Power meter are both in the red.}} | {{MoveListRow | | {{DPF}} {{LS}}+{{LK}} (close) | Sabrina grabs her opponent and does two rolling suplexes. This move can only be performed when the character's health and Guard Power meter are both in the red.}} | ||
| − | {{MoveListRow | | {{right}}+{{LS}}+{{LK}} (close) ( | + | {{MoveListRow | | {{right}}+{{LS}}+{{LK}} (close) (without weapon)}} |
| − | {{MoveListRow | | {{left}}+{{LS}}+{{LK}} (close) ( | + | {{MoveListRow | | {{left}}+{{LS}}+{{LK}} (close) (without weapon)}} |
| − | {{MoveListRow | | {{HCB}} {{LS}} ( | + | {{MoveListRow | | {{HCB}} {{LS}} (without weapon)}} |
| − | {{MoveListRow | | {{HCB}} {{LK}} ( | + | {{MoveListRow | | {{HCB}} {{LK}} (without weapon)}} |
}} | }} | ||
{{MoveListTable | desc=Combos | | {{MoveListTable | desc=Combos | | ||
| Line 197: | Line 233: | ||
{{MoveListRow | コンビネーション6 | {{right}}+{{HS}} {{LS}} {{LS}} {{LS}}}} | {{MoveListRow | コンビネーション6 | {{right}}+{{HS}} {{LS}} {{LS}} {{LS}}}} | ||
{{MoveListRow | コンビネーション7 | {{right}}+{{LS}} {{HK}} {{HK}} {{HK}}}} | {{MoveListRow | コンビネーション7 | {{right}}+{{LS}} {{HK}} {{HK}} {{HK}}}} | ||
| − | {{MoveListRow | コンビネーション8 | {{LS}} {{HS}} ( | + | {{MoveListRow | コンビネーション8 | {{LS}} {{HS}} (without weapon)}} |
| − | {{MoveListRow | コンビネーション9 | {{LK}} {{LS}} {{LS}} ( | + | {{MoveListRow | コンビネーション9 | {{LK}} {{LS}} {{LS}} (without weapon)}} |
}} | }} | ||
}} | }} | ||
| Line 204: | Line 240: | ||
| title=Seiya | | title=Seiya | ||
| sprite={{sprite | D-Xhird Saturn, Characters.png | crop_width=128 | crop_height=120 | crop_x=512 | crop_y=0}} | | sprite={{sprite | D-Xhird Saturn, Characters.png | crop_width=128 | crop_height=120 | crop_x=512 | crop_y=0}} | ||
| − | | info1name=Weapon | + | | info1name=Height |
| − | | | + | | info1=175 cm |
| − | | desc= | + | | info2name=Weight |
| + | | info2=66 kg | ||
| + | | info3name=Age | ||
| + | | info3=18 | ||
| + | | info4name=Weapon | ||
| + | | info4=Flamberge | ||
| + | | info5name=Origin | ||
| + | | info5={{flag|US}} | ||
| + | | desc=An American hunter. | ||
{{MoveListTable | desc=Special moves | | {{MoveListTable | desc=Special moves | | ||
{{MoveListRow | | {{down}} {{right}}+{{LS}}+{{LK}} | Seiya swings his sword and a column of fireballs erupts from the ground in front of him, which knocks his opponent over on impact. This move drains the Guard Power meter.}} | {{MoveListRow | | {{down}} {{right}}+{{LS}}+{{LK}} | Seiya swings his sword and a column of fireballs erupts from the ground in front of him, which knocks his opponent over on impact. This move drains the Guard Power meter.}} | ||
| Line 223: | Line 267: | ||
{{MoveListRow | | {{left}}+{{HS}}+{{HK}} (close) | Seiya pulls his opponent down to the ground and bashes them with the hilt of his sword.}} | {{MoveListRow | | {{left}}+{{HS}}+{{HK}} (close) | Seiya pulls his opponent down to the ground and bashes them with the hilt of his sword.}} | ||
{{MoveListRow | | {{left}}+{{LS}}+{{HS}} (close) | Seiya kicks his opponent into the air, then stomps them after they land, followed by a kick to the head.}} | {{MoveListRow | | {{left}}+{{LS}}+{{HS}} (close) | Seiya kicks his opponent into the air, then stomps them after they land, followed by a kick to the head.}} | ||
| − | {{MoveListRow | | {{downright}}+{{LS}}+{{HS}}+{{guard}} (close) ( | + | {{MoveListRow | | {{downright}}+{{LS}}+{{HS}}+{{guard}} (close) (without weapon)}} |
}} | }} | ||
{{MoveListTable | desc=Combos | | {{MoveListTable | desc=Combos | | ||
| Line 229: | Line 273: | ||
{{MoveListRow | コンビネーション2 | {{HK}} {{right}} {{HK}}}} | {{MoveListRow | コンビネーション2 | {{HK}} {{right}} {{HK}}}} | ||
{{MoveListRow | コンビネーション3 | {{LK}} {{LK}} {{HK}} {{LK}} {{HK}} {{HK}}}} | {{MoveListRow | コンビネーション3 | {{LK}} {{LK}} {{HK}} {{LK}} {{HK}} {{HK}}}} | ||
| − | {{MoveListRow | コンビネーション4 | {{LS}} {{HS}} ( | + | {{MoveListRow | コンビネーション4 | {{LS}} {{HS}} (without weapon)}} |
| − | {{MoveListRow | コンビネーション5 | {{LS}} {{LS}} {{HS}} {{HS}} ( | + | {{MoveListRow | コンビネーション5 | {{LS}} {{LS}} {{HS}} {{HS}} (without weapon)}} |
}} | }} | ||
}} | }} | ||
| Line 236: | Line 280: | ||
| title=Merow | | title=Merow | ||
| sprite={{sprite | D-Xhird Saturn, Characters.png | crop_width=128 | crop_height=120 | crop_x=0 | crop_y=120}} | | sprite={{sprite | D-Xhird Saturn, Characters.png | crop_width=128 | crop_height=120 | crop_x=0 | crop_y=120}} | ||
| − | | info1name=Weapon | + | | info1name=Height |
| − | | | + | | info1=180 cm |
| − | | desc= | + | | info2name=Weight |
| + | | info2=65 kg | ||
| + | | info3name=Age | ||
| + | | info3=31 | ||
| + | | info4name=Weapon | ||
| + | | info4=Saber | ||
| + | | info5name=Origin | ||
| + | | info5={{flag|FR}} | ||
| + | | desc=A French swordsman. | ||
{{MoveListTable | desc=Special moves | | {{MoveListTable | desc=Special moves | | ||
{{MoveListRow | | {{down}} {{right}}+{{LS}}+{{HS}} | Merow slashes his sword, sending a slow-moving tornado across the battlefield, which knocks his opponent back on impact. This move drains the Guard Power meter.}} | {{MoveListRow | | {{down}} {{right}}+{{LS}}+{{HS}} | Merow slashes his sword, sending a slow-moving tornado across the battlefield, which knocks his opponent back on impact. This move drains the Guard Power meter.}} | ||
| Line 256: | Line 308: | ||
{{MoveListRow | | {{right}}+{{LS}}+{{LK}} (close) | Merow holds his opponent up and stabs them with his sword multiple times. He can follow this up by stabbing the opponent additional times after they fall to the ground by pressing {{down}}+{{LS}} {{HS}} {{LS}} {{HS}} during the move.}} | {{MoveListRow | | {{right}}+{{LS}}+{{LK}} (close) | Merow holds his opponent up and stabs them with his sword multiple times. He can follow this up by stabbing the opponent additional times after they fall to the ground by pressing {{down}}+{{LS}} {{HS}} {{LS}} {{HS}} during the move.}} | ||
{{MoveListRow | | {{left}}+{{LS}}+{{LK}} (close) | Merow grabs his opponent by the head and pushes them to the ground.}} | {{MoveListRow | | {{left}}+{{LS}}+{{LK}} (close) | Merow grabs his opponent by the head and pushes them to the ground.}} | ||
| − | {{MoveListRow | | {{right}}+{{HS}}+{{HK}} (close) ( | + | {{MoveListRow | | {{right}}+{{HS}}+{{HK}} (close) (without weapon)}} |
| − | {{MoveListRow | | {{downright}}+{{LS}}+{{HS}}+{{guard}} (close) ( | + | {{MoveListRow | | {{downright}}+{{LS}}+{{HS}}+{{guard}} (close) (without weapon)}} |
| − | {{MoveListRow | | {{QCF}} {{HS}} ( | + | {{MoveListRow | | {{QCF}} {{HS}} (without weapon)}} |
| − | {{MoveListRow | | {{HCB}} {{HS}} ( | + | {{MoveListRow | | {{HCB}} {{HS}} (without weapon)}} |
}} | }} | ||
{{MoveListTable | desc=Combos | | {{MoveListTable | desc=Combos | | ||
| Line 267: | Line 319: | ||
{{MoveListRow | コンビネーション4 | {{LS}} {{LS}} {{LS}} {{HS}} {{HS}}}} | {{MoveListRow | コンビネーション4 | {{LS}} {{LS}} {{LS}} {{HS}} {{HS}}}} | ||
{{MoveListRow | コンビネーション5 | {{down}}+{{LK}} {{down}}+{{HK}}}} | {{MoveListRow | コンビネーション5 | {{down}}+{{LK}} {{down}}+{{HK}}}} | ||
| − | {{MoveListRow | コンビネーション6 | {{LK}} {{HK}} ( | + | {{MoveListRow | コンビネーション6 | {{LK}} {{HK}} (without weapon)}} |
| − | {{MoveListRow | コンビネーション7 | {{HS}} {{LS}} {{HS}} {{HS}} ( | + | {{MoveListRow | コンビネーション7 | {{HS}} {{LS}} {{HS}} {{HS}} (without weapon)}} |
}} | }} | ||
}} | }} | ||
| Line 274: | Line 326: | ||
| title=Saotome | | title=Saotome | ||
| sprite={{sprite | D-Xhird Saturn, Characters.png | crop_width=128 | crop_height=120 | crop_x=128 | crop_y=120}} | | sprite={{sprite | D-Xhird Saturn, Characters.png | crop_width=128 | crop_height=120 | crop_x=128 | crop_y=120}} | ||
| − | | info1name=Weapon | + | | info1name=Height |
| − | | | + | | info1=176 cm |
| − | | desc= | + | | info2name=Weight |
| + | | info2=70 kg | ||
| + | | info3name=Age | ||
| + | | info3=28 | ||
| + | | info4name=Weapon | ||
| + | | info4=Twin Kodachi | ||
| + | | info5name=Origin | ||
| + | | info5={{flag|JP}} | ||
| + | | desc=A Japanese assassin. | ||
{{MoveListTable | desc=Special moves | | {{MoveListTable | desc=Special moves | | ||
{{MoveListRow | | {{upright}}+{{LS}}+{{HS}} | Saotome steps forward with a sword chop from each hand, which knocks his opponent over.}} | {{MoveListRow | | {{upright}}+{{LS}}+{{HS}} | Saotome steps forward with a sword chop from each hand, which knocks his opponent over.}} | ||
| Line 295: | Line 355: | ||
{{MoveListRow | | {{left}}+{{LS}}+{{LK}} (close) | Saotome grabs his opponent's arm and drops them to the ground, then dislocates their shoulder.}} | {{MoveListRow | | {{left}}+{{LS}}+{{LK}} (close) | Saotome grabs his opponent's arm and drops them to the ground, then dislocates their shoulder.}} | ||
{{MoveListRow | | {{left}}+{{LS}}+{{HS}} (close) | Saotome kicks his opponent into the air, then stomps them after they land, followed by a kick to the head.}} | {{MoveListRow | | {{left}}+{{LS}}+{{HS}} (close) | Saotome kicks his opponent into the air, then stomps them after they land, followed by a kick to the head.}} | ||
| − | {{MoveListRow | | {{right}} {{left}}+{{LK}}+{{HK}}+{{guard}} (close) ( | + | {{MoveListRow | | {{right}} {{left}}+{{LK}}+{{HK}}+{{guard}} (close) (without weapon)}} |
}} | }} | ||
{{MoveListTable | desc=Combos | | {{MoveListTable | desc=Combos | | ||
| Line 303: | Line 363: | ||
{{MoveListRow | コンビネーション4 | {{HK}} {{HS}}}} | {{MoveListRow | コンビネーション4 | {{HK}} {{HS}}}} | ||
{{MoveListRow | コンビネーション5 | {{LK}} {{HS}} {{HS}}}} | {{MoveListRow | コンビネーション5 | {{LK}} {{HS}} {{HS}}}} | ||
| − | {{MoveListRow | コンビネーション6 | {{LS}} {{HS}} ( | + | {{MoveListRow | コンビネーション6 | {{LS}} {{HS}} (without weapon)}} |
}} | }} | ||
}} | }} | ||
| Line 309: | Line 369: | ||
| title=Schneider | | title=Schneider | ||
| sprite={{sprite | D-Xhird Saturn, Characters.png | crop_width=128 | crop_height=120 | crop_x=256 | crop_y=120}} | | sprite={{sprite | D-Xhird Saturn, Characters.png | crop_width=128 | crop_height=120 | crop_x=256 | crop_y=120}} | ||
| − | | info1name=Weapon | + | | info1name=Height |
| − | | | + | | info1=180 cm |
| − | | desc= | + | | info2name=Weight |
| + | | info2=65 kg | ||
| + | | info3name=Age | ||
| + | | info3=32 | ||
| + | | info4name=Weapon | ||
| + | | info4=Cannon Staff | ||
| + | | info5name=Origin | ||
| + | | info5={{flag|DE}} | ||
| + | | desc=A German investigator. | ||
{{MoveListTable | desc=Special moves | | {{MoveListTable | desc=Special moves | | ||
{{MoveListRow | | {{down}} {{right}}+{{HS}} | Schneider lunges forward and thrusts his staff forward. This move can only be blocked standing.}} | {{MoveListRow | | {{down}} {{right}}+{{HS}} | Schneider lunges forward and thrusts his staff forward. This move can only be blocked standing.}} | ||
| Line 328: | Line 396: | ||
{{MoveListTable | desc=Command throws | | {{MoveListTable | desc=Command throws | | ||
{{MoveListRow | | {{right}}+{{LS}}+{{LK}} (close) | Schneider grabs his opponent by the arm and throws them.}} | {{MoveListRow | | {{right}}+{{LS}}+{{LK}} (close) | Schneider grabs his opponent by the arm and throws them.}} | ||
| − | {{MoveListRow | | {{right}} {{left}}+{{LK}}+{{HK}}+{{guard}} (close) ( | + | {{MoveListRow | | {{right}} {{left}}+{{LK}}+{{HK}}+{{guard}} (close) (without weapon)}} |
}} | }} | ||
{{MoveListTable | desc=Combos | | {{MoveListTable | desc=Combos | | ||
| Line 336: | Line 404: | ||
{{MoveListRow | コンビネーション4 | {{LK}} {{LK}} {{LK}} {{HK}} {{LK}} {{LK}} {{LK}} {{LK}}}} | {{MoveListRow | コンビネーション4 | {{LK}} {{LK}} {{LK}} {{HK}} {{LK}} {{LK}} {{LK}} {{LK}}}} | ||
{{MoveListRow | コンビネーション5 | {{LS}} {{HS}} {{down}}+{{HK}}}} | {{MoveListRow | コンビネーション5 | {{LS}} {{HS}} {{down}}+{{HK}}}} | ||
| − | {{MoveListRow | コンビネーション6 | {{LS}} {{HS}} ( | + | {{MoveListRow | コンビネーション6 | {{LS}} {{HS}} (without weapon)}} |
| − | {{MoveListRow | コンビネーション7 | {{LS}} {{LS}} ( | + | {{MoveListRow | コンビネーション7 | {{LS}} {{LS}} (without weapon)}} |
}} | }} | ||
}} | }} | ||
| Line 343: | Line 411: | ||
| title=Kohjin | | title=Kohjin | ||
| sprite={{sprite | D-Xhird Saturn, Characters.png | crop_width=128 | crop_height=120 | crop_x=384 | crop_y=120}} | | sprite={{sprite | D-Xhird Saturn, Characters.png | crop_width=128 | crop_height=120 | crop_x=384 | crop_y=120}} | ||
| − | | info1name=Weapon | + | | info1name=Height |
| − | | | + | | info1=158 cm |
| − | | desc= | + | | info2name=Weight |
| + | | info2=51 kg | ||
| + | | info3name=Age | ||
| + | | info3=60 | ||
| + | | info4name=Weapon | ||
| + | | info4=Tessen | ||
| + | | info5name=Origin | ||
| + | | info5={{flag|CN}} | ||
| + | | desc=A Chinese healer. | ||
{{MoveListTable | desc=Special moves | | {{MoveListTable | desc=Special moves | | ||
{{MoveListRow | | {{down}} {{right}}+{{LS}} | Kohjin steps forward with a headbutt that knocks his opponent over. This move cannot hit crouching opponents.}} | {{MoveListRow | | {{down}} {{right}}+{{LS}} | Kohjin steps forward with a headbutt that knocks his opponent over. This move cannot hit crouching opponents.}} | ||
| Line 364: | Line 440: | ||
{{MoveListRow | | {{right}}+{{HS}}+{{HK}} (close) | Kohjin stabs his opponent with his fan.}} | {{MoveListRow | | {{right}}+{{HS}}+{{HK}} (close) | Kohjin stabs his opponent with his fan.}} | ||
{{MoveListRow | | {{right}}+{{LS}}+{{LK}} (close) | Kohjin puts his opponent in a headlock and falls back.}} | {{MoveListRow | | {{right}}+{{LS}}+{{LK}} (close) | Kohjin puts his opponent in a headlock and falls back.}} | ||
| − | {{MoveListRow | | {{left}}+{{HS}}+{{HK}} (close) ( | + | {{MoveListRow | | {{left}}+{{HS}}+{{HK}} (close) (without weapon)}} |
| − | {{MoveListRow | | {{left}}+{{LS}}+{{LK}} (close) ( | + | {{MoveListRow | | {{left}}+{{LS}}+{{LK}} (close) (without weapon)}} |
| − | {{MoveListRow | | {{right}} {{left}}+{{LK}}+{{HK}}+{{guard}} (close) ( | + | {{MoveListRow | | {{right}} {{left}}+{{LK}}+{{HK}}+{{guard}} (close) (without weapon)}} |
}} | }} | ||
{{MoveListTable | desc=Combos | | {{MoveListTable | desc=Combos | | ||
| Line 376: | Line 452: | ||
{{MoveListRow | コンビネーション6 | {{LS}} {{LS}} {{LK}} {{LK}} {{HS}}}} | {{MoveListRow | コンビネーション6 | {{LS}} {{LS}} {{LK}} {{LK}} {{HS}}}} | ||
{{MoveListRow | コンビネーション7 | {{HS}} {{HS}} {{HK}} {{HK}} {{LS}}}} | {{MoveListRow | コンビネーション7 | {{HS}} {{HS}} {{HK}} {{HK}} {{LS}}}} | ||
| − | {{MoveListRow | コンビネーション8 | {{LS}} {{LS}} {{HS}} ( | + | {{MoveListRow | コンビネーション8 | {{LS}} {{LS}} {{HS}} (without weapon)}} |
}} | }} | ||
}} | }} | ||
| Line 382: | Line 458: | ||
| title=Karen | | title=Karen | ||
| sprite={{sprite | D-Xhird Saturn, Characters.png | crop_width=128 | crop_height=120 | crop_x=512 | crop_y=120}} | | sprite={{sprite | D-Xhird Saturn, Characters.png | crop_width=128 | crop_height=120 | crop_x=512 | crop_y=120}} | ||
| − | | info1name=Weapon | + | | info1name=Height |
| − | | | + | | info1=156 cm |
| − | | desc= | + | | info2name=Weight |
| + | | info2=42 kg | ||
| + | | info3name=Age | ||
| + | | info3=18 | ||
| + | | info4name=Weapon | ||
| + | | info4=Twin Chakram | ||
| + | | info5name=Origin | ||
| + | | info5={{flag|JP}} | ||
| + | | desc=A Japanese student. | ||
{{MoveListTable | desc=Special moves | | {{MoveListTable | desc=Special moves | | ||
{{MoveListRow | | {{down}} {{right}}+{{LS}} | Karen walks forward while swinging her chakrams, knocking the opponent over on the last hit. This move cannot hit crouching opponents.}} | {{MoveListRow | | {{down}} {{right}}+{{LS}} | Karen walks forward while swinging her chakrams, knocking the opponent over on the last hit. This move cannot hit crouching opponents.}} | ||
| Line 406: | Line 490: | ||
{{MoveListRow | | {{left}}+{{HS}}+{{HK}} (close) | Karen jumps onto her opponent's back and hammers them with her chakrams.}} | {{MoveListRow | | {{left}}+{{HS}}+{{HK}} (close) | Karen jumps onto her opponent's back and hammers them with her chakrams.}} | ||
{{MoveListRow | | {{left}}+{{LS}}+{{LK}} (close) | Karen jumps on top of her opponent and hammers them with her chakrams. She can follow this up by hammer the opponent additional times after they fall to the ground by pressing {{LS}}+{{LK}} during the move.}} | {{MoveListRow | | {{left}}+{{LS}}+{{LK}} (close) | Karen jumps on top of her opponent and hammers them with her chakrams. She can follow this up by hammer the opponent additional times after they fall to the ground by pressing {{LS}}+{{LK}} during the move.}} | ||
| − | {{MoveListRow | | {{QCF}} {{QCF}} {{left}}+{{HS}}+{{HK}} (close) ( | + | {{MoveListRow | | {{QCF}} {{QCF}} {{left}}+{{HS}}+{{HK}} (close) (without weapon)}} |
| − | {{MoveListRow | | {{right}} {{left}}+{{LK}}+{{HK}}+{{guard}} (close) ( | + | {{MoveListRow | | {{right}} {{left}}+{{LK}}+{{HK}}+{{guard}} (close) (without weapon)}} |
}} | }} | ||
{{MoveListTable | desc=Combos | | {{MoveListTable | desc=Combos | | ||
| Line 425: | Line 509: | ||
| title=Venus | | title=Venus | ||
| sprite={{sprite | D-Xhird Saturn, Characters.png | crop_width=128 | crop_height=120 | crop_x=0 | crop_y=240}} | | sprite={{sprite | D-Xhird Saturn, Characters.png | crop_width=128 | crop_height=120 | crop_x=0 | crop_y=240}} | ||
| − | | info1name=Weapon | + | | info1name=Height |
| − | | | + | | info1=168 cm |
| − | | desc= | + | | info2name=Weight |
| + | | info2=43 kg | ||
| + | | info3name=Age | ||
| + | | info3=26? | ||
| + | | info4name=Weapon | ||
| + | | info4=Trident | ||
| + | | info5name=Origin | ||
| + | | info5=Unknown | ||
| + | | desc=The subboss of the game. | ||
{{MoveListTable | desc=Special moves | | {{MoveListTable | desc=Special moves | | ||
{{MoveListRow | | {{down}} {{right}}+{{LS}}+{{LK}} | Venus hovers in the air, then shoots an energy orb diagonally downwards from her trident. The orb explodes into a large blast when it hits the ground. This move drains the Guard Power meter.}} | {{MoveListRow | | {{down}} {{right}}+{{LS}}+{{LK}} | Venus hovers in the air, then shoots an energy orb diagonally downwards from her trident. The orb explodes into a large blast when it hits the ground. This move drains the Guard Power meter.}} | ||
| Line 445: | Line 537: | ||
{{MoveListRow | | {{right}}+{{HS}}+{{HK}} (close) | Venus trips her opponent with her trident.}} | {{MoveListRow | | {{right}}+{{HS}}+{{HK}} (close) | Venus trips her opponent with her trident.}} | ||
{{MoveListRow | | {{left}}+{{HS}}+{{HK}} (close) | Venus stabs her opponent repeatedly with her trident.}} | {{MoveListRow | | {{left}}+{{HS}}+{{HK}} (close) | Venus stabs her opponent repeatedly with her trident.}} | ||
| − | {{MoveListRow | | {{up}}+{{HS}} (close) ( | + | {{MoveListRow | | {{up}}+{{HS}} (close) (without weapon)}} |
| − | {{MoveListRow | | {{downright}}+{{LS}}+{{HS}}+{{guard}} (close) ( | + | {{MoveListRow | | {{downright}}+{{LS}}+{{HS}}+{{guard}} (close) (without weapon)}} |
}} | }} | ||
{{MoveListTable | desc=Combos | | {{MoveListTable | desc=Combos | | ||
| Line 461: | Line 553: | ||
| title=Izanagi | | title=Izanagi | ||
| sprite={{sprite | D-Xhird Saturn, Characters.png | crop_width=128 | crop_height=120 | crop_x=128 | crop_y=240}} | | sprite={{sprite | D-Xhird Saturn, Characters.png | crop_width=128 | crop_height=120 | crop_x=128 | crop_y=240}} | ||
| − | | info1name=Weapon | + | | info1name=Height |
| − | | | + | | info1=205 cm |
| − | | desc= | + | | info2name=Weight |
| + | | info2=85 kg | ||
| + | | info3name=Age | ||
| + | | info3=Unknown | ||
| + | | info4name=Weapon | ||
| + | | info4=Razor Gauntlets | ||
| + | | info5name=Origin | ||
| + | | info5=Unknown | ||
| + | | desc=The final boss of the game. | ||
{{MoveListTable | desc=Special moves | | {{MoveListTable | desc=Special moves | | ||
{{MoveListRow | | {{downright}}+{{LS}} | Izanagi swipes his clawed hand downward, knocking his opponent over on impact. This move can only be blocked standing.}} | {{MoveListRow | | {{downright}}+{{LS}} | Izanagi swipes his clawed hand downward, knocking his opponent over on impact. This move can only be blocked standing.}} | ||
| Line 493: | Line 593: | ||
| title=Shadow Boy | | title=Shadow Boy | ||
| sprite={{sprite | D-Xhird Saturn, Characters.png | crop_width=128 | crop_height=120 | crop_x=256 | crop_y=240}} | | sprite={{sprite | D-Xhird Saturn, Characters.png | crop_width=128 | crop_height=120 | crop_x=256 | crop_y=240}} | ||
| − | | info1name=Weapon | + | | info1name=Height |
| − | | | + | | info1=172 cm |
| − | | desc= | + | | info2name=Weight |
| + | | info2=62 kg | ||
| + | | info3name=Age | ||
| + | | info3=18 | ||
| + | | info4name=Weapon | ||
| + | | info4=Cannon Blade | ||
| + | | info5name=Origin | ||
| + | | info5=Unknown | ||
| + | | desc=A form of Boy that has been possessed by the evil force inside of him. He appears as a secret boss if the player defeats every other opponent up to this point without using a continue. | ||
{{MoveListTable | desc=Special moves | | {{MoveListTable | desc=Special moves | | ||
{{MoveListRow | | {{HCB}} {{LK}} | Shadow Boy leaps forward with a spiraling dropkick, which knocks his opponent over on impact. This move cannot hit crouching opponents.}} | {{MoveListRow | | {{HCB}} {{LK}} | Shadow Boy leaps forward with a spiraling dropkick, which knocks his opponent over on impact. This move cannot hit crouching opponents.}} | ||
| Line 512: | Line 620: | ||
| title=Eiji | | title=Eiji | ||
| sprite={{sprite | D-Xhird Saturn, Characters.png | crop_width=128 | crop_height=120 | crop_x=384 | crop_y=240}} | | sprite={{sprite | D-Xhird Saturn, Characters.png | crop_width=128 | crop_height=120 | crop_x=384 | crop_y=240}} | ||
| − | | info1name=Weapon | + | | info1name=Height |
| − | | | + | | info1=175 cm |
| − | | desc= | + | | info2name=Weight |
| + | | info2=63 kg | ||
| + | | info3name=Age | ||
| + | | info3=23 | ||
| + | | info4name=Weapon | ||
| + | | info4=Byakko no Tachi | ||
| + | | info5name=Origin | ||
| + | | info5={{flag|JP}} | ||
| + | | desc=The protagonist of the ''[[:Category:Battle Arena Toshinden|Battle Arena Toshinden]]'' series. He appears as a secret final boss if the player defeats Shadow Boy without using a continue. | ||
{{MoveListTable | desc=Special moves | | {{MoveListTable | desc=Special moves | | ||
{{MoveListRow | | {{down}} {{right}}+{{LS}}+{{HS}} | Eiji swings his sword twice, shooting two wave-shaped projectiles across the battlefield that knock the opponent down on impact.}} | {{MoveListRow | | {{down}} {{right}}+{{LS}}+{{HS}} | Eiji swings his sword twice, shooting two wave-shaped projectiles across the battlefield that knock the opponent down on impact.}} | ||
| Line 528: | Line 644: | ||
{{MoveListTable | desc=Command throws | | {{MoveListTable | desc=Command throws | | ||
{{MoveListRow | | {{left}}+{{HS}}+{{HK}} (close) | Eiji rolls backward while tossing his opponent.}} | {{MoveListRow | | {{left}}+{{HS}}+{{HK}} (close) | Eiji rolls backward while tossing his opponent.}} | ||
| − | {{MoveListRow | | {{downright}}+{{LK}}+{{HK}}+{{guard}} (close) ( | + | {{MoveListRow | | {{downright}}+{{LK}}+{{HK}}+{{guard}} (close) (without weapon)}} |
}} | }} | ||
{{MoveListTable | desc=Combos | | {{MoveListTable | desc=Combos | | ||
| Line 537: | Line 653: | ||
{{MoveListRow | コンビネーション5 | {{LS}} {{LS}} {{LS}}}} | {{MoveListRow | コンビネーション5 | {{LS}} {{LS}} {{LS}}}} | ||
{{MoveListRow | コンビネーション6 | {{HK}} {{LS}} {{HS}}}} | {{MoveListRow | コンビネーション6 | {{HK}} {{LS}} {{HS}}}} | ||
| − | {{MoveListRow | コンビネーション7 | {{LS}} {{HS}} ( | + | {{MoveListRow | コンビネーション7 | {{LS}} {{HS}} (without weapon)}} |
}} | }} | ||
}} | }} | ||
| Line 543: | Line 659: | ||
===Stages=== | ===Stages=== | ||
| − | Every character has his or her own stage where matches are hosted. | + | Every character has his or her own stage where matches are hosted. The stage can be chosen in the two-player modes. There are three additional stages that are not associated with any character but can be selected in the two-player modes. |
{{gallery|widths=200|screens=yes| | {{gallery|widths=200|screens=yes| | ||
{{ginfo|D-Xhird Saturn, Stages, Table-Land.png|Table-Land|Boy's stage.}} | {{ginfo|D-Xhird Saturn, Stages, Table-Land.png|Table-Land|Boy's stage.}} | ||
| Line 559: | Line 675: | ||
{{ginfo|D-Xhird Saturn, Stages, Rain.png|Rain|Shadow Boy's stage.}} | {{ginfo|D-Xhird Saturn, Stages, Rain.png|Rain|Shadow Boy's stage.}} | ||
{{ginfo|D-Xhird Saturn, Stages, Babel.png|Babel|Eiji's stage.}} | {{ginfo|D-Xhird Saturn, Stages, Babel.png|Babel|Eiji's stage.}} | ||
| + | {{ginfo|D-Xhird Saturn, Stages, Drainroad.png|Drainroad|Available in two-player modes.}} | ||
| + | {{ginfo|D-Xhird Saturn, Stages, Iceberg.png|Iceberg|Available in two-player modes.}} | ||
| + | {{ginfo|D-Xhird Saturn, Stages, Cellar.png|Cellar|Available in two-player modes.}} | ||
}} | }} | ||
Revision as of 19:50, 4 March 2024
| D-Xhird | ||||||||||
|---|---|---|---|---|---|---|---|---|---|---|
| System(s): Sega Saturn | ||||||||||
| Publisher: Takara | ||||||||||
| Developer: Takara, Nextech | ||||||||||
| Sound driver: SCSP/CD-DA (21 tracks) | ||||||||||
| Genre: Fighting Action/Kakutou Action (格闘アクション)[1], Action[2] | ||||||||||
| Number of players: 1-2 | ||||||||||
|

D-Xhird (ディ・サード) is a 3D fighting game for the Sega Saturn. During development it was known as DDD.
Contents
Story
The protagonist of the story, called "Boy," is seeking revenge for the murders of his mother and lover. Their assassins are working for a cult that is hunting Boy because, unbeknownst to him, he holds an ancient and powerful evil spirit inside him known only as "The Shadow."
Gameplay


The game is a 3D fighting game and a spiritual successor to the Battle Arena Toshinden games, which were ported to the Saturn by the same developer. It has similar mechanics but a new cast of characters. Matches are fought to the best of three rounds. A round is won by depleting the other fighter's health, having more health than the opponent if time runs out, or knocking the opponent out of the arena. Most stages are open arenas (where ring-outs are possible), as before, but the game also introduces stages that are fought in closed cages, similar to Fighting Vipers, where fighters can be damaged by being knocked against the walls.
Characters walk with ![]() and
and ![]() . They crouch with
. They crouch with ![]() and walk while crouched with
and walk while crouched with ![]() and
and ![]() . Normal movement is slow, but characters can backstep or dash with
. Normal movement is slow, but characters can backstep or dash with ![]()
![]() or
or ![]()
![]() . When dashing, the direction can be held to continue running. Characters jump upward with
. When dashing, the direction can be held to continue running. Characters jump upward with ![]() and jump behind and ahead with
and jump behind and ahead with ![]() or
or ![]() . They can jump off the sides of the caged arenas by pressing a kick button upon contact with the wall. They can sidestep to dodge attacks by stepping forwards (toward the screen) with
. They can jump off the sides of the caged arenas by pressing a kick button upon contact with the wall. They can sidestep to dodge attacks by stepping forwards (toward the screen) with ![]() or stepping backwards (away from the screen) with
or stepping backwards (away from the screen) with ![]() . Characters attack by slashing with their weapon with
. Characters attack by slashing with their weapon with ![]() for a weak slash or
for a weak slash or ![]() for a heavy slash, or they can kick with
for a heavy slash, or they can kick with ![]() for a weak kick or
for a weak kick or ![]() for a heavy kick. Weak attacks are faster, but heavy attacks do more damage. Each character has his or her own unique set of basic moves and special moves performed with special button combinations. Characters can attack while dashing or sidestepping.
for a heavy kick. Weak attacks are faster, but heavy attacks do more damage. Each character has his or her own unique set of basic moves and special moves performed with special button combinations. Characters can attack while dashing or sidestepping.
Some attacks knock a fighter down. Characters can attack a downed fighter by pressing ![]() +
+![]() for a short-distance pounce or
for a short-distance pounce or ![]() +
+![]() for a long-distance pounce or stomp a downed opponent by holding
for a long-distance pounce or stomp a downed opponent by holding ![]() (or
(or ![]() when facing left) and pressing a kick button. When knocked down, characters can roll backwards or forwards by holding
when facing left) and pressing a kick button. When knocked down, characters can roll backwards or forwards by holding ![]() or
or ![]() or roll into the background or foreground by holding
or roll into the background or foreground by holding ![]() or
or ![]() to avoid attacks.
to avoid attacks.
Characters can guard against attacks by holding the D-Pad in the opposite direction of the opponent or by holding ![]() or
or ![]() . Guarding can be done while standing or crouching but not while jumping. Each fighter has a Guard Power meter that is depleted every time the character guards against an attack. When the meter is empty, attacks can still be blocked but inflict partial damage. Some special moves cost part of the Guard Power meter, and some special moves can only be performed when the health bar, Guard Power meter, or both are low and red. Characters can grab and throw opponents by pressing the D-Pad away from the opponent while pressing a heavy punch or kick button, which cannot be blocked. Characters also have special command grabs and maneuvers that can be done after repelling off a wall (in caged arenas).
. Guarding can be done while standing or crouching but not while jumping. Each fighter has a Guard Power meter that is depleted every time the character guards against an attack. When the meter is empty, attacks can still be blocked but inflict partial damage. Some special moves cost part of the Guard Power meter, and some special moves can only be performed when the health bar, Guard Power meter, or both are low and red. Characters can grab and throw opponents by pressing the D-Pad away from the opponent while pressing a heavy punch or kick button, which cannot be blocked. Characters also have special command grabs and maneuvers that can be done after repelling off a wall (in caged arenas).
After dashing, the player can press the weak slash and kick buttons together or the heavy slash and kick buttons together to empower the character. While in this state, the character can chain moves together quickly for an aggressive combo. If the sequence is interrupted, the character is momentarily stunned and vulnerable. If the sequence is performed completely, the enemy is knocked back, and the character does a victory pose. The Guard Power meter drains on every hit of the combo. When the Guard Power meter is red, the character can also perform special moves by pressing the weak slash and kick buttons together while backstepping or sidestepping.
Modes
These modes are initially available:
- 1P Mode: A single-player mode where the player chooses any character and fights a series of matches against computer-controlled opponents. After defeating every playable character in the game, the player faces the bosses Venus and Izanagi. If the player makes it to this point and defeats the bosses without using a continue on at least the default difficulty setting, an additional fight against Shadow Boy is unlocked. If the player defeats Shadow Boy without using a continue, a final fight against Eiji (from Battle Arena Toshinden) is unlocked. The game can be continued an unlimited number of times if the player is defeated by an opponent. A second player can join at any time to challenge the first to a match by pressing START .
- Vs Mode: A two-player mode where both players can choose any character and any stage and fight against each other.
- Time Limit Mode: A single-player mode where the player chooses any character and tries to defeat all ten normally playable characters (no bosses) within a time limit of 20 minutes and 10 seconds. Individual rounds have no time limit. If successful, the player unlocks the Team Edit Mode. The game cannot be continued if the player loses a match.
- Practice Mode: A training mode where the player can choose any character and any opponent. Both fighters have unlimited health and Guard Power, and there is no time limit. The second fighter is a dummy who does not fight back but can be moved with a second control pad. The player can open a move list for the current character by pressing START . Moves that normally require red health or Guard Power can always be performed in this mode.
These modes can be unlocked:
- Real Fight Mode: A two-player mode. Players choose any character and any stage. Instead of having health bars, characters can take unlimited damage but are defeated when they are knocked down by any attack. Unlocked by completing the 1P Mode with any character.
- Unlimited Mode: A single-player endurance mode. The player chooses any character and fights an unlimited number of matches with the goal of surviving as long as possible. The game ends after losing a match. Unlocked by completing the 1P Mode and watching the introduction FMVs and demo sequences.
- Team Edit Mode: A two-player mode. Each player chooses three characters and fights a single match on any stage. When one character is defeated, the player plays the next selected character in the next round. The match is decided when all of a player's characters have been eliminated. Unlocked by completing the Time Limit Mode.
- Mini Ring Mode: A variant of the 1P Mode that follows the same rules, but all stages are much smaller. Unlocked by completing the 1P Mode with all of the unlockable boss characters.
The game saves unlocked modes and high scores (including the best time in the Time Limit Mode and the most matches survived in the Unlimited Mode) to the Saturn's internal memory or a backup cartridge.
There are three difficulty levels for computer-controlled opponents (Easy, Normal, Hard). Players can also change the amount of time per round (30, 45, 60, or 90 seconds or unlimited, with a default of 60) and the number of wins needed to win a match (between 1 and 5, with a default of 2).
Characters
Note: Move lists assume that the character is facing right. When facing left, ![]() and
and ![]() should be reversed.
should be reversed.
| S | Any slash button |
| LS | Light slash |
| HS | Hard slash |
| K | Any kick button |
| LK | Light kick |
| HK | Hard kick |
| G | Guard |
Playable
| Boy | |||||||||||||||||||||||||||||||||||||||||||||||||||||||||||||||||||||||||||||||||||||||
|---|---|---|---|---|---|---|---|---|---|---|---|---|---|---|---|---|---|---|---|---|---|---|---|---|---|---|---|---|---|---|---|---|---|---|---|---|---|---|---|---|---|---|---|---|---|---|---|---|---|---|---|---|---|---|---|---|---|---|---|---|---|---|---|---|---|---|---|---|---|---|---|---|---|---|---|---|---|---|---|---|---|---|---|---|---|---|---|
|
Height: 172 cm Weight: 62 kg Age: 18 Weapon: Cannon Blade Origin: | |||||||||||||||||||||||||||||||||||||||||||||||||||||||||||||||||||||||||||||||||||||||
A British drifter who is avenging the assassinations of his mother and his lover.
| |||||||||||||||||||||||||||||||||||||||||||||||||||||||||||||||||||||||||||||||||||||||
| Lucifer | |||||||||||||||||||||||||||||||||||||||||||||||||||||||||||||||||||||||||||||||||||||||
|
Height: 190 cm Weight: 60 kg Age: 25? Weapon: Scythe Origin: Unknown | |||||||||||||||||||||||||||||||||||||||||||||||||||||||||||||||||||||||||||||||||||||||
An executioner.
| |||||||||||||||||||||||||||||||||||||||||||||||||||||||||||||||||||||||||||||||||||||||
| Sanjuroh | |||||||||||||||||||||||||||||||||||||||||||||||||||||||||||||||||||||||||||||||||||||||
|
Height: 174 cm Weight: 67 kg Age: 38 Weapon: Kotetsu Origin: | |||||||||||||||||||||||||||||||||||||||||||||||||||||||||||||||||||||||||||||||||||||||
A Japanese fencer.
| |||||||||||||||||||||||||||||||||||||||||||||||||||||||||||||||||||||||||||||||||||||||
| Sabrina | |||||||||||||||||||||||||||||||||||||||||||||||||||||||||||||||||||||||||||||||||||||||
|
Height: 170 cm Weight: 45 kg Age: 26 Weapon: Stun Stick Origin: | |||||||||||||||||||||||||||||||||||||||||||||||||||||||||||||||||||||||||||||||||||||||
An American secret agent.
| |||||||||||||||||||||||||||||||||||||||||||||||||||||||||||||||||||||||||||||||||||||||
| Seiya | |||||||||||||||||||||||||||||||||||||||||||||||||||||||||||||||||||||||||||||||||||||||
|
Height: 175 cm Weight: 66 kg Age: 18 Weapon: Flamberge Origin: | |||||||||||||||||||||||||||||||||||||||||||||||||||||||||||||||||||||||||||||||||||||||
An American hunter.
| |||||||||||||||||||||||||||||||||||||||||||||||||||||||||||||||||||||||||||||||||||||||
| Merow | |||||||||||||||||||||||||||||||||||||||||||||||||||||||||||||||||||||||||||||||||||||||
|
Height: 180 cm Weight: 65 kg Age: 31 Weapon: Saber Origin: | |||||||||||||||||||||||||||||||||||||||||||||||||||||||||||||||||||||||||||||||||||||||
A French swordsman.
| |||||||||||||||||||||||||||||||||||||||||||||||||||||||||||||||||||||||||||||||||||||||
| Saotome | |||||||||||||||||||||||||||||||||||||||||||||||||||||||||||||||||||||||||||||||||||||||
|
Height: 176 cm Weight: 70 kg Age: 28 Weapon: Twin Kodachi Origin: | |||||||||||||||||||||||||||||||||||||||||||||||||||||||||||||||||||||||||||||||||||||||
A Japanese assassin.
| |||||||||||||||||||||||||||||||||||||||||||||||||||||||||||||||||||||||||||||||||||||||
| Schneider | |||||||||||||||||||||||||||||||||||||||||||||||||||||||||||||||||||||||||||||||||||||||
|
Height: 180 cm Weight: 65 kg Age: 32 Weapon: Cannon Staff Origin: | |||||||||||||||||||||||||||||||||||||||||||||||||||||||||||||||||||||||||||||||||||||||
A German investigator.
| |||||||||||||||||||||||||||||||||||||||||||||||||||||||||||||||||||||||||||||||||||||||
| Kohjin | |||||||||||||||||||||||||||||||||||||||||||||||||||||||||||||||||||||||||||||||||||||||
|
Height: 158 cm Weight: 51 kg Age: 60 Weapon: Tessen Origin: | |||||||||||||||||||||||||||||||||||||||||||||||||||||||||||||||||||||||||||||||||||||||
A Chinese healer.
| |||||||||||||||||||||||||||||||||||||||||||||||||||||||||||||||||||||||||||||||||||||||
| Karen | |||||||||||||||||||||||||||||||||||||||||||||||||||||||||||||||||||||||||||||||||||||||
|
Height: 156 cm Weight: 42 kg Age: 18 Weapon: Twin Chakram Origin: | |||||||||||||||||||||||||||||||||||||||||||||||||||||||||||||||||||||||||||||||||||||||
A Japanese student.
|
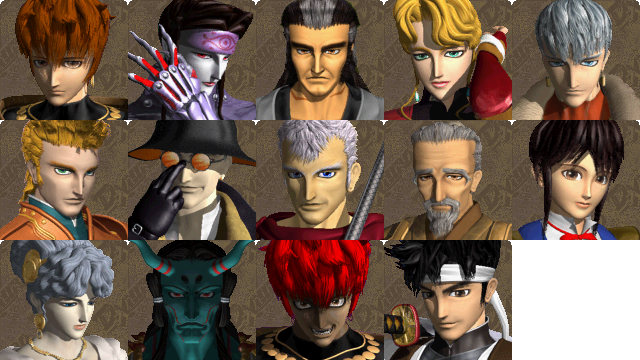
Bosses
| Venus | |||||||||||||||||||||||||||||||||||||||||||||||||||||||||||||||||||||||||||
|---|---|---|---|---|---|---|---|---|---|---|---|---|---|---|---|---|---|---|---|---|---|---|---|---|---|---|---|---|---|---|---|---|---|---|---|---|---|---|---|---|---|---|---|---|---|---|---|---|---|---|---|---|---|---|---|---|---|---|---|---|---|---|---|---|---|---|---|---|---|---|---|---|---|---|---|
|
Height: 168 cm Weight: 43 kg Age: 26? Weapon: Trident Origin: Unknown | |||||||||||||||||||||||||||||||||||||||||||||||||||||||||||||||||||||||||||
The subboss of the game.
| |||||||||||||||||||||||||||||||||||||||||||||||||||||||||||||||||||||||||||
| Izanagi | |||||||||||||||||||||||||||||||||||||||||||||||||||||||||||||||||||||||||||
|
Height: 205 cm Weight: 85 kg Age: Unknown Weapon: Razor Gauntlets Origin: Unknown | |||||||||||||||||||||||||||||||||||||||||||||||||||||||||||||||||||||||||||
The final boss of the game.
| |||||||||||||||||||||||||||||||||||||||||||||||||||||||||||||||||||||||||||
| Shadow Boy | |||||||||||||||||||||||||||||||||||||||||||||||||||||||||||||||||||||||||||
|
Height: 172 cm Weight: 62 kg Age: 18 Weapon: Cannon Blade Origin: Unknown | |||||||||||||||||||||||||||||||||||||||||||||||||||||||||||||||||||||||||||
A form of Boy that has been possessed by the evil force inside of him. He appears as a secret boss if the player defeats every other opponent up to this point without using a continue.
| |||||||||||||||||||||||||||||||||||||||||||||||||||||||||||||||||||||||||||
| Eiji | |||||||||||||||||||||||||||||||||||||||||||||||||||||||||||||||||||||||||||
|
Height: 175 cm Weight: 63 kg Age: 23 Weapon: Byakko no Tachi Origin: | |||||||||||||||||||||||||||||||||||||||||||||||||||||||||||||||||||||||||||
The protagonist of the Battle Arena Toshinden series. He appears as a secret final boss if the player defeats Shadow Boy without using a continue.
|
Stages
Every character has his or her own stage where matches are hosted. The stage can be chosen in the two-player modes. There are three additional stages that are not associated with any character but can be selected in the two-player modes.


Production credits
- <プロジェクトリーダー>: 生地 宏則
- <プロデューサー>: 青山 勝治, 牧 由尚
- <ディレクター>: 長崎 剛志
- <プランニング>: 前田 哲也, 田島 大輔
- <キャラクターデザイン>: 箕輪 豊
- <プログラム>: 谷 裕紀彦, 豊田 利夫, 高橋 学, 松田 浩一, 近藤 知生, 鈴木 進一, 村田 景信
- <グラフィックデザイン 2D>: 永田 和宏, 星野 宇喜子, 宮澤 義行, 泉 由起, 小林 功一郎, 木我 浩一, 中村 貞子
- <グラフィックデザイン 3D>
- (キャラクターモデリング): 太田 潤一, 菊池 秀幸
- (CGムービー): 金子 寿志, 加藤 英材
- (モーションデータ作成): 勝山 征基, 佐藤 正弘, 谷川 明美, 岩佐 博幸, 荒川 恵子
- <サウンド>: 葉山 宏治, 榎本 英彦 (オープニングテーマ)
- <サウンドエフェクト>: 玉山 文人, 鶴山 尚史
- <スーパー マーケッター>: 森岡 俊広, 岩崎 正浩, 鳥浜 克哉, 青木 優
- <パブリシティ>: 岡本 賢一
- <セールス スタッフ>: 熊田 聡, 田浦 達也, 飯田 哲也, 中村 睦美
- <アートワーク デザイン>: ソニーミュージックコミュニケーションズ, クラフト, 橋本 満明
- <タカラ CSデベロップメント スタッフ>: 庖刀 達也, 大草 俊一, 池上 剛史, 高田 直幸, 木村 昭彦, 早坂 憲洋, 秦 さとし, 小澤 文彦, 笠川 弘史
- <モーションキャプチャー アクター>: アトラクティブ アクション クラブ (AAC), 阿部 光男, 大橋 明, 小林 英治, 小林 勇治, 吉尾 亜希子, 梛野 素子, 若駒プロ, 車 邦秀
- <キャラクターボイス>: 草尾 毅, 古川 登志夫, 銀河 万丈, 皆口 裕子, 曽我部 和恭, 郷里 大輔, 森川 智之, 大倉 正章, 江川 央生, 中井 和哉, 野島 健児, 藤巻 恵理子, ブライアン・マット・ユル, 屋良 有作, 平井 裕子
- <オープニング テーマ ヴォーカル>: 藤巻 恵理子
- <スペシャルサンクス>: 戸塚 正利, 福田 裕史, 八木 孝志, 稲葉 進吾, 土屋 淳一, 古市 利雄, 衛藤 直子
- <エグゼクティブ プロデューサー>: 森川 雅博, 中野 隆幸
- <シニア エグゼクティブ プロデューサー>: 佐藤 博久
- Presented by: Takara
- To Be Continued.. "2"
Magazine articles
- Main article: D-Xhird/Magazine articles.
Promotional material

also published in:
- Sega Saturn Magazine (JP) #1997-21: "1997-21 (1997-06-27)" (1997-06-13)[5]
Physical scans
| Sega Retro Average | |||||||||||||||||||||||||||||||||||||||
|---|---|---|---|---|---|---|---|---|---|---|---|---|---|---|---|---|---|---|---|---|---|---|---|---|---|---|---|---|---|---|---|---|---|---|---|---|---|---|---|
|
| 56 | |
|---|---|
| Based on 7 reviews | |
| Saturn, JP |
|---|
  Cover
|
Spinecard  Disc |
Technical information
- Main article: D-Xhird/Technical information.
ROM dump status
| System | Hash | Size | Build Date | Source | Comments | |||||||||
|---|---|---|---|---|---|---|---|---|---|---|---|---|---|---|
|
331,566,144 | 1997-05-03 | CD-ROM (JP) | T-10307G V1.002 |
Track list
| 1. Data track |
|---|
| 2. CD Warning message (special) (0:18) |
|---|
| 3. Select (0:54) |
|---|
| 4. Lucifer (1:12) |
|---|
| 5. Schneider (1:04) |
|---|
| 6. Boy (1:07) |
|---|
| 7. Shadow boy (1:07) |
|---|
| 8. Karen (1:08) |
|---|
| 9. Sanjuroh (1:06) |
|---|
| 10. Kohjin (1:11) |
|---|
| 11. Sabrina (1:05) |
|---|
| 12. Saotome (1:08) |
|---|
| 13. Merow (1:12) |
|---|
| 14. Seiya (1:11) |
|---|
| 15. Venus (1:16) |
|---|
| 16. Izanagi (1:18) |
|---|
| 17. Eiji (1:03) |
|---|
| 18. Extra-1 (1:08) |
|---|
| 19. Extra-2 (1:07) |
|---|
| 20. Extra-3 (1:15) |
|---|
| 21. Continue (0:16) |
|---|
| 22. Ending (1:59) |
|---|
References
- ↑ File:DXhird Saturn JP Box Back.jpg
- ↑ 2.0 2.1 https://sega.jp/fb/segahard/ss/soft_licensee3.html (Wayback Machine: 2019-07-28 12:30)
- ↑ Sega Saturn Magazine, "1997-19 (1997-06-13)" (JP; 1997-05-30), page 15
- ↑ File:DXhird Saturn JP SSEnding.pdf
- ↑ Sega Saturn Magazine, "1997-21 (1997-06-27)" (JP; 1997-06-13), page 66
- ↑ Famitsu, "1997-06-06" (JP; 1997-05-23), page 1
- ↑ GameFan, "Volume 5, Issue 8: August 1997" (US; 1997-xx-xx), page 20
- ↑ MAN!AC, "08/97" (DE; 1997-07-09), page 68
- ↑ Mega Force, "Juillet/Août 1997" (FR; 1997-0x-xx), page 64
- ↑ Next Generation, "September 1997" (US; 1997-08-19), page 134
- ↑ Sega Saturn Magazine, "1997-18 (1997-06-06)" (JP; 1997-05-23), page 157
- ↑ Sega Saturn Magazine, "Readers rating final data" (JP; 2000-03), page 16
| D-Xhird | |
|---|---|
|
Main page | Hidden content | Development | Magazine articles | Reception | |
| Battle Arena Toshinden games for Sega systems | |
|---|---|
| Battle Arena Toshinden Remix (1995) | Battle Arena Toshinden URA (1996) | |
| Related games | |
| D-Xhird (1997) | |