Difference between revisions of "Two Point Hospital"
From Sega Retro
| (5 intermediate revisions by one other user not shown) | |||
| Line 2: | Line 2: | ||
| bobscreen=Two_Point_Hospital_PC_title.png | | bobscreen=Two_Point_Hospital_PC_title.png | ||
| title= | | title= | ||
| − | | publisher=[[Sega]] | + | | publisher=[[Sega Games]] |
| developer={{company|[[Two Point Studios]]}} | | developer={{company|[[Two Point Studios]]}} | ||
{{company|[[Red Kite Games]]|system=PS4,XBONE,Switch}} | {{company|[[Red Kite Games]]|system=PS4,XBONE,Switch}} | ||
| Line 93: | Line 93: | ||
}} | }} | ||
{{sub-stub}} | {{sub-stub}} | ||
| − | '''''{{PAGENAME}}''''' is a spiritual successor to ''[[Theme Hospital]]''. | + | '''''{{PAGENAME}}''''' is the first video game to be produced by [[Two Point Studios]], a development company formed by Ben Hymers and former [[Bullfrog Productions]] and [[Lionhead Studios]] develoeprs Mark Webley and Gary Carr. It was developed as a spiritual successor to the 1997 [[Windows PC]] game ''[[Theme Hospital]]'', a Bullfrog creation of which Webley and Carr are credited as programmers. |
| + | |||
| + | The game was released on [[Steam]] in 2018 before coming to the [[PlayStation 4]], [[Xbox One]] and [[Nintendo Switch]] two years later. While [[Sega]] were originally only set to publish the game, its success lead to Two Point Studios being acquired by [[Sega Europe]], before being followed by a sequel, ''[[Two Point Campus]]''. | ||
==Gameplay== | ==Gameplay== | ||
| + | ''Two Point Hospital'' shares similar gameplay to ''Theme Hospital'', though benefits from twenty years of technological improvements, being rendered in real-time 3D and offering significantly more content than any version of ''Theme Hospital'' ever released. The player's objective is to construct and manage a series of hospitals in the fictional Two Point County, completing objectives set by the local authority or land owners, and earning star ratings. | ||
| + | |||
| + | Success is achieved by hiring staff, building rooms and diagnosing and curing ill patients, who will start arriving at the hospital shortly after the game begins. Patients pay for diagnosis and treatment (regardless of outcome), and the generated funds are in turn used to expand the hospital and pay for staff wages. If the player's funds get too low, the hospital will go bankrupt and the game will end. | ||
| + | |||
| + | The chances of a cure depends on the skills of staff members, the quality of equipment and time taken from the patient's arrival; curing a patient increases the hospital's reputation, while failure (or death) can lead to the reverse. Reputation in turn dictates the type and volume of patience arriving, which can affect cash flow, hence there is an incentive to quicky process patients and cure as many as possible. | ||
| + | |||
| + | The player is also tasked with meeting the needs of both their staff and patients are met, ensuring they have access to food and drink, toilets, entertainment and are kept comfortable (with staff also having regular breaks). Unhappy patients may "rage quit", leaving the hospital (and again damaging reputation), while unhappy staff may resign, taking their expertise with them. Some needs depend on the scenario; for example, cold climates mean hospitals should be heated, or hospital hygene could be an issue. | ||
| + | |||
| + | As the campaign progresses, the volume of patients may increase as can the difficulty of treating their illnesses. Future success may require staff to receive further training and promotions, while machines may need to be upgraded to improve their effectiveness. Like ''Theme Hospital'', occasionally the player is alerted to a group of "emergency" patients and is able to choose whether to attempt to cure them within a set time limit. Doing so can lead to reputation and financial boosts (in addition to the usual cost of treatment). | ||
| + | |||
| + | Machines degrade with each use and so must be maintained by janitors, otherwise they risk catching fire and exploding. Natural disasters can also affect the running of the hospital. | ||
| + | |||
| + | ===Staff=== | ||
| + | Four types of staff members exist in ''Two Point Hospital'', though can be set to work in specific roles: | ||
| + | {{InfoTable| | ||
| + | {{InfoRow | ||
| + | | image= | ||
| + | | title=Doctor | ||
| + | | desc= | ||
| + | }} | ||
| + | {{InfoRow | ||
| + | | image= | ||
| + | | title=Nurse | ||
| + | | desc= | ||
| + | }} | ||
| + | {{InfoRow | ||
| + | | image= | ||
| + | | title=Assistant | ||
| + | | desc= | ||
| + | }} | ||
| + | {{InfoRow | ||
| + | | image= | ||
| + | | title=Janitor | ||
| + | | desc= | ||
| + | }} | ||
| + | }} | ||
| + | |||
| + | ===Hospitals=== | ||
| + | {{InfoTable| | ||
| + | {{InfoRow | ||
| + | | image= | ||
| + | | title=Hogsport | ||
| + | | desc= | ||
| + | }} | ||
| + | {{InfoRow | ||
| + | | image= | ||
| + | | title=Lower Bullocks | ||
| + | | desc= | ||
| + | }} | ||
| + | {{InfoRow | ||
| + | | image= | ||
| + | | title=Flottering | ||
| + | | desc= | ||
| + | }} | ||
| + | {{InfoRow | ||
| + | | image= | ||
| + | | title=Mitton University | ||
| + | | desc= | ||
| + | }} | ||
| + | {{InfoRow | ||
| + | | image= | ||
| + | | title=Tumble | ||
| + | | desc= | ||
| + | }} | ||
| + | {{InfoRow | ||
| + | | image= | ||
| + | | title=Flemington | ||
| + | | desc= | ||
| + | }} | ||
| + | {{InfoRow | ||
| + | | image= | ||
| + | | title=Smogley | ||
| + | | desc= | ||
| + | }} | ||
| + | {{InfoRow | ||
| + | | image= | ||
| + | | title=Melt Downs | ||
| + | | desc= | ||
| + | }} | ||
| + | {{InfoRow | ||
| + | | image= | ||
| + | | title=Duckworth-upon-Bilge | ||
| + | | desc= | ||
| + | }} | ||
| + | {{InfoRow | ||
| + | | image= | ||
| + | | title=Grockle Bay | ||
| + | | desc= | ||
| + | }} | ||
| + | {{InfoRow | ||
| + | | image= | ||
| + | | title=Sweaty Palms | ||
| + | | desc= | ||
| + | }} | ||
| + | {{InfoRow | ||
| + | | image= | ||
| + | | title=Blighton | ||
| + | | desc= | ||
| + | }} | ||
| + | {{InfoRow | ||
| + | | image= | ||
| + | | title=Pelican Wharf | ||
| + | | desc= | ||
| + | }} | ||
| + | {{InfoRow | ||
| + | | image= | ||
| + | | title=Rotting Hill | ||
| + | | desc= | ||
| + | }} | ||
| + | {{InfoRow | ||
| + | | image= | ||
| + | | title=Croquembouche | ||
| + | | desc= | ||
| + | }} | ||
| + | }} | ||
| + | |||
===Rooms=== | ===Rooms=== | ||
{{InfoTable| | {{InfoTable| | ||
| − | + | {{InfoRow | |
| + | | image= | ||
| + | | title=Reception | ||
| + | | desc= | ||
| + | }} | ||
| + | {{InfoRow | ||
| + | | image= | ||
| + | | title=GP's Office | ||
| + | | desc= | ||
| + | }} | ||
| + | {{InfoRow | ||
| + | | image= | ||
| + | | title=Pharmacy | ||
| + | | desc= | ||
| + | }} | ||
| + | {{InfoRow | ||
| + | | image= | ||
| + | | title=General Diagnosis | ||
| + | | desc= | ||
| + | }} | ||
| + | {{InfoRow | ||
| + | | image= | ||
| + | | title=Cardiology | ||
| + | | desc= | ||
| + | }} | ||
| + | {{InfoRow | ||
| + | | image= | ||
| + | | title=Ward | ||
| + | | desc= | ||
| + | }} | ||
| + | {{InfoRow | ||
| + | | image= | ||
| + | | title=Psychiatry | ||
| + | | desc= | ||
| + | }} | ||
| + | {{InfoRow | ||
| + | | image= | ||
| + | | title=Staff Room | ||
| + | | desc= | ||
| + | }} | ||
| + | {{InfoRow | ||
| + | | image= | ||
| + | | title=Toilets | ||
| + | | desc= | ||
| + | }} | ||
| + | {{InfoRow | ||
| + | | image= | ||
| + | | title=Training | ||
| + | | desc= | ||
| + | }} | ||
| + | {{InfoRow | ||
| + | | image= | ||
| + | | title=De-Lux Clinic | ||
| + | | desc= | ||
| + | }} | ||
| + | {{InfoRow | ||
| + | | image= | ||
| + | | title=Pans Lab | ||
| + | | desc= | ||
| + | }} | ||
| + | {{InfoRow | ||
| + | | image= | ||
| + | | title=Clown Clinic | ||
| + | | desc= | ||
| + | }} | ||
| + | {{InfoRow | ||
| + | | image= | ||
| + | | title=Fracture Ward | ||
| + | | desc= | ||
| + | }} | ||
| + | {{InfoRow | ||
| + | | image= | ||
| + | | title=Research | ||
| + | | desc= | ||
| + | }} | ||
| + | {{InfoRow | ||
| + | | image= | ||
| + | | title=Marketing | ||
| + | | desc= | ||
| + | }} | ||
| + | {{InfoRow | ||
| + | | image= | ||
| + | | title=Chromatherapy | ||
| + | | desc= | ||
| + | }} | ||
| + | {{InfoRow | ||
| + | | image= | ||
| + | | title=X-Ray | ||
| + | | desc= | ||
| + | }} | ||
| + | {{InfoRow | ||
| + | | image= | ||
| + | | title=Injection Room | ||
| + | | desc= | ||
| + | }} | ||
| + | {{InfoRow | ||
| + | | image= | ||
| + | | title=Fluid Analysis | ||
| + | | desc= | ||
| + | }} | ||
| + | {{InfoRow | ||
| + | | image= | ||
| + | | title=M.E.G.A Scan | ||
| + | | desc= | ||
| + | }} | ||
| + | {{InfoRow | ||
| + | | image= | ||
| + | | title=Café | ||
| + | | desc= | ||
| + | }} | ||
| + | {{InfoRow | ||
| + | | image= | ||
| + | | title=Surgery | ||
| + | | desc= | ||
| + | }} | ||
| + | {{InfoRow | ||
| + | | image= | ||
| + | | title=Pest Control | ||
| + | | desc= | ||
| + | }} | ||
| + | {{InfoRow | ||
| + | | image= | ||
| + | | title=Head Office | ||
| + | | desc= | ||
| + | }} | ||
| + | {{InfoRow | ||
| + | | image= | ||
| + | | title=DNA Lab | ||
| + | | desc= | ||
| + | }} | ||
| + | {{InfoRow | ||
| + | | image= | ||
| + | | title=Shock Clinic | ||
| + | | desc= | ||
| + | }} | ||
| + | {{InfoRow | ||
| + | | image= | ||
| + | | title=Resolution Lab | ||
| + | | desc= | ||
| + | }} | ||
| + | {{InfoRow | ||
| + | | image= | ||
| + | | title=Recurvery Room | ||
| + | | desc= | ||
| + | }} | ||
| + | {{InfoRow | ||
| + | | image= | ||
| + | | title=Cryptology | ||
| + | | desc= | ||
| + | }} | ||
}} | }} | ||
| Line 106: | Line 373: | ||
}} | }} | ||
| − | |||
| − | |||
| − | |||
===Expansions=== | ===Expansions=== | ||
====''Bigfoot''==== | ====''Bigfoot''==== | ||
| + | =====Hospitals===== | ||
| + | {{InfoTable| | ||
| + | {{InfoRow | ||
| + | | image= | ||
| + | | title=Underlook Hotel | ||
| + | | desc= | ||
| + | }} | ||
| + | {{InfoRow | ||
| + | | image= | ||
| + | | title=Swelbard | ||
| + | | desc= | ||
| + | }} | ||
| + | {{InfoRow | ||
| + | | image= | ||
| + | | title=Roquefort Castle | ||
| + | | desc= | ||
| + | }} | ||
| + | }} | ||
| + | |||
=====Rooms===== | =====Rooms===== | ||
{{InfoTable| | {{InfoTable| | ||
| − | + | {{InfoRow | |
| + | | image= | ||
| + | | title=Doghouse | ||
| + | | desc= | ||
| + | }} | ||
| + | {{InfoRow | ||
| + | | image= | ||
| + | | title=Urban Mythology | ||
| + | | desc= | ||
| + | }} | ||
| + | {{InfoRow | ||
| + | | image= | ||
| + | | title=Reanimation | ||
| + | | desc= | ||
| + | }} | ||
}} | }} | ||
| Line 125: | Line 422: | ||
====''Pebberley Island''==== | ====''Pebberley Island''==== | ||
| + | =====Hospitals===== | ||
| + | {{InfoTable| | ||
| + | {{InfoRow | ||
| + | | image= | ||
| + | | title=Pebberley Reef | ||
| + | | desc= | ||
| + | }} | ||
| + | {{InfoRow | ||
| + | | image= | ||
| + | | title=Overgrowth | ||
| + | | desc= | ||
| + | }} | ||
| + | {{InfoRow | ||
| + | | image= | ||
| + | | title=Topless Mountain | ||
| + | | desc= | ||
| + | }} | ||
| + | }} | ||
| + | |||
=====Rooms===== | =====Rooms===== | ||
{{InfoTable| | {{InfoTable| | ||
| − | + | {{InfoRow | |
| + | | image= | ||
| + | | title=Indentification | ||
| + | | desc= | ||
| + | }} | ||
| + | {{InfoRow | ||
| + | | image= | ||
| + | | title=Escape Room | ||
| + | | desc= | ||
| + | }} | ||
| + | {{InfoRow | ||
| + | | image= | ||
| + | | title=Correcting Pool | ||
| + | | desc= | ||
| + | }} | ||
}} | }} | ||
| Line 136: | Line 466: | ||
====''Close Encounters''==== | ====''Close Encounters''==== | ||
| + | =====Hospitals===== | ||
| + | {{InfoTable| | ||
| + | {{InfoRow | ||
| + | | image= | ||
| + | | title=Goldpan | ||
| + | | desc= | ||
| + | }} | ||
| + | {{InfoRow | ||
| + | | image= | ||
| + | | title=Camouflage Falls | ||
| + | | desc= | ||
| + | }} | ||
| + | {{InfoRow | ||
| + | | image= | ||
| + | | title=Chasm 24 | ||
| + | | desc= | ||
| + | }} | ||
| + | }} | ||
| + | |||
=====Rooms===== | =====Rooms===== | ||
{{InfoTable| | {{InfoTable| | ||
| − | + | {{InfoRow | |
| + | | image= | ||
| + | | title=Self-Assembly | ||
| + | | desc= | ||
| + | }} | ||
| + | {{InfoRow | ||
| + | | image= | ||
| + | | title=Toad Hall | ||
| + | | desc= | ||
| + | }} | ||
| + | {{InfoRow | ||
| + | | image= | ||
| + | | title=Personification | ||
| + | | desc= | ||
| + | }} | ||
}} | }} | ||
| Line 147: | Line 510: | ||
====''Off the Grid''==== | ====''Off the Grid''==== | ||
| + | =====Hospitals===== | ||
| + | {{InfoTable| | ||
| + | {{InfoRow | ||
| + | | image= | ||
| + | | title=Wanderoff | ||
| + | | desc= | ||
| + | }} | ||
| + | {{InfoRow | ||
| + | | image= | ||
| + | | title=Old Newpoint | ||
| + | | desc= | ||
| + | }} | ||
| + | {{InfoRow | ||
| + | | image= | ||
| + | | title=Windsock | ||
| + | | desc= | ||
| + | }} | ||
| + | }} | ||
| + | |||
=====Rooms===== | =====Rooms===== | ||
{{InfoTable| | {{InfoTable| | ||
| − | + | {{InfoRow | |
| + | | image= | ||
| + | | title=Woodwork | ||
| + | | desc= | ||
| + | }} | ||
| + | {{InfoRow | ||
| + | | image= | ||
| + | | title=Herb Garden | ||
| + | | desc= | ||
| + | }} | ||
| + | {{InfoRow | ||
| + | | image= | ||
| + | | title=Farmacology | ||
| + | | desc= | ||
| + | }} | ||
| + | {{InfoRow | ||
| + | | image= | ||
| + | | title=Tech Support | ||
| + | | desc= | ||
| + | }} | ||
}} | }} | ||
| Line 158: | Line 559: | ||
====''Culture Shock''==== | ====''Culture Shock''==== | ||
| + | =====Hospitals===== | ||
| + | {{InfoTable| | ||
| + | {{InfoRow | ||
| + | | image= | ||
| + | | title=Plywood Studios | ||
| + | | desc= | ||
| + | }} | ||
| + | {{InfoRow | ||
| + | | image= | ||
| + | | title=Mudbury Festival | ||
| + | | desc= | ||
| + | }} | ||
| + | {{InfoRow | ||
| + | | image= | ||
| + | | title=Fitzpocket Academy | ||
| + | | desc= | ||
| + | }} | ||
| + | }} | ||
| + | |||
=====Rooms===== | =====Rooms===== | ||
{{InfoTable| | {{InfoTable| | ||
| − | + | {{InfoRow | |
| + | | image= | ||
| + | | title=Danger Zone | ||
| + | | desc= | ||
| + | }} | ||
| + | {{InfoRow | ||
| + | | image= | ||
| + | | title=Wash Pit | ||
| + | | desc= | ||
| + | }} | ||
| + | {{InfoRow | ||
| + | | image= | ||
| + | | title=War Room | ||
| + | | desc= | ||
| + | }} | ||
}} | }} | ||
| Line 169: | Line 603: | ||
====''A Stitch in Time''==== | ====''A Stitch in Time''==== | ||
| + | =====Hospitals===== | ||
| + | {{InfoTable| | ||
| + | {{InfoRow | ||
| + | | image= | ||
| + | | title=Clockwise-upon-Thyme | ||
| + | | desc= | ||
| + | }} | ||
| + | {{InfoRow | ||
| + | | image= | ||
| + | | title=Clockwise-before-Thyme | ||
| + | | desc= | ||
| + | }} | ||
| + | {{InfoRow | ||
| + | | image= | ||
| + | | title=Clockwise-above-Thyme | ||
| + | | desc= | ||
| + | }} | ||
| + | }} | ||
| + | |||
=====Rooms===== | =====Rooms===== | ||
{{InfoTable| | {{InfoTable| | ||
| − | + | {{InfoRow | |
| + | | image= | ||
| + | | title=Speed Dating | ||
| + | | desc= | ||
| + | }} | ||
}} | }} | ||
| Line 180: | Line 637: | ||
====''Speedy Recovery''==== | ====''Speedy Recovery''==== | ||
| + | =====Hospitals===== | ||
| + | {{InfoTable| | ||
| + | {{InfoRow | ||
| + | | image= | ||
| + | | title=Ailing | ||
| + | | desc= | ||
| + | }} | ||
| + | {{InfoRow | ||
| + | | image= | ||
| + | | title=Betts Shore | ||
| + | | desc= | ||
| + | }} | ||
| + | {{InfoRow | ||
| + | | image= | ||
| + | | title=Pointy Pass | ||
| + | | desc= | ||
| + | }} | ||
| + | }} | ||
| + | |||
=====Rooms===== | =====Rooms===== | ||
{{InfoTable| | {{InfoTable| | ||
| − | + | {{InfoRow | |
| + | | image= | ||
| + | | title=Cloud Computing | ||
| + | | desc= | ||
| + | }} | ||
| + | {{InfoRow | ||
| + | | image= | ||
| + | | title=Wax Works | ||
| + | | desc= | ||
| + | }} | ||
| + | {{InfoRow | ||
| + | | image= | ||
| + | | title=Powder Room | ||
| + | | desc= | ||
| + | }} | ||
}} | }} | ||
Latest revision as of 10:41, 6 November 2024
| Two Point Hospital | |||||||||||||||||||||||||||||||||||||||||||||||||||||||||||||||||||||||||||||||||||||||||||||||||||||||||||||||||||||||||||||||||||||||||||||||||||||||||||||||||||||||||||||||||||||||||||||||||||||||||||||||||||||||
|---|---|---|---|---|---|---|---|---|---|---|---|---|---|---|---|---|---|---|---|---|---|---|---|---|---|---|---|---|---|---|---|---|---|---|---|---|---|---|---|---|---|---|---|---|---|---|---|---|---|---|---|---|---|---|---|---|---|---|---|---|---|---|---|---|---|---|---|---|---|---|---|---|---|---|---|---|---|---|---|---|---|---|---|---|---|---|---|---|---|---|---|---|---|---|---|---|---|---|---|---|---|---|---|---|---|---|---|---|---|---|---|---|---|---|---|---|---|---|---|---|---|---|---|---|---|---|---|---|---|---|---|---|---|---|---|---|---|---|---|---|---|---|---|---|---|---|---|---|---|---|---|---|---|---|---|---|---|---|---|---|---|---|---|---|---|---|---|---|---|---|---|---|---|---|---|---|---|---|---|---|---|---|---|---|---|---|---|---|---|---|---|---|---|---|---|---|---|---|---|---|---|---|---|---|---|---|---|---|---|---|---|---|---|---|---|
| System(s): Steam, PlayStation 4, Xbox One, Nintendo Switch | |||||||||||||||||||||||||||||||||||||||||||||||||||||||||||||||||||||||||||||||||||||||||||||||||||||||||||||||||||||||||||||||||||||||||||||||||||||||||||||||||||||||||||||||||||||||||||||||||||||||||||||||||||||||
| Publisher: Sega Games | |||||||||||||||||||||||||||||||||||||||||||||||||||||||||||||||||||||||||||||||||||||||||||||||||||||||||||||||||||||||||||||||||||||||||||||||||||||||||||||||||||||||||||||||||||||||||||||||||||||||||||||||||||||||
| Developer: Two Point Studios
| |||||||||||||||||||||||||||||||||||||||||||||||||||||||||||||||||||||||||||||||||||||||||||||||||||||||||||||||||||||||||||||||||||||||||||||||||||||||||||||||||||||||||||||||||||||||||||||||||||||||||||||||||||||||
| Genre: Simulation | |||||||||||||||||||||||||||||||||||||||||||||||||||||||||||||||||||||||||||||||||||||||||||||||||||||||||||||||||||||||||||||||||||||||||||||||||||||||||||||||||||||||||||||||||||||||||||||||||||||||||||||||||||||||
| Number of players: 1 | |||||||||||||||||||||||||||||||||||||||||||||||||||||||||||||||||||||||||||||||||||||||||||||||||||||||||||||||||||||||||||||||||||||||||||||||||||||||||||||||||||||||||||||||||||||||||||||||||||||||||||||||||||||||
|

This teeny-tiny article needs some work. You can help us by expanding it.
Two Point Hospital is the first video game to be produced by Two Point Studios, a development company formed by Ben Hymers and former Bullfrog Productions and Lionhead Studios develoeprs Mark Webley and Gary Carr. It was developed as a spiritual successor to the 1997 Windows PC game Theme Hospital, a Bullfrog creation of which Webley and Carr are credited as programmers.
The game was released on Steam in 2018 before coming to the PlayStation 4, Xbox One and Nintendo Switch two years later. While Sega were originally only set to publish the game, its success lead to Two Point Studios being acquired by Sega Europe, before being followed by a sequel, Two Point Campus.
Contents
- 1 Gameplay
- 2 Versions
- 3 Downloadable content
- 4 Promotional material
- 5 Artwork
- 6 Physical scans
- 7 External links
- 8 References
Gameplay
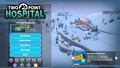
Two Point Hospital shares similar gameplay to Theme Hospital, though benefits from twenty years of technological improvements, being rendered in real-time 3D and offering significantly more content than any version of Theme Hospital ever released. The player's objective is to construct and manage a series of hospitals in the fictional Two Point County, completing objectives set by the local authority or land owners, and earning star ratings.
Success is achieved by hiring staff, building rooms and diagnosing and curing ill patients, who will start arriving at the hospital shortly after the game begins. Patients pay for diagnosis and treatment (regardless of outcome), and the generated funds are in turn used to expand the hospital and pay for staff wages. If the player's funds get too low, the hospital will go bankrupt and the game will end.
The chances of a cure depends on the skills of staff members, the quality of equipment and time taken from the patient's arrival; curing a patient increases the hospital's reputation, while failure (or death) can lead to the reverse. Reputation in turn dictates the type and volume of patience arriving, which can affect cash flow, hence there is an incentive to quicky process patients and cure as many as possible.
The player is also tasked with meeting the needs of both their staff and patients are met, ensuring they have access to food and drink, toilets, entertainment and are kept comfortable (with staff also having regular breaks). Unhappy patients may "rage quit", leaving the hospital (and again damaging reputation), while unhappy staff may resign, taking their expertise with them. Some needs depend on the scenario; for example, cold climates mean hospitals should be heated, or hospital hygene could be an issue.
As the campaign progresses, the volume of patients may increase as can the difficulty of treating their illnesses. Future success may require staff to receive further training and promotions, while machines may need to be upgraded to improve their effectiveness. Like Theme Hospital, occasionally the player is alerted to a group of "emergency" patients and is able to choose whether to attempt to cure them within a set time limit. Doing so can lead to reputation and financial boosts (in addition to the usual cost of treatment).
Machines degrade with each use and so must be maintained by janitors, otherwise they risk catching fire and exploding. Natural disasters can also affect the running of the hospital.
Staff
Four types of staff members exist in Two Point Hospital, though can be set to work in specific roles:
| Doctor | |
|---|---|
| Nurse | |
| Assistant | |
| Janitor | |
Hospitals
| Hogsport | |
|---|---|
| Lower Bullocks | |
| Flottering | |
| Mitton University | |
| Tumble | |
| Flemington | |
| Smogley | |
| Melt Downs | |
| Duckworth-upon-Bilge | |
| Grockle Bay | |
| Sweaty Palms | |
| Blighton | |
| Pelican Wharf | |
| Rotting Hill | |
| Croquembouche | |
Rooms
| Reception | |
|---|---|
| GP's Office | |
| Pharmacy | |
| General Diagnosis | |
| Cardiology | |
| Ward | |
| Psychiatry | |
| Staff Room | |
| Toilets | |
| Training | |
| De-Lux Clinic | |
| Pans Lab | |
| Clown Clinic | |
| Fracture Ward | |
| Research | |
| Marketing | |
| Chromatherapy | |
| X-Ray | |
| Injection Room | |
| Fluid Analysis | |
| M.E.G.A Scan | |
| Café | |
| Surgery | |
| Pest Control | |
| Head Office | |
| DNA Lab | |
| Shock Clinic | |
| Resolution Lab | |
| Recurvery Room | |
| Cryptology | |
Items
Expansions
Bigfoot
Hospitals
| Underlook Hotel | |
|---|---|
| Swelbard | |
| Roquefort Castle | |
Rooms
| Doghouse | |
|---|---|
| Urban Mythology | |
| Reanimation | |
Items
Pebberley Island
Hospitals
| Pebberley Reef | |
|---|---|
| Overgrowth | |
| Topless Mountain | |
Rooms
| Indentification | |
|---|---|
| Escape Room | |
| Correcting Pool | |
Items
Close Encounters
Hospitals
| Goldpan | |
|---|---|
| Camouflage Falls | |
| Chasm 24 | |
Rooms
| Self-Assembly | |
|---|---|
| Toad Hall | |
| Personification | |
Items
Off the Grid
Hospitals
| Wanderoff | |
|---|---|
| Old Newpoint | |
| Windsock | |
Rooms
| Woodwork | |
|---|---|
| Herb Garden | |
| Farmacology | |
| Tech Support | |
Items
Culture Shock
Hospitals
| Plywood Studios | |
|---|---|
| Mudbury Festival | |
| Fitzpocket Academy | |
Rooms
| Danger Zone | |
|---|---|
| Wash Pit | |
| War Room | |
Items
A Stitch in Time
Hospitals
| Clockwise-upon-Thyme | |
|---|---|
| Clockwise-before-Thyme | |
| Clockwise-above-Thyme | |
Rooms
| Speed Dating | |
|---|---|
Items
Speedy Recovery
Hospitals
| Ailing | |
|---|---|
| Betts Shore | |
| Pointy Pass | |
Rooms
| Cloud Computing | |
|---|---|
| Wax Works | |
| Powder Room | |
Items
Content packs
Retro Items Pack
Exhibition Items Pack
Sega 60th Items
Fancy Dress Pack
Achievements
- Main article: Two Point Hospital/Achievements.
Versions
Version history
- Main article: Two Point Hospital/Changelog.
| System | Version | Size | Date | Comment | Ref | Icon | |
|---|---|---|---|---|---|---|---|
| 1.16 | 2019-08-15 | [3] | |||||
| 1.12 | 2019-02-19 | [4] | |||||
| 1.11 | 2019-02-06 | [5] | |||||
| 1.10 | 2018-12-17 | [6] | |||||
| 1.09 | 2018-12-05 | [7] | |||||
| 1.08 | 2018-10-26 | [8] | |||||
| 1.07 | 2018-10-23 | [9] | |||||
| 1.06 | 2018-10-03 | [10] | |||||
| 1.05 | 2018-09-22 | [11] | |||||
| 1.04 | 2018-09-14 | [12] | |||||
| 1.03 | 2018-09-07 | [13] | |||||
| 1.02 | 2018-09-04 | [14] | |||||
| 1.01 | 2018-08-30 | [15] |
Downloadable content
- Main article: Two Point Hospital/Downloadable content.
Promotional material
Console press release
Close Encounters press release

Sandbox mode press release
A Stitch in Time press release
A Stitch in Time streaming press release
Jumbo Edition press release
Artwork


Physical scans
PlayStation 4 version
| PlayStation 4, US |
|---|
|
| PlayStation 4, UK |
|---|
|
| PlayStation 4, FR |
|---|
|
| PlayStation 4, DE |
|---|
|
| PlayStation 4, ES |
|---|
|
Xbox One version
| Xbox One, US |
|---|
|
| Xbox One, UK |
|---|
|
| Xbox One, FR |
|---|
|
| Xbox One, DE |
|---|
|
| Xbox One, ES |
|---|
|
Nintendo Switch version
| Switch, US |
|---|
|
| Switch, UK |
|---|
|
| Switch, FR |
|---|
|
| Switch, DE |
|---|
|
| Switch, ES |
|---|
|
External links
References
- ↑ 1.00 1.01 1.02 1.03 1.04 1.05 1.06 1.07 1.08 1.09 1.10 1.11 1.12 1.13 1.14 1.15 1.16 1.17 1.18 1.19 1.20 https://steamdb.info/app/535930/ (Wayback Machine: 2018-10-28 06:20)
- ↑ 2.0 2.1 2.2 https://steamdb.info/app/535930/ (Wayback Machine: 2019-04-03 22:53)
- ↑ https://store.steampowered.com/news/?appids=535930 (Wayback Machine: 2019-09-14 18:04)
- ↑ https://steamcommunity.com/app/535930/discussions/0/3203652426723239424/ (Wayback Machine: 2019-11-29 01:22)
- ↑ https://steamcommunity.com/app/535930/discussions/0/1778262124933711289/ (Wayback Machine: 2019-11-29 01:19)
- ↑ https://steamcommunity.com/app/535930/discussions/0/2806204040006424820/ (Wayback Machine: 2019-04-25 13:03)
- ↑ https://steamcommunity.com/app/535930/discussions/0/1744479698793334049/ (Wayback Machine: 2018-12-08 13:48)
- ↑ https://steamcommunity.com/app/535930/discussions/0/1735468693696549361/ (Wayback Machine: 2018-10-28 06:35)
- ↑ https://steamcommunity.com/app/535930/discussions/0/1734342161870561505/ (Wayback Machine: 2018-10-28 06:35)
- ↑ https://steamcommunity.com/app/535930/discussions/0/1730963192532977799/ (Wayback Machine: 2018-10-28 06:48)
- ↑ https://steamcommunity.com/app/535930/discussions/0/1734339901242274332/ (Wayback Machine: 2018-10-28 06:47)
- ↑ https://steamcommunity.com/app/535930/discussions/0/1742220359686940247/ (Wayback Machine: 2018-10-28 06:47)
- ↑ https://steamcommunity.com/app/535930/discussions/0/2590022385657630517/ (Wayback Machine: 2018-10-28 06:47)
- ↑ https://steamcommunity.com/app/535930/discussions/0/1737715419912789209/ (Wayback Machine: 2018-09-24 18:20)
- ↑ https://steamcommunity.com/app/535930/discussions/0/1737715419894374958/ (Wayback Machine: 2018-10-28 06:47)
| Two Point Hospital | |
|---|---|
|
Main page | Downloadable content | Changelog | |
| Games in the Two Point series | |
|---|---|
| Two Point Hospital (2018) | Two Point Campus (2022) | Two Point Museum (2024) |
- 1 player games
- US Steam games
- All US games
- EU Steam games
- All EU games
- UK Steam games
- All UK games
- AU Steam games
- All AU games
- US Steam Linux games
- EU Steam Linux games
- UK Steam Linux games
- AU Steam Linux games
- US Steam OS X games
- EU Steam OS X games
- UK Steam OS X games
- AU Steam OS X games
- Steam games
- Steam x64 games
- Steam Linux games
- Steam OS X games
- US PlayStation 4 games
- DE PlayStation 4 games
- All DE games
- ES PlayStation 4 games
- All ES games
- FR PlayStation 4 games
- All FR games
- UK PlayStation 4 games
- PlayStation 4 games
- All simulation games
- 2020 PlayStation 4 games
- All 2020 games
- US Xbox One games
- DE Xbox One games
- ES Xbox One games
- FR Xbox One games
- UK Xbox One games
- Xbox One games
- 2020 Xbox One games
- US Nintendo Switch games
- DE Nintendo Switch games
- ES Nintendo Switch games
- FR Nintendo Switch games
- UK Nintendo Switch games
- Nintendo Switch games
- 2020 Nintendo Switch games
- All games
- Sub-stubs
- Two Point Hospital
- Two Point