Difference between revisions of "Samurai Spirits Zankurou Musouken"
From Sega Retro
m (→Gameplay) |
|||
| Line 30: | Line 30: | ||
==Story== | ==Story== | ||
| − | The first part of a two-chapter story that is chronologically set between the events of '' | + | The first part of a two-chapter story that is chronologically set between the events of ''Samurai Spirits'' and ''Shin Samurai Spirits: Haohmaru Jigokuhen'' (''[[Samurai Shodown]]'' and ''Samurai Shodown II'' in the West), the game follows the journey of a young semi-amnesic boy named Shizumaru Hisame. He and many other warriors seek out the powerful and dangerous swordsman Zankuro Minazuki, called "The Demon," for their own personal reasons. |
==Gameplay== | ==Gameplay== | ||
| Line 45: | Line 45: | ||
Guarding is done by holding the D-Pad away from the opponent. Guarding can be done while standing or crouching and can also be done in midair. Most attacks can be blocked while standing or crouching, but some attacks must specifically be blocked high or low. Characters can become dizzy and stunned momentarily after taking repeated damage; they can recover more quickly by moving the D-Pad and pressing buttons rapidly. Every character has a sweep kick performed with {{downright}}+{{Z}} (or {{downleft}}+{{Z}} when facing left) that can only be blocked crouching and an overhead move performed with {{Y}} (or {{B}}+{{C}}) that can only be blocked standing. Characters can throw an opponent by holding {{left}} or {{right}} while pressing the heavy slash button in close range. Throws cannot be blocked. After a character has been knocked down, the character can roll away by pressing {{left}} or {{right}}. | Guarding is done by holding the D-Pad away from the opponent. Guarding can be done while standing or crouching and can also be done in midair. Most attacks can be blocked while standing or crouching, but some attacks must specifically be blocked high or low. Characters can become dizzy and stunned momentarily after taking repeated damage; they can recover more quickly by moving the D-Pad and pressing buttons rapidly. Every character has a sweep kick performed with {{downright}}+{{Z}} (or {{downleft}}+{{Z}} when facing left) that can only be blocked crouching and an overhead move performed with {{Y}} (or {{B}}+{{C}}) that can only be blocked standing. Characters can throw an opponent by holding {{left}} or {{right}} while pressing the heavy slash button in close range. Throws cannot be blocked. After a character has been knocked down, the character can roll away by pressing {{left}} or {{right}}. | ||
| − | Each character has a "POW" ({{rolloverText|怒|Ika}}) gauge that fills as the player is hit by enemy attacks or guards against an attack. The gauge can also be filled by holding {{A}}+{{B}}+{{C}}, though the character is vulnerable to attack while doing this. When the gauge is full, the character begins to flash and attacks with increased strength for a duration. The character can | + | Each character has a "POW" ({{rolloverText|怒|Ika}}) gauge that fills as the player is hit by enemy attacks or guards against an attack. The gauge can also be filled by holding {{A}}+{{B}}+{{C}}, though the character is vulnerable to attack while doing this. When the gauge is full, the character begins to flash and attacks with increased strength for a duration. The character can perform special "Rage" moves for as long as the gauge stays filled, which are powerful super moves that do heavy damage and disarm the opponent. These moves require special button combinations or can be performed automatically by pressing {{R}}. Since they do not drain the gauge, they can potentially be used multiple times before the gauge drains. |
===Modes=== | ===Modes=== | ||
| Line 139: | Line 139: | ||
{{MoveListRow | Gou Ha | {{DPF}} {{kick}} | Haohmaru charges forward with a shoulder ram that knocks his opponent over.}} | {{MoveListRow | Gou Ha | {{DPF}} {{kick}} | Haohmaru charges forward with a shoulder ram that knocks his opponent over.}} | ||
{{MoveListRow | Senpuu Ha | {{QCF}} {{kick}} (requires weapon) | Haohmaru swings his sword across the ground, generating a spray of sparks that pushes his opponent back.}} | {{MoveListRow | Senpuu Ha | {{QCF}} {{kick}} (requires weapon) | Haohmaru swings his sword across the ground, generating a spray of sparks that pushes his opponent back.}} | ||
| − | {{MoveListRow | Nagi Yaiba | {{QCB}} {{right}} {{HS}} | + | {{MoveListRow | Nagi Yaiba | {{QCB}} {{right}} {{HS}} (requires weapon) | Haohmaru holds his blade in a reverse grip. If the opponent tries to hit him while he is doing this or if he is close to the opponent, he counters by slicing upward with his katana, then continues slicing as he rises into the air.}} |
{{MoveListRow | '''Rage:''' Hiougi Tenha Dankuu Retsu Zan | {{right}} {{HCF}} {{HS}}+{{kick}} (close) (requires weapon) | Haohmaru slices upward with his katana, creating a cyclone that tosses his opponent into the air, then follows it up with a downward sword slash in the air and another downward sword slash when he lands on the ground.}} | {{MoveListRow | '''Rage:''' Hiougi Tenha Dankuu Retsu Zan | {{right}} {{HCF}} {{HS}}+{{kick}} (close) (requires weapon) | Haohmaru slices upward with his katana, creating a cyclone that tosses his opponent into the air, then follows it up with a downward sword slash in the air and another downward sword slash when he lands on the ground.}} | ||
}} | }} | ||
| Line 161: | Line 161: | ||
{{MoveListRow | Sankaku Tobi | D-Pad in the opposite direction when jumping onto the edge of the screen | Shizumaru can jump off the edges of the screen.}} | {{MoveListRow | Sankaku Tobi | D-Pad in the opposite direction when jumping onto the edge of the screen | Shizumaru can jump off the edges of the screen.}} | ||
{{MoveListRow | Hitouryuu Shigure | {{down}}+{{HS}} in midair (requires weapon) | Shizumaru stabs downward with his closed parasol. If he hits his opponent, he bounces back up and can keep stabbing until he is hit or returns to the ground.}} | {{MoveListRow | Hitouryuu Shigure | {{down}}+{{HS}} in midair (requires weapon) | Shizumaru stabs downward with his closed parasol. If he hits his opponent, he bounces back up and can keep stabbing until he is hit or returns to the ground.}} | ||
| − | {{MoveListRow | Hitouryuu Kosame | {{up}}+{{HS}} in midair (requires weapon) | Shizumaru opens his parasol and floats down slowly until he is hit or attacks. He can move with {{left}} or {{right}} while floating.}} | + | {{MoveListRow | Hitouryuu Kosame | {{up}}+{{HS}} in midair (requires weapon) | Shizumaru opens his parasol and floats down slowly until he is hit or attacks. He can move with {{left}} or {{right}} while floating or can fall to the ground with {{slash}} or {{kick}}.}} |
{{MoveListRow | Hitouryuu Kirisame Jin | {{QCF}} {{slash}} (requires weapon) | Shizumaru throws his open parasol across the screen, which returns to him like a boomerang. The parasol knocks down the opponent on impact and can hit opponents on its way out or back. The distance traveled by the parasol depends on the strength of the button used.}} | {{MoveListRow | Hitouryuu Kirisame Jin | {{QCF}} {{slash}} (requires weapon) | Shizumaru throws his open parasol across the screen, which returns to him like a boomerang. The parasol knocks down the opponent on impact and can hit opponents on its way out or back. The distance traveled by the parasol depends on the strength of the button used.}} | ||
{{MoveListRow | Hitouryuu Baiu Ensatsu Jin | {{DPF}} {{slash}} (requires weapon) | Shizumaru swings his parasol around like a bat, unsheathing the blade, then rises into the air with it. The height of the jump depends on the strength of the button used.}} | {{MoveListRow | Hitouryuu Baiu Ensatsu Jin | {{DPF}} {{slash}} (requires weapon) | Shizumaru swings his parasol around like a bat, unsheathing the blade, then rises into the air with it. The height of the jump depends on the strength of the button used.}} | ||
| Line 176: | Line 176: | ||
{{MoveListRow | Sankaku Tobi | D-Pad in the opposite direction when jumping onto the edge of the screen | Galford can jump off the edges of the screen.}} | {{MoveListRow | Sankaku Tobi | D-Pad in the opposite direction when jumping onto the edge of the screen | Galford can jump off the edges of the screen.}} | ||
{{MoveListRow | Stardust Drop | {{left}}+{{HS}} or {{right}}+{{HS}} in midair (close) | Galford grabs and slams his opponent to the ground.}} | {{MoveListRow | Stardust Drop | {{left}}+{{HS}} or {{right}}+{{HS}} in midair (close) | Galford grabs and slams his opponent to the ground.}} | ||
| − | {{MoveListRow | Plasma | + | {{MoveListRow | Plasma Blade | {{QCF}} {{slash}} | Galford throws two large plasma kunai across the screen. The speed of the projectiles depends on the strength of the button used.}} |
{{MoveListRow | Rush Dog | {{QCB}} {{LS}} | Galford sends his dog Poppy to rush over and charge his opponent, which knocks the opponent over.}} | {{MoveListRow | Rush Dog | {{QCB}} {{LS}} | Galford sends his dog Poppy to rush over and charge his opponent, which knocks the opponent over.}} | ||
{{MoveListRow | Machine Gun Dog | {{QCB}} {{MS}} | Galford sends his dog Poppy to rush over and maul his opponent, which knocks the opponent over.}} | {{MoveListRow | Machine Gun Dog | {{QCB}} {{MS}} | Galford sends his dog Poppy to rush over and maul his opponent, which knocks the opponent over.}} | ||
| Line 186: | Line 186: | ||
{{MoveListRow | Shadow Copy | {{right}} {{HCF}} {{LS}} or {{MS}} | Galford disappears in a cloud of smoke, then two flashing mirror images appear, one on each side of the screen. Galford reappears in place of the leftmost image with {{LS}} or the rightmost image with {{MS}}.}} | {{MoveListRow | Shadow Copy | {{right}} {{HCF}} {{LS}} or {{MS}} | Galford disappears in a cloud of smoke, then two flashing mirror images appear, one on each side of the screen. Galford reappears in place of the leftmost image with {{LS}} or the rightmost image with {{MS}}.}} | ||
{{MoveListRow | Rolling Crush | {{DPF}} {{HS}} (close) | Galford grabs and slams his opponent into the side of the screen, then Poppy hits the opponent with a spin attack on the way down.}} | {{MoveListRow | Rolling Crush | {{DPF}} {{HS}} (close) | Galford grabs and slams his opponent into the side of the screen, then Poppy hits the opponent with a spin attack on the way down.}} | ||
| − | {{MoveListRow | '''Rage:''' Double Mega Strike Heads | {{right}} {{HCF}} {{HS}} or {{kick}} | Galford disappears, then he and a duplicate fall from the air around his opponent and perform a series of sword strikes. Then they carry the opponent into the air and finish with a slam.}} | + | {{MoveListRow | '''Rage:''' Double Mega Strike Heads | {{right}} {{HCF}} {{HS}} or {{kick}} | Galford disappears, then he and a duplicate fall from the air around his opponent and perform a series of sword strikes. Then they carry the opponent into the air and finish with a slam. Galford falls in front of the opponent with {{HS}} or behind the opponent with {{kick}}.}} |
}} | }} | ||
{{hr}} | {{hr}} | ||
| Line 192: | Line 192: | ||
{{MoveListRow | Sankaku Tobi | D-Pad in the opposite direction when jumping onto the edge of the screen | Galford can jump off the edges of the screen.}} | {{MoveListRow | Sankaku Tobi | D-Pad in the opposite direction when jumping onto the edge of the screen | Galford can jump off the edges of the screen.}} | ||
{{MoveListRow | Stardust Drop | {{left}}+{{HS}} or {{right}}+{{HS}} in midair (close) | Galford grabs and slams his opponent to the ground.}} | {{MoveListRow | Stardust Drop | {{left}}+{{HS}} or {{right}}+{{HS}} in midair (close) | Galford grabs and slams his opponent to the ground.}} | ||
| − | {{MoveListRow | Plasma | + | {{MoveListRow | Plasma Blade | {{QCF}} {{slash}} | Galford throws two large plasma kunai across the screen. The speed of the projectiles depends on the strength of the button used.}} |
| − | {{MoveListRow | Plasma | + | {{MoveListRow | Plasma Factor | {{right}}+{{LS}}+{{MS}} (requires weapon) | Galford infuses his sword with plasma and swings it down, which knocks opponents over on impact.}} |
{{MoveListRow | Lightning Slash | {{DPF}} {{slash}} (requires weapon) | Galford runs forward with a rolling kick. If it connects, it knocks the opponent backward, then Galford follows up with a plasma-charged sword slash.}} | {{MoveListRow | Lightning Slash | {{DPF}} {{slash}} (requires weapon) | Galford runs forward with a rolling kick. If it connects, it knocks the opponent backward, then Galford follows up with a plasma-charged sword slash.}} | ||
{{MoveListRow | Replica Attack | {{HCB}} {{LS}}+{{HS}} or {{MS}}+{{kick}} | Galford disappears, then reappears in the air above his opponent, falling with a spinning sword slash. He appears in front of the opponent with {{LS}}+{{HS}} or behind the opponent with {{MS}}+{{kick}}.}} | {{MoveListRow | Replica Attack | {{HCB}} {{LS}}+{{HS}} or {{MS}}+{{kick}} | Galford disappears, then reappears in the air above his opponent, falling with a spinning sword slash. He appears in front of the opponent with {{LS}}+{{HS}} or behind the opponent with {{MS}}+{{kick}}.}} | ||
| Line 236: | Line 236: | ||
| desc=A kabuki artist who mixes his performance style with fighting to create a beautiful combat art. He fights with a naginata. | | desc=A kabuki artist who mixes his performance style with fighting to create a beautiful combat art. He fights with a naginata. | ||
{{MoveListTable | bordercolor=#800000 | desc=Slash (修羅) | | {{MoveListTable | bordercolor=#800000 | desc=Slash (修羅) | | ||
| − | {{MoveListRow | Chikemuri Kuruwa | {{down}}+{{LS}} in midair (requires weapon) | Kyoshiro spins | + | {{MoveListRow | Chikemuri Kuruwa | {{down}}+{{LS}} in midair (requires weapon) | Kyoshiro spins around like a top while holding his naginata out.}} |
| + | {{MoveListRow | Oo Tsunami | {{QCB}} {{slash}} | Kyoshiro spins around and causes a tsunami to roll across the ground. The speed of the wave depends on the strength of the button used.}} | ||
| + | {{MoveListRow | Gama Jigoku | {{right}} {{HCF}} {{LS}}+{{HS}} | Kyoshiro summons a giant toad, which extends its tongue to swallow the opponent. Kyoshiro then leaps on the toad's belly to eject the opponent. This move can only be blocked low.}} | ||
{{MoveListRow | Kaiten Kyokubu: Ten | {{DPF}} {{slash}} (requires weapon) | Kyoshiro rises into the air while spinning like a whirlwind and holding his naginata out. The height and angle increases with the strength of the button used.}} | {{MoveListRow | Kaiten Kyokubu: Ten | {{DPF}} {{slash}} (requires weapon) | Kyoshiro rises into the air while spinning like a whirlwind and holding his naginata out. The height and angle increases with the strength of the button used.}} | ||
{{MoveListRow | Kaen Kyokubu | {{QCF}} {{slash}} | Kyoshiro breathes a tall cloud of flame in front of him, which knocks over his opponent on impact.}} | {{MoveListRow | Kaen Kyokubu | {{QCF}} {{slash}} | Kyoshiro breathes a tall cloud of flame in front of him, which knocks over his opponent on impact.}} | ||
| − | {{MoveListRow | Choubi Jishi | {{ | + | {{MoveListRow | Choubi Jishi | {{HCB}} {{slash}} (requires weapon) | Kyoshiro vaults onto his naginata and kicks forward while radiating with fire, which knocks over his opponent on impact.}} |
| − | |||
| − | |||
{{MoveListRow | Kyoushiro Enbu | {{QCF}} {{QCF}} {{HS}} (requires weapon) | Kyoshiro spins around twice, slashing his naginata downward, then slashes his naginata upward.}} | {{MoveListRow | Kyoushiro Enbu | {{QCF}} {{QCF}} {{HS}} (requires weapon) | Kyoshiro spins around twice, slashing his naginata downward, then slashes his naginata upward.}} | ||
{{MoveListRow | '''Rage:''' Aragotoshi Kyoshiro "Oni no Mai" | {{QCF}} {{QCF}} {{MS}}+{{HS}} | Kyoshiro breathes a cloud of flame that explodes and causes a wave of fire to roll across the ground.}} | {{MoveListRow | '''Rage:''' Aragotoshi Kyoshiro "Oni no Mai" | {{QCF}} {{QCF}} {{MS}}+{{HS}} | Kyoshiro breathes a cloud of flame that explodes and causes a wave of fire to roll across the ground.}} | ||
| Line 247: | Line 247: | ||
{{hr}} | {{hr}} | ||
{{MoveListTable | bordercolor=#000080 | desc=Bust (羅刹) | | {{MoveListTable | bordercolor=#000080 | desc=Bust (羅刹) | | ||
| − | {{MoveListRow | Chikmeuri Kuruwa | {{down}}+{{LS}} in midair (requires weapon) | Kyoshiro spins | + | {{MoveListRow | Chikmeuri Kuruwa | {{down}}+{{LS}} in midair (requires weapon) | Kyoshiro spins around like a top while holding his naginata out.}} |
{{MoveListRow | Kaiten Kyokubu: Chi | {{DPF}} {{slash}} (requires weapon) | Kyoshiro moves across the ground while spinning like a whirlwind and holding his naginata out. The distance traveled depends on the strength of the button used.}} | {{MoveListRow | Kaiten Kyokubu: Chi | {{DPF}} {{slash}} (requires weapon) | Kyoshiro moves across the ground while spinning like a whirlwind and holding his naginata out. The distance traveled depends on the strength of the button used.}} | ||
{{MoveListRow | Kaen Kyokubu: Utage | {{QCF}} {{slash}} | Kyoshiro breathes a long stream of flame in front of him, which knocks over his opponent on impact.}} | {{MoveListRow | Kaen Kyokubu: Utage | {{QCF}} {{slash}} | Kyoshiro breathes a long stream of flame in front of him, which knocks over his opponent on impact.}} | ||
| Line 264: | Line 264: | ||
{{MoveListRow | Hiken Sasameyuki | {{QCB}} {{slash}} (requires weapon) | Ukyo tosses an apple into the air, then rapidly slashes his sword in front of him, destroying the apple. He slashes more times when a stronger button is used.}} | {{MoveListRow | Hiken Sasameyuki | {{QCB}} {{slash}} (requires weapon) | Ukyo tosses an apple into the air, then rapidly slashes his sword in front of him, destroying the apple. He slashes more times when a stronger button is used.}} | ||
{{MoveListRow | Hiken Sasameyuki (Damashi) | {{QCB}} {{kick}} | Ukyo tosses an apple into the air but does not slash his sword. This move is intended as a deception.}} | {{MoveListRow | Hiken Sasameyuki (Damashi) | {{QCB}} {{kick}} | Ukyo tosses an apple into the air but does not slash his sword. This move is intended as a deception.}} | ||
| − | {{MoveListRow | Hiken Oboro Gatana | {{QCF}} {{slash}} (requires weapon) | Ukyo advances with afterimages of himself that perform sword slashes that knock the opponent over. He slashes | + | {{MoveListRow | Hiken Oboro Gatana | {{QCF}} {{slash}} (requires weapon) | Ukyo advances with afterimages of himself that perform sword slashes that knock the opponent over. He slashes one time with {{LS}}, two times with {{MS}}, and three times with {{HS}}.}} |
{{MoveListRow | Hiken Tsubame Gaeshi | {{downleft}} {{QCF}} {{slash}} in midair (requires weapon) | Ukyo slashes his sword in a semicircle, leaving a trail of fire in the air. This move is an overhead attack that can hit characters who are crouch blocking.}} | {{MoveListRow | Hiken Tsubame Gaeshi | {{downleft}} {{QCF}} {{slash}} in midair (requires weapon) | Ukyo slashes his sword in a semicircle, leaving a trail of fire in the air. This move is an overhead attack that can hit characters who are crouch blocking.}} | ||
{{MoveListRow | Hiken Amatsu Kaze | {{HCB}} {{HS}}, then {{LS}} (requires weapon) | Ukyo charges his sword with fire. When {{LS}} is pressed, he runs forward and jumps over his opponent with an overhead slash (which can be avoided by ducking).}} | {{MoveListRow | Hiken Amatsu Kaze | {{HCB}} {{HS}}, then {{LS}} (requires weapon) | Ukyo charges his sword with fire. When {{LS}} is pressed, he runs forward and jumps over his opponent with an overhead slash (which can be avoided by ducking).}} | ||
| Line 276: | Line 276: | ||
{{MoveListRow | Hiken Tsubame Gaeshi | {{downleft}} {{QCF}} {{slash}} in midair (requires weapon) | Ukyo slashes his sword in a semicircle, leaving a trail of fire in the air. This move is an overhead attack that can hit characters who are crouch blocking.}} | {{MoveListRow | Hiken Tsubame Gaeshi | {{downleft}} {{QCF}} {{slash}} in midair (requires weapon) | Ukyo slashes his sword in a semicircle, leaving a trail of fire in the air. This move is an overhead attack that can hit characters who are crouch blocking.}} | ||
{{MoveListRow | Hiken Kagerou | {{DPF}} {{slash}} (requires weapon) | Ukyo slashes the air, causing a wave-like projectile to travel across the screen. The stronger versions travel faster but have a longer startup time.}} | {{MoveListRow | Hiken Kagerou | {{DPF}} {{slash}} (requires weapon) | Ukyo slashes the air, causing a wave-like projectile to travel across the screen. The stronger versions travel faster but have a longer startup time.}} | ||
| − | {{MoveListRow | Hiken Yume Gasumi | {{downright}} {{QCB}} {{right}} {{HS}} (requires weapon) | Ukyo holds his partially sheathed sword in front of him in a defensive pose. If he is hit by a mid-level attack, he | + | {{MoveListRow | Hiken Yume Gasumi | {{downright}} {{QCB}} {{right}} {{HS}} (requires weapon) | Ukyo holds his partially sheathed sword in front of him in a defensive pose. If he is hit by a mid-level attack, he parries the attack, then slashes the opponent away.}} |
{{MoveListRow | '''Rage:''' Musou Zankou Ka | {{right}} {{left}} {{right}} {{HS}}+{{kick}} (requires weapon) | Ukyo runs around his opponent in a blur while slashing his sword. As he stops to sheathe his sword, the slashes hit the opponent.}} | {{MoveListRow | '''Rage:''' Musou Zankou Ka | {{right}} {{left}} {{right}} {{HS}}+{{kick}} (requires weapon) | Ukyo runs around his opponent in a blur while slashing his sword. As he stops to sheathe his sword, the slashes hit the opponent.}} | ||
}} | }} | ||
| Line 290: | Line 290: | ||
{{MoveListRow | Rupush Tek Num (Chiu) | {{HCB}} {{MS}} (close) | Rimururu freezes her opponent, then shoves them to the ground. This move is a grab that cannot be blocked.}} | {{MoveListRow | Rupush Tek Num (Chiu) | {{HCB}} {{MS}} (close) | Rimururu freezes her opponent, then shoves them to the ground. This move is a grab that cannot be blocked.}} | ||
{{MoveListRow | Konru Nonno | {{DPF}} {{LS}} | Rimururu creates an ice lotus that flies straight upwards.}} | {{MoveListRow | Konru Nonno | {{DPF}} {{LS}} | Rimururu creates an ice lotus that flies straight upwards.}} | ||
| + | {{MoveListRow | Konru Memu | {{left}} {{downleft}} {{down}} {{LS}} | Rimururu creates an ice puddle in front of her, which does no damage but causes her opponent to slip when walking over it, stunning them momentarily.}} | ||
{{MoveListRow | Kamui Shituki | {{QCB}} {{right}} {{HS}} | Rimururu creates an ice barrier in front of her. It hurts her opponent if the opponent touches or tries to attack it, and it reflects projectiles.}} | {{MoveListRow | Kamui Shituki | {{QCB}} {{right}} {{HS}} | Rimururu creates an ice barrier in front of her. It hurts her opponent if the opponent touches or tries to attack it, and it reflects projectiles.}} | ||
| − | |||
{{MoveListRow | Konru Shiraru | {{right}} {{downright}} {{down}} {{LS}} in midair | Rimururu creates an ice platform beneath herself in midair, which then falls and harms her opponent if it hits. Rimururu can jump off it or fall with it.}} | {{MoveListRow | Konru Shiraru | {{right}} {{downright}} {{down}} {{LS}} in midair | Rimururu creates an ice platform beneath herself in midair, which then falls and harms her opponent if it hits. Rimururu can jump off it or fall with it.}} | ||
{{MoveListRow | '''Rage:''' Rupush Kamui Emush | {{HCB}} {{HCB}} {{HS}}+{{kick}} | Rimururu jumps into the air, then shoots an ice block diagonally downwards that grows into a huge ice block when it hits the ground.}} | {{MoveListRow | '''Rage:''' Rupush Kamui Emush | {{HCB}} {{HCB}} {{HS}}+{{kick}} | Rimururu jumps into the air, then shoots an ice block diagonally downwards that grows into a huge ice block when it hits the ground.}} | ||
| Line 298: | Line 298: | ||
{{MoveListTable | bordercolor=#000080 | desc=Bust (羅刹) | | {{MoveListTable | bordercolor=#000080 | desc=Bust (羅刹) | | ||
{{MoveListRow | Sankaku Tobi | D-Pad in the opposite direction when jumping onto the edge of the screen | Rimururu can jump off the edges of the screen.}} | {{MoveListRow | Sankaku Tobi | D-Pad in the opposite direction when jumping onto the edge of the screen | Rimururu can jump off the edges of the screen.}} | ||
| − | {{MoveListRow | Rupushi Tum | {{right}}+{{LS}}+{{MS}} | Rimururu slices her frozen kodachi upward.}} | + | {{MoveListRow | Rupush Kuare | {{QCF}} {{slash}} | Rimururu tosses an icy spiked ball in an arc, which explodes into an ice flower after hitting the ground or reaching the end of its travel. The opponent is frozen for a moment if they touch the ice flower (but not the icy spiked ball). The angle of the arc depends on the strength of the button used, with {{LS}} being the lowest and {{HS}} being the closest to 45°.}} |
| + | {{MoveListRow | Rupushi Tum | {{right}}+{{LS}}+{{MS}} | Rimururu slices her frozen kodachi upward, which freezes her opponent momentarily.}} | ||
{{MoveListRow | Upun Op | {{repeat|{{slash}}}} | Rimururu creates a wall of icy spears in front of her, then pushes them a short distance forward as one large ice spear.}} | {{MoveListRow | Upun Op | {{repeat|{{slash}}}} | Rimururu creates a wall of icy spears in front of her, then pushes them a short distance forward as one large ice spear.}} | ||
| − | {{MoveListRow | | + | {{MoveListRow | Konru Memu | {{left}} {{downleft}} {{down}} {{LS}} | Rimururu creates an ice puddle in front of her, which does no damage but causes her opponent to slip when walking over it, stunning them momentarily.}} |
{{MoveListRow | Rupush Tek Num (Yaku) | {{HCB}} {{kick}} (close) | Rimururu freezes her opponent, then kicks them twice. This move is a grab that cannot be blocked.}} | {{MoveListRow | Rupush Tek Num (Yaku) | {{HCB}} {{kick}} (close) | Rimururu freezes her opponent, then kicks them twice. This move is a grab that cannot be blocked.}} | ||
| − | |||
{{MoveListRow | Konru Shiraru | {{right}} {{downright}} {{down}} {{LS}} in midair | Rimururu creates an ice platform beneath herself in midair, which then falls and harms her opponent if it hits. Rimururu can jump off it or fall with it.}} | {{MoveListRow | Konru Shiraru | {{right}} {{downright}} {{down}} {{LS}} in midair | Rimururu creates an ice platform beneath herself in midair, which then falls and harms her opponent if it hits. Rimururu can jump off it or fall with it.}} | ||
{{MoveListRow | '''Rage:''' Rupush Kamui Emushi | {{HCB}} {{HCB}} {{HS}}+{{kick}} | Rimururu jumps into the air, then shoots an ice block diagonally downwards that grows into a huge ice block when it hits the ground.}} | {{MoveListRow | '''Rage:''' Rupush Kamui Emushi | {{HCB}} {{HCB}} {{HS}}+{{kick}} | Rimururu jumps into the air, then shoots an ice block diagonally downwards that grows into a huge ice block when it hits the ground.}} | ||
| Line 314: | Line 314: | ||
{{MoveListTable | bordercolor=#800000 | desc=Slash (修羅) | | {{MoveListTable | bordercolor=#800000 | desc=Slash (修羅) | | ||
{{MoveListRow | Sankaku Tobi | D-Pad in the opposite direction when jumping onto the edge of the screen | Nakoruru can jump off the edges of the screen.}} | {{MoveListRow | Sankaku Tobi | D-Pad in the opposite direction when jumping onto the edge of the screen | Nakoruru can jump off the edges of the screen.}} | ||
| − | {{MoveListRow | Lela Kishima Tek | {{left}}+{{HS}} or {{right}}+{{HS}} in midair (close | + | {{MoveListRow | Lela Kishima Tek | {{left}}+{{HS}} or {{right}}+{{HS}} in midair (close) | Nakoruru grabs and slams her opponent to the ground.}} |
| − | {{MoveListRow | Kamui Fum Kesupu | {{down}}+{{kick}} or {{right}}+{{kick}} in midair | + | {{MoveListRow | Kamui Fum Kesupu | {{down}}+{{kick}} or {{right}}+{{kick}} in midair | Nakoruru does an axe kick in the air. This move is an overhead attack that can hit characters who are crouch blocking.}} |
{{MoveListRow | Annu Mutsube | {{left}} {{downleft}} {{down}} {{slash}} (requires weapon) | Nakoruru flies along the ground while holding her kodachi in front of her, which knocks over and slides to the other side of her opponent. The distance traveled depends on the strength of the button used. This move can only be blocked low.}} | {{MoveListRow | Annu Mutsube | {{left}} {{downleft}} {{down}} {{slash}} (requires weapon) | Nakoruru flies along the ground while holding her kodachi in front of her, which knocks over and slides to the other side of her opponent. The distance traveled depends on the strength of the button used. This move can only be blocked low.}} | ||
{{MoveListRow | Lela Mutsube | {{QCF}} {{slash}} (requires weapon) | Nakoruru flies into the air while holding her kodachi in front of her. The distance and the height traveled depends on the strength of the button used.}} | {{MoveListRow | Lela Mutsube | {{QCF}} {{slash}} (requires weapon) | Nakoruru flies into the air while holding her kodachi in front of her. The distance and the height traveled depends on the strength of the button used.}} | ||
| Line 330: | Line 330: | ||
{{MoveListTable | bordercolor=#000080 | desc=Bust (羅刹) | | {{MoveListTable | bordercolor=#000080 | desc=Bust (羅刹) | | ||
{{MoveListRow | Sankaku Tobi | D-Pad in the opposite direction when jumping onto the edge of the screen | Nakoruru can jump off the edges of the screen.}} | {{MoveListRow | Sankaku Tobi | D-Pad in the opposite direction when jumping onto the edge of the screen | Nakoruru can jump off the edges of the screen.}} | ||
| − | {{MoveListRow | Lela Kishima Tek | {{left}}+{{HS}} or {{right}}+{{HS}} in midair (close | + | {{MoveListRow | Lela Kishima Tek | {{left}}+{{HS}} or {{right}}+{{HS}} in midair (close) | Nakoruru grabs and slams her opponent to the ground.}} |
| − | {{MoveListRow | Kamui Fum Kesupu | {{down}}+{{kick}} or {{right}}+{{kick}} in midair | + | {{MoveListRow | Kamui Fum Kesupu | {{down}}+{{kick}} or {{right}}+{{kick}} in midair | Nakoruru does an axe kick in the air. This move is an overhead attack that can hit characters who are crouch blocking.}} |
{{MoveListRow | Annu Mutsube | {{left}} {{downleft}} {{down}} {{slash}} (requires weapon) | Nakoruru flies along the ground while holding her kodachi in front of her, which knocks over and slides to the other side of her opponent. The distance traveled depends on the strength of the button used. This move can only be blocked low.}} | {{MoveListRow | Annu Mutsube | {{left}} {{downleft}} {{down}} {{slash}} (requires weapon) | Nakoruru flies along the ground while holding her kodachi in front of her, which knocks over and slides to the other side of her opponent. The distance traveled depends on the strength of the button used. This move can only be blocked low.}} | ||
{{MoveListRow | Lela Mutsube | {{QCF}} {{slash}} (requires weapon) | Nakoruru flies into the air while holding her kodachi in front of her. The distance and the height traveled depends on the strength of the button used.}} | {{MoveListRow | Lela Mutsube | {{QCF}} {{slash}} (requires weapon) | Nakoruru flies into the air while holding her kodachi in front of her. The distance and the height traveled depends on the strength of the button used.}} | ||
| Line 354: | Line 354: | ||
{{MoveListRow | Ninpou Bakuen Ryu: Kai | {{QCB}} {{slash}} | Hanzo summons a fire dragon, which moves across the ground like a wave, then returns after it reaches the end of its travel. It knocks over the opponent on impact. The speed and distance traveled depends on the strength of the button used.}} | {{MoveListRow | Ninpou Bakuen Ryu: Kai | {{QCB}} {{slash}} | Hanzo summons a fire dragon, which moves across the ground like a wave, then returns after it reaches the end of its travel. It knocks over the opponent on impact. The speed and distance traveled depends on the strength of the button used.}} | ||
{{MoveListRow | Ninpou Reppuu Shuriken | {{QCF}} {{slash}} in midair | Hanzo throws shuriken diagonally downwards. He throws one shuriken with {{LS}}, two shuriken with {{MS}}, or three shuriken with {{HS}}.}} | {{MoveListRow | Ninpou Reppuu Shuriken | {{QCF}} {{slash}} in midair | Hanzo throws shuriken diagonally downwards. He throws one shuriken with {{LS}}, two shuriken with {{MS}}, or three shuriken with {{HS}}.}} | ||
| − | {{MoveListRow | Ninpou Kage Bunshin | {{right}} {{HCF}} {{LS}} or {{MS}} | Hanzo disappears in a cloud of smoke, then two flashing mirror images appear, one on each side of the screen. | + | {{MoveListRow | Ninpou Kage Bunshin | {{right}} {{HCF}} {{LS}} or {{MS}} | Hanzo disappears in a cloud of smoke, then two flashing mirror images appear, one on each side of the screen. Hanzo reappears in place of the leftmost image with {{LS}} or the rightmost image with {{MS}}.}} |
{{MoveListRow | Ninpou Kage: Shizune | {{down}} {{down}}+{{LS}} | Hanzo disappears in a cloud of smoke, then reappears in the same position.}} | {{MoveListRow | Ninpou Kage: Shizune | {{down}} {{down}}+{{LS}} | Hanzo disappears in a cloud of smoke, then reappears in the same position.}} | ||
{{MoveListRow | Ninpou Utsusemi Chizan | {{HCF}} {{MS}}+{{HS}}+{{kick}} | Hanzo disappears in a cloud of smoke, then reappears in front of his opponent with a low slash that sweeps his opponent. This move can only be blocked low.}} | {{MoveListRow | Ninpou Utsusemi Chizan | {{HCF}} {{MS}}+{{HS}}+{{kick}} | Hanzo disappears in a cloud of smoke, then reappears in front of his opponent with a low slash that sweeps his opponent. This move can only be blocked low.}} | ||
| Line 369: | Line 369: | ||
{{MoveListRow | Ninpou Bakuen Ryu: Kai | {{QCB}} {{slash}} | Hanzo summons a fire dragon, which moves across the ground like a wave, then returns after it reaches the end of its travel. It knocks over the opponent on impact. The speed and distance traveled depends on the strength of the button used.}} | {{MoveListRow | Ninpou Bakuen Ryu: Kai | {{QCB}} {{slash}} | Hanzo summons a fire dragon, which moves across the ground like a wave, then returns after it reaches the end of its travel. It knocks over the opponent on impact. The speed and distance traveled depends on the strength of the button used.}} | ||
{{MoveListRow | Ninpou Reppuu Shuriken | {{QCF}} {{slash}} in midair | Hanzo throws shuriken diagonally downwards. He throws one shuriken with {{LS}}, two shuriken with {{MS}}, or three shuriken with {{HS}}.}} | {{MoveListRow | Ninpou Reppuu Shuriken | {{QCF}} {{slash}} in midair | Hanzo throws shuriken diagonally downwards. He throws one shuriken with {{LS}}, two shuriken with {{MS}}, or three shuriken with {{HS}}.}} | ||
| − | {{MoveListRow | Ninpou Kage Bunshin | {{right}} {{HCF}} {{LS}} or {{MS}} | Hanzo disappears in a cloud of smoke, then two flashing mirror images appear, one on each side of the screen. | + | {{MoveListRow | Ninpou Kage Bunshin | {{right}} {{HCF}} {{LS}} or {{MS}} | Hanzo disappears in a cloud of smoke, then two flashing mirror images appear, one on each side of the screen. Hanzo reappears in place of the leftmost image with {{LS}} or the rightmost image with {{MS}}.}} |
{{MoveListRow | Ninpou Kage: Shizune | {{down}} {{down}}+{{LS}} | Hanzo disappears in a cloud of smoke, then reappears in the same position.}} | {{MoveListRow | Ninpou Kage: Shizune | {{down}} {{down}}+{{LS}} | Hanzo disappears in a cloud of smoke, then reappears in the same position.}} | ||
{{MoveListRow | Ninpou Utsusemi Chizan | {{HCF}} {{MS}}+{{HS}}+{{kick}} | Hanzo disappears in a cloud of smoke, then reappears in front of his opponent with a low slash that sweeps his opponent. This move can only be blocked low.}} | {{MoveListRow | Ninpou Utsusemi Chizan | {{HCF}} {{MS}}+{{HS}}+{{kick}} | Hanzo disappears in a cloud of smoke, then reappears in front of his opponent with a low slash that sweeps his opponent. This move can only be blocked low.}} | ||
Revision as of 04:41, 22 February 2024
| Samurai Spirits Zankurou Musouken | |||||||||||||||
|---|---|---|---|---|---|---|---|---|---|---|---|---|---|---|---|
| System(s): Sega Saturn | |||||||||||||||
| Publisher: SNK | |||||||||||||||
| Developer: SIMS | |||||||||||||||
| Supporting companies: Sega Digital Media[1] (audio) | |||||||||||||||
| Original system(s): Neo Geo | |||||||||||||||
| Developer(s) of original games: SNK | |||||||||||||||
| Sound driver: SCSP/CD-DA (36 tracks) | |||||||||||||||
| Peripherals supported: Extended RAM Cartridge (1MB/4MB) | |||||||||||||||
| Genre: Fighting Action/Kakutou Action (格闘アクション)[2], Action[3] | |||||||||||||||
| Number of players: 1-2 | |||||||||||||||
| |||||||||||||||
|

Samurai Spirits Zankurou Musouken (サムライスピリッツ 斬紅郎無双剣) is a 2D fighting game developed by SNK as part of the Samurai Spirits series. It was originally released for the Neo Geo in late 1995, then ported to the Sega Saturn nearly a full year later in 1996. The game requires an Extended RAM Cartridge to play.
Contents
Story
The first part of a two-chapter story that is chronologically set between the events of Samurai Spirits and Shin Samurai Spirits: Haohmaru Jigokuhen (Samurai Shodown and Samurai Shodown II in the West), the game follows the journey of a young semi-amnesic boy named Shizumaru Hisame. He and many other warriors seek out the powerful and dangerous swordsman Zankuro Minazuki, called "The Demon," for their own personal reasons.
Gameplay


The game is the third in a series of weapons-based fighting game set in Sakoku-period Japan. This entry has a notably darker aesthetic compared to its predecessors and introduces two selectable alignments for each character. Four new characters have been introduced, but several characters from the previous games have been left out. The game changes the control scheme from two pairs of weak and normal attack buttons, one for slashes and one for kicks (with the player able to press weak and normal together for a heavy attack), to three slash buttons and a single kick. It also adds a dodge mechanic.
As before, matches are fought to the best of three rounds. Each round is timed (with the winner being the combatant with the most vitality remaining if time runs out). If the battle goes to four rounds, both characters start with full POW gauges on the final round. Both players lose if the fourth round ends in a draw or a tie. Occasionally, pieces of chicken are thrown into the battlefield, which restore partial vitality for a character when walked over. Sometimes bombs are thrown over instead, usually when a character has not moved enough for a while. Bombs explode and harm either fighter but can be blocked without taking damage.
Characters move with ![]() or
or ![]() . They backstep or dash with
. They backstep or dash with ![]()
![]() or
or ![]()
![]() . They jump upward with
. They jump upward with ![]() and jump behind and ahead with
and jump behind and ahead with ![]() or
or ![]() . They crouch with
. They crouch with ![]() . Characters can slash (or punch if disarmed) with
. Characters can slash (or punch if disarmed) with ![]() (weak),
(weak), ![]() (normal), or
(normal), or ![]() (heavy) and kick with
(heavy) and kick with ![]() . Attacks can be done while standing, crouching, jumping, or dashing. Dashing heavy slashes have slow startup but cannot be blocked. Performing a counter-hit (hitting the opponent while the opponent is attacking) does extra damage. Characters can dodge attacks with
. Attacks can be done while standing, crouching, jumping, or dashing. Dashing heavy slashes have slow startup but cannot be blocked. Performing a counter-hit (hitting the opponent while the opponent is attacking) does extra damage. Characters can dodge attacks with ![]() (or
(or ![]() +
+![]() ), which causes the character to lean into the background, causing any attacks made in that moment to miss. If the character is close to the opponent, instead of dodging, the character passes to the other side of the opponent.
), which causes the character to lean into the background, causing any attacks made in that moment to miss. If the character is close to the opponent, instead of dodging, the character passes to the other side of the opponent.
When characters slash each other at the same time or dash into each other (when both armed), they lock swords. Players must press the slash buttons rapidly to break the lock, with the player who loses the hold (by not pressing the buttons as fast as the opposing player) having the character knocked back and disarmed. A character can equip his or her weapon again by pressing a slash button while standing next to it. In addition to their standard attacks, characters can perform special moves using specific button combinations (though many special moves cannot be performed if the character is disarmed).
Guarding is done by holding the D-Pad away from the opponent. Guarding can be done while standing or crouching and can also be done in midair. Most attacks can be blocked while standing or crouching, but some attacks must specifically be blocked high or low. Characters can become dizzy and stunned momentarily after taking repeated damage; they can recover more quickly by moving the D-Pad and pressing buttons rapidly. Every character has a sweep kick performed with ![]() +
+![]() (or
(or ![]() +
+![]() when facing left) that can only be blocked crouching and an overhead move performed with
when facing left) that can only be blocked crouching and an overhead move performed with ![]() (or
(or ![]() +
+![]() ) that can only be blocked standing. Characters can throw an opponent by holding
) that can only be blocked standing. Characters can throw an opponent by holding ![]() or
or ![]() while pressing the heavy slash button in close range. Throws cannot be blocked. After a character has been knocked down, the character can roll away by pressing
while pressing the heavy slash button in close range. Throws cannot be blocked. After a character has been knocked down, the character can roll away by pressing ![]() or
or ![]() .
.
Each character has a "POW" (怒) gauge that fills as the player is hit by enemy attacks or guards against an attack. The gauge can also be filled by holding ![]() +
+![]() +
+![]() , though the character is vulnerable to attack while doing this. When the gauge is full, the character begins to flash and attacks with increased strength for a duration. The character can perform special "Rage" moves for as long as the gauge stays filled, which are powerful super moves that do heavy damage and disarm the opponent. These moves require special button combinations or can be performed automatically by pressing
, though the character is vulnerable to attack while doing this. When the gauge is full, the character begins to flash and attacks with increased strength for a duration. The character can perform special "Rage" moves for as long as the gauge stays filled, which are powerful super moves that do heavy damage and disarm the opponent. These moves require special button combinations or can be performed automatically by pressing ![]() . Since they do not drain the gauge, they can potentially be used multiple times before the gauge drains.
. Since they do not drain the gauge, they can potentially be used multiple times before the gauge drains.
Modes

In the single-player mode, the player chooses any of the twelve selectable characters and the character's alignment and then fights every character, including a fight against the referee Kuroko (who transforms into the player's chosen character but with the opposite alignment) midway through the game. The game ends with a battle agains the final boss Zankuro Minazuki. There are eight difficulty levels. A second player can enter the game by pressing START on a second control pad.
There is also a dedicated two-player mode where two players can fight each other in single matches. Zankuro is playable in this mode after completing the game at least once.
In either mode, after choosing a character, the player can choose between two versions of the character: 修羅 (localized as "Slash" in other releases of the game, the chivalrous alignment) or 羅刹 ("Bust," the treacherous alignment). Slash is the "normal" version of the character, while Bust is a darker version with a modified moveset. Then the player chooses between three experience levels: 剣聖 (localized as "Upper Grade"), 剣豪 ("Medium Grade"), or 剣客 ("Beginner Grade"). Upper Grade gives the player a permanently full POW gauge (so the fighter always does increased damage and can perform unlimited "Rage" moves), though the character cannot block (but can still dodge). Medium Grade is the normal game. The character can block, and the POW gauge fills normally. Beginner Grade gives the player five auto-guards (the computer blocks for the player when the character is not attacking), but the POW gauge can only be charged by holding ![]() +
+![]() +
+![]() (which takes twice as long) and does not fill when the character is attacked.
(which takes twice as long) and does not fill when the character is attacked.
There are also options for setting the attack damage (0% for no damage, 30%, 50%, 100%, 200%, or "MAX" for one-hit kills), the time limit for each round (30, 60, or 99 seconds or unlimited), and the POW meter (normal for empty or "MAX" for full). After completing the game, there is a Stage Select option that lets the player choose which fight to start from (1 through 12, Last Stage for the final battle against Zankuro, or Ending for the selected character's ending). The game saves that it has been completed to the Saturn's internal memory.
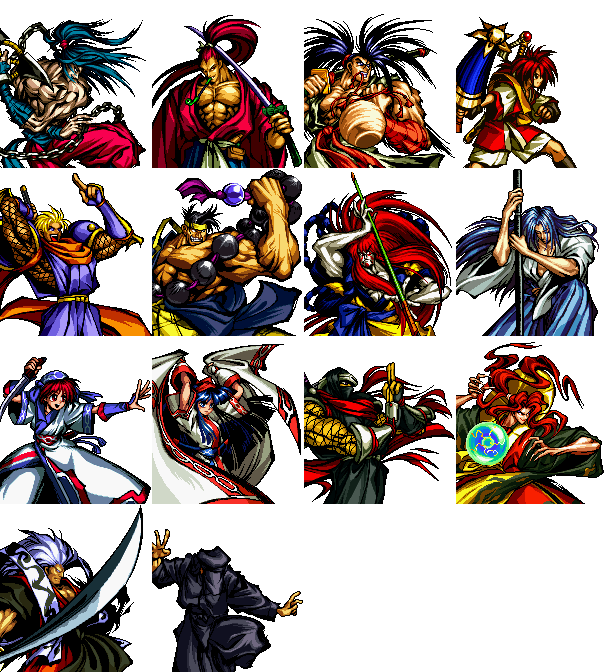
Characters
Move lists assume the player is facing right. If facing left, ![]() and
and ![]() should be reversed. S refers to any of the slash or punch buttons, while K refers to the kick button.
should be reversed. S refers to any of the slash or punch buttons, while K refers to the kick button.
Genjuro was introduced in the previous game (not ported to any Sega console). Basara, Shizumaru, Gaira, and Rimururu are new characters introduced in this game. Amakusa, the boss of the first game, is now a normally playable character.
|
Basara | |||||||||||||||||||||||||||||||||||||||||||||||||||||||||||||||||||||||||||||||||||
A yuurei who was murdered, along with his lover Kagaribi, by the possessed swordsman Zankuro. He was mysteriously brought back to life and seeks revenge. He fights using a large, three-bladed shuriken attached to a chain.
| ||||||||||||||||||||||||||||||||||||||||||||||||||||||||||||||||||||||||||||||||||||
|
Genjuro Kibagami | |||||||||||||||||||||||||||||||||||||||||||||||||||||||||||||||||||||||||||||||||||
A merciless ronin who fights only for his love of violence and killing. He is a foil to Haohmaru and was trained by the same master. He wields a katana.
| ||||||||||||||||||||||||||||||||||||||||||||||||||||||||||||||||||||||||||||||||||||
|
Haohmaru | |||||||||||||||||||||||||||||||||||||||||||||||||||||||||||||||||||||||||||||||||||
A wandering samurai who fights to improve himself and to challenge evildoers. He wields a katana.
| ||||||||||||||||||||||||||||||||||||||||||||||||||||||||||||||||||||||||||||||||||||
|
Shizumaru Hisame | |||||||||||||||||||||||||||||||||||||||||||||||||||||||||||||||||||||||||||||||||||
An adolescent boy who has partially lost his memory and believes he has a "demon" residing within him. He wants vengeance because he believes that Zankuro murdered his family. He fights with a sword sheathed in a parasol.
| ||||||||||||||||||||||||||||||||||||||||||||||||||||||||||||||||||||||||||||||||||||
|
Galford D. Weller | |||||||||||||||||||||||||||||||||||||||||||||||||||||||||||||||||||||||||||||||||||
An American sailor who traveled to Japan to learn ninjutsu. He fights with his pet husky, Poppy (in Slash form only), and wields a ninjatou.
| ||||||||||||||||||||||||||||||||||||||||||||||||||||||||||||||||||||||||||||||||||||
|
Gaira Caffeine | |||||||||||||||||||||||||||||||||||||||||||||||||||||||||||||||||||||||||||||||||||
A Buddhist monk in training and the nephew of Nicotine Caffeine, a master swordsman who trained Haohmaru and Genjuro. He fights with a necklace of giant prayer beads.
| ||||||||||||||||||||||||||||||||||||||||||||||||||||||||||||||||||||||||||||||||||||
|
Kyoshiro Senryo | |||||||||||||||||||||||||||||||||||||||||||||||||||||||||||||||||||||||||||||||||||
A kabuki artist who mixes his performance style with fighting to create a beautiful combat art. He fights with a naginata.
| ||||||||||||||||||||||||||||||||||||||||||||||||||||||||||||||||||||||||||||||||||||
|
Ukyo Tachibana | |||||||||||||||||||||||||||||||||||||||||||||||||||||||||||||||||||||||||||||||||||
An expert iaijutsu swordsman who is suffering from tuberculosis. He vows revenge against the demonic Zankuro for slaughtering the disciples of his old training dojo. He wields a sword.
| ||||||||||||||||||||||||||||||||||||||||||||||||||||||||||||||||||||||||||||||||||||
|
Rimururu | |||||||||||||||||||||||||||||||||||||||||||||||||||||||||||||||||||||||||||||||||||
A priestess and the younger sister of Nakoruru. She can summon and control the ice spirit Konru and wields a kodachi (a short sword).
| ||||||||||||||||||||||||||||||||||||||||||||||||||||||||||||||||||||||||||||||||||||
|
Nakoruru | |||||||||||||||||||||||||||||||||||||||||||||||||||||||||||||||||||||||||||||||||||
A young girl who is a guardian of nature. She fights with her pet hawk, Mamahaha (in Slash form), or her wolf companion, Shikuruu (in Bust form), and wields a kodachi (a short sword).
| ||||||||||||||||||||||||||||||||||||||||||||||||||||||||||||||||||||||||||||||||||||
|
Hanzo Hattori | |||||||||||||||||||||||||||||||||||||||||||||||||||||||||||||||||||||||||||||||||||
A serious ninja and a master of stealth and deception. He fights with a ninjato.
| ||||||||||||||||||||||||||||||||||||||||||||||||||||||||||||||||||||||||||||||||||||
|
Shiro Tokisada Amakusa | |||||||||||||||||||||||||||||||||||||||||||||||||||||||||||||||||||||||||||||||||||
A powerful sorcerer who was resurrected by the dark god Ambrosia, then freed from his wicked possession.
|
Bosses
- Main article: Samurai Spirits Zankurou Musouken/Hidden content.
Zankuro is playable in the two-player versus mode after the player has completed the game with any other character.
|
Kuroko | ||||||||||||||||||||||||||
| The referee from the earlier games appears as a mid-boss after the player has defeated five opponents. Rather than being a unique character, he simply takes the form of the player's chosen character but with the opposite alignment. | |||||||||||||||||||||||||||
|
Zankuro Minazuki | ||||||||||||||||||||||||||
| A formidable swordsman who has been possessed by a demon and filled with bloodlust. He wields a zanbatou (a large sword). He is the final boss. After he is defeated in the first match, he returns with a full power meter and must be defeated again in a one-round final match (which cannot be won by a time over).
Though he has both Slash and Bust alignments selectable, they have the same moveset and differ only in appearance.
|
Stages
Each character has his or her own stage where battles are hosted.


Music and sound
CD audio tracks 32 to 35 contain vocal tracks where Nakoruru and Rimururu promote the Samurai Spirits RPG, Shinsetsu Samurai Spirits Bushidou Retsuden.
History
Release
Zankurou Musouken is the third main entry in the series. Had it been released in the Western world, it would have likely used the name Samurai Shodown III: Blades of Blood, like other ports.
Production credits
| This article needs a list of production credits, either from the game itself, a manual, or other reliable source. Source: Samurai Spirits III Saturn credits.pdf |
Magazine articles
- Main article: Samurai Spirits Zankurou Musouken/Magazine articles.
Promotional material
also published in:
- Sega Saturn Magazine (JP) #1996-20: "1996-20 (1996-11-22)" (1996-11-08)[5]

Physical scans
| Sega Retro Average | |||||||||||||||||||||||||||||||||||||||||||||||||
|---|---|---|---|---|---|---|---|---|---|---|---|---|---|---|---|---|---|---|---|---|---|---|---|---|---|---|---|---|---|---|---|---|---|---|---|---|---|---|---|---|---|---|---|---|---|---|---|---|---|
|
| 75 | |
|---|---|
| Based on 9 reviews | |
| Saturn, JP |
|---|
  Cover
|
Spinecard  Disc Manual |
| Saturn, JP (1MB RAM Pack) |
|---|
 _Saturn_JP_Box_Front_ST%E5%89%AF%E6%9C%AC.jpg) Cover
|
 Disc _Saturn_JP_Box_F_ront.jpg) Jewel Case |
Technical information
- Main article: Samurai Spirits Zankurou Musouken/Technical information.
References
- ↑ http://www.wave-master.com/wm/works/index.html (Wayback Machine: 2004-05-19 20:54)
- ↑ File:SSZM Saturn JP Box Back.jpg
- ↑ 3.0 3.1 https://sega.jp/fb/segahard/ss/soft_licensee2.html (Wayback Machine: 2020-03-20 23:05)
- ↑ 4.0 4.1 4.2 Sega Saturn Magazine, "1996-19 (1996-11-08)" (JP; 1996-10-25), page 115
- ↑ Sega Saturn Magazine, "1996-20 (1996-11-22)" (JP; 1996-11-08), page 6
- ↑ Consoles +, "Janvier 1997" (FR; 199x-xx-xx), page 122
- ↑ Famitsu, "1996-11-08,15" (JP; 1996-10-25), page 1
- ↑ Fun Generation, "01/97" (DE; 1996-12-18), page 94
- ↑ MAN!AC, "01/97" (DE; 1996-12-11), page 64
- ↑ Mega Force, "Janvier/Février 1997" (FR; 199x-xx-xx), page 50
- ↑ Saturn Fan, "1996 No. 25" (JP; 1996-11-29), page 180
- ↑ Saturn Fan, "1996 No. 26" (JP; 1996-12-13), page 70
- ↑ Sega Saturn Magazine, "1996-19 (1996-11-08)" (JP; 1996-10-25), page 232
- ↑ Sega Saturn Magazine, "Readers rating final data" (JP; 2000-03), page 13
| Samurai Spirits Zankurou Musouken | |
|---|---|
|
Main page | Hidden content | Magazine articles | Reception | Technical information | |
| Samurai Shodown/Samurai Spirits games for Sega systems | |
|---|---|
| Samurai Shodown (1994) | |
| Samurai Shodown (1994) | |
| Samurai Shodown (1995) | |
| Samurai Spirits Zankurou Musouken (1996) | Shinsetsu Samurai Spirits Bushidou Retsuden (1997) | Samurai Spirits Amakusa Kourin (1997) | Samurai Spirits Best Collection (1998) | |
| Nakoruru: Anohito Kara no Okurimono (2002) | |
| Samurai Spirits Tenkaichi Kenkakuden (2005) | |
| Unlicensed Samurai Shodown/Samurai Spirits games for Sega systems | |
| Soul Edge vs. Samurai Spirits (1997) | Shin Samurai Spirits Haohmaru Jigokuhen (1998) | |