Difference between revisions of "Samurai Spirits Zankurou Musouken"
From Sega Retro
| (4 intermediate revisions by 2 users not shown) | |||
| Line 39: | Line 39: | ||
As before, matches are fought to the best of three rounds. Characters can move (but not attack) before the round begins. Each round is timed (with the winner being the combatant with the most health remaining if time runs out). If the battle goes to four rounds, both characters start with full POW gauges and fight a shortened final round. Both players lose if the fourth round ends in a draw or a tie. Occasionally, pieces of meat are thrown into the battlefield, which restore partial health for a character when walked over. Sometimes bombs are thrown over instead, which explode and harm either fighter but can be blocked without taking damage. | As before, matches are fought to the best of three rounds. Characters can move (but not attack) before the round begins. Each round is timed (with the winner being the combatant with the most health remaining if time runs out). If the battle goes to four rounds, both characters start with full POW gauges and fight a shortened final round. Both players lose if the fourth round ends in a draw or a tie. Occasionally, pieces of meat are thrown into the battlefield, which restore partial health for a character when walked over. Sometimes bombs are thrown over instead, which explode and harm either fighter but can be blocked without taking damage. | ||
| − | Characters move with {{left}} or {{right}}. They backstep or dash with {{left}} {{left}} or {{right}} {{right}}. They jump upward with {{up}} and jump behind and ahead with {{upleft}} or {{upright}}. They crouch with {{down}}. Characters can slash (or punch if disarmed) with {{A}} (weak), {{B}} (normal), or {{C}} (heavy) and kick with {{Z}}. Attacks can be done while standing, crouching, jumping, or dashing. Dashing heavy slashes have slow startup but cannot be blocked. Performing a counter-hit (hitting the opponent while the opponent is attacking) does extra damage. Characters can evade attacks with {{X}} (or {{A}}+{{B}}), which causes the character to quickly lean into the background, causing any attacks made in that moment to miss; however, the character is vulnerable for an instant when coming out of the dodge. If the character is close to the opponent, instead of dodging, the character passes to the other side of the opponent. This can also be used to evade an enemy strike, leaving the opponent open to counterattack if timed right. | + | Characters move with {{left}} or {{right}}. They backstep or dash with {{left}} {{left}} or {{right}} {{right}}. They jump upward with {{up}} and jump behind and ahead with {{upleft}} or {{upright}}. They crouch with {{down}}. Characters can slash (or punch if disarmed) with {{A}} (weak), {{B}} (normal), or {{C}} (heavy) and kick with {{Z}}. Heavy attacks do more damage but are significantly slower. Attacks can be done while standing, crouching, jumping, or dashing. Dashing heavy slashes have slow startup but cannot be blocked. Performing a counter-hit (hitting the opponent while the opponent is attacking) does extra damage. Characters can evade attacks with {{X}} (or {{A}}+{{B}}), which causes the character to quickly lean into the background, causing any attacks made in that moment to miss; however, the character is vulnerable for an instant when coming out of the dodge. If the character is close to the opponent, instead of dodging, the character passes to the other side of the opponent. This can also be used to evade an enemy strike, leaving the opponent open to counterattack if timed right. |
When characters slash each other at the same time or dash into each other (when both armed), they lock swords. Players must press the slash buttons rapidly to break the lock, with the player who loses the hold (by not pressing the buttons as fast as the opposing player) having the character knocked back and disarmed. A character can equip his or her weapon again by pressing a slash button while standing next to it. Weapons cannot be destroyed as in previous games. In addition to their standard attacks, characters can perform special moves using specific button combinations (though many special moves cannot be performed if the character is disarmed). | When characters slash each other at the same time or dash into each other (when both armed), they lock swords. Players must press the slash buttons rapidly to break the lock, with the player who loses the hold (by not pressing the buttons as fast as the opposing player) having the character knocked back and disarmed. A character can equip his or her weapon again by pressing a slash button while standing next to it. Weapons cannot be destroyed as in previous games. In addition to their standard attacks, characters can perform special moves using specific button combinations (though many special moves cannot be performed if the character is disarmed). | ||
| − | Guarding is done by holding the D-Pad away from the opponent. Guarding can be done while standing or crouching and can also be done in midair. Most attacks can be blocked while standing or crouching, but many attacks must specifically be blocked high or low. Every character has a sweep kick performed with {{downright}}+{{Z}} (or {{downleft}}+{{Z}} when facing left) that can only be blocked crouching and an overhead move performed with {{Y}} (or {{B}}+{{C}}) that can only be blocked standing. If a character is armed, the character can also perform a parry against a weapon attack by pressing {{HCF}} (or {{HCB}} when facing left) as the opponent is attacking in close range. The timing for this maneuver must be precise, but if successful, the character repels the opponent's attack, and the opponent is left vulnerable to counterattack for a moment. If the character is unarmed, this move instead disarms the opponent. | + | Guarding is done by holding the D-Pad away from the opponent. Guarding can be done while standing or crouching and can also be done in midair. Most attacks can be blocked while standing or crouching, but many attacks must specifically be blocked high or low. Every character has a sweep kick performed with {{downright}}+{{Z}} (or {{downleft}}+{{Z}} when facing left) that can only be blocked crouching and an overhead move performed with {{Y}} (or {{B}}+{{C}}) that can only be blocked standing. Jumping attacks must also be blocked standing. If a character is armed, the character can also perform a parry against a weapon attack by pressing {{HCF}} (or {{HCB}} when facing left) as the opponent is attacking in close range. The timing for this maneuver must be precise, but if successful, the character repels the opponent's attack, and the opponent is left vulnerable to counterattack for a moment. If the character is unarmed, this move instead disarms the opponent. |
| − | Characters can become dizzy and stunned momentarily after taking repeated damage; they can recover more quickly by moving the D-Pad and pressing buttons rapidly. Characters can break an opponent's guard by holding {{left}} or {{right}} while pressing the heavy slash button in close range (replacing throws from previous games). This grabs and then pushes or pulls the opponent aside. After a character has been knocked down, the character can roll away by holding {{left}} or {{right}}. | + | Characters can become dizzy and stunned momentarily after taking repeated damage; they can recover more quickly by moving the D-Pad and pressing buttons rapidly. Characters can break an opponent's guard by holding {{left}} or {{right}} while pressing the heavy slash button in close range (replacing throws from previous games). This grabs and then pushes or pulls the opponent aside, which does no damage by itself but leaves the opponent open to attack. After a character has been knocked down, the character can roll away by holding {{left}} or {{right}}. |
Each character has a "POW" ({{rolloverText|怒|Ika}}) gauge that fills as the player is hit by enemy attacks or guards against an attack. The gauge can also be filled by holding {{A}}+{{B}}+{{C}}, though the character is vulnerable to attack while doing this. When the gauge is full, the character enters a "Rage explosion" mode ({{rolloverText|怒りモード|Ikari Moudo}}) and turns red for a duration. Attacking extends the duration, but it cannot be extended indefinitely. During this state, the character attacks with increased strength and can perform a Weapon-Flipping Technique ({{rolloverText|武器飛ばし必殺技|Buki Tobashi Hissatsu Waza}}). These are super moves that do heavy damage and disarm the opponent, which are performed with special button combinations or by pressing {{R}}. The gauge drains if the move hits the opponent (but not if it misses). The POW gauge stays permanently filled when a character's health gauge has depleted into the red area and started flashing. | Each character has a "POW" ({{rolloverText|怒|Ika}}) gauge that fills as the player is hit by enemy attacks or guards against an attack. The gauge can also be filled by holding {{A}}+{{B}}+{{C}}, though the character is vulnerable to attack while doing this. When the gauge is full, the character enters a "Rage explosion" mode ({{rolloverText|怒りモード|Ikari Moudo}}) and turns red for a duration. Attacking extends the duration, but it cannot be extended indefinitely. During this state, the character attacks with increased strength and can perform a Weapon-Flipping Technique ({{rolloverText|武器飛ばし必殺技|Buki Tobashi Hissatsu Waza}}). These are super moves that do heavy damage and disarm the opponent, which are performed with special button combinations or by pressing {{R}}. The gauge drains if the move hits the opponent (but not if it misses). The POW gauge stays permanently filled when a character's health gauge has depleted into the red area and started flashing. | ||
| Line 75: | Line 75: | ||
===Characters=== | ===Characters=== | ||
| − | + | {{MoveListNote|legend=SamuraiShodown3}} | |
| − | + | ====Playable==== | |
Genjuro was introduced in the previous game (not ported to any Sega console). Basara, Shizumaru, Gaira, and Rimururu are new characters introduced in this game. Amakusa, the boss of the first game, is now a normally playable character. | Genjuro was introduced in the previous game (not ported to any Sega console). Basara, Shizumaru, Gaira, and Rimururu are new characters introduced in this game. Amakusa, the boss of the first game, is now a normally playable character. | ||
{{InfoTable| | {{InfoTable| | ||
| Line 86: | Line 86: | ||
{{MoveListTable | bordercolor=#800000 | desc=Slash (修羅) | | {{MoveListTable | bordercolor=#800000 | desc=Slash (修羅) | | ||
{{MoveListRow | Sankaku Tobi | D-Pad in the opposite direction when jumping onto the edge of the screen | Basara can jump off the edges of the screen.}} | {{MoveListRow | Sankaku Tobi | D-Pad in the opposite direction when jumping onto the edge of the screen | Basara can jump off the edges of the screen.}} | ||
| − | {{MoveListRow | Sashi Ashi | {{down}}+{{kick}} in midair | Basara stomps downward. If he hits his opponent, he bounces back up and can keep stomping until he is hit or returns to the ground | + | {{MoveListRow | Sashi Ashi | {{down}}+{{kick}} in midair | Basara stomps downward. If he hits his opponent, he bounces back up and can keep stomping until he is hit or returns to the ground.}} |
| − | {{MoveListRow | Zugai Wari | {{right}}+{{kick}} in midair | Basara does an axe kick | + | {{MoveListRow | Zugai Wari | {{right}}+{{kick}} in midair | Basara does an axe kick.}} |
{{MoveListRow | Chisashi | {{QCF}} {{slash}} (requires weapon) | Basara throws his shuriken in a high arc. The distance it is thrown depends on the strength of the button used.}} | {{MoveListRow | Chisashi | {{QCF}} {{slash}} (requires weapon) | Basara throws his shuriken in a high arc. The distance it is thrown depends on the strength of the button used.}} | ||
{{MoveListRow | Sorasashi | {{QCF}} {{slash}} in midair (requires weapon) | Basara throws his shuriken diagonally downwards. The angle of the shuriken's trajectory depends on the strength of the button used, with {{LS}} being closest to vertical and {{HS}} being closest to 45°.}} | {{MoveListRow | Sorasashi | {{QCF}} {{slash}} in midair (requires weapon) | Basara throws his shuriken diagonally downwards. The angle of the shuriken's trajectory depends on the strength of the button used, with {{LS}} being closest to vertical and {{HS}} being closest to 45°.}} | ||
| Line 99: | Line 99: | ||
{{MoveListTable | bordercolor=#000080 | desc=Bust (羅刹) | | {{MoveListTable | bordercolor=#000080 | desc=Bust (羅刹) | | ||
{{MoveListRow | Sankaku Tobi | D-Pad in the opposite direction when jumping onto the edge of the screen | Basara can jump off the edges of the screen.}} | {{MoveListRow | Sankaku Tobi | D-Pad in the opposite direction when jumping onto the edge of the screen | Basara can jump off the edges of the screen.}} | ||
| − | {{MoveListRow | Sashi Ashi | {{down}}+{{kick}} in midair | Basara stomps downward. If he hits his opponent, he bounces back up and can keep stomping until he is hit or returns to the ground | + | {{MoveListRow | Sashi Ashi | {{down}}+{{kick}} in midair | Basara stomps downward. If he hits his opponent, he bounces back up and can keep stomping until he is hit or returns to the ground.}} |
| − | {{MoveListRow | Zugai Wari | {{right}}+{{kick}} in midair | Basara does an axe kick | + | {{MoveListRow | Zugai Wari | {{right}}+{{kick}} in midair | Basara does an axe kick.}} |
{{MoveListRow | Chisashi | {{QCF}} {{slash}} (requires weapon) | Basara throws his shuriken in a high arc. The distance it is thrown depends on the strength of the button used.}} | {{MoveListRow | Chisashi | {{QCF}} {{slash}} (requires weapon) | Basara throws his shuriken in a high arc. The distance it is thrown depends on the strength of the button used.}} | ||
{{MoveListRow | Sorasashi | {{QCF}} {{slash}} in midair (requires weapon) | Basara throws his shuriken diagonally downwards. The angle of the shuriken's trajectory depends on the strength of the button used, with {{LS}} being closest to vertical and {{HS}} being closest to 45°.}} | {{MoveListRow | Sorasashi | {{QCF}} {{slash}} in midair (requires weapon) | Basara throws his shuriken diagonally downwards. The angle of the shuriken's trajectory depends on the strength of the button used, with {{LS}} being closest to vertical and {{HS}} being closest to 45°.}} | ||
| Line 119: | Line 119: | ||
{{MoveListRow | Sanren Satsu | {{QCF}} {{slash}} (requires weapon) | Genjuro slides forward with a lateral sword slice. The distance traveled depends on the strength of the button used. He can cross over to the other side of the opponent with {{MS}} or {{HS}}. He can perform up to two more sword slices by pressing {{QCF}} {{slash}} more times.}} | {{MoveListRow | Sanren Satsu | {{QCF}} {{slash}} (requires weapon) | Genjuro slides forward with a lateral sword slice. The distance traveled depends on the strength of the button used. He can cross over to the other side of the opponent with {{MS}} or {{HS}}. He can perform up to two more sword slices by pressing {{QCF}} {{slash}} more times.}} | ||
{{MoveListRow | Shizuku Jin | {{RDP}} {{HS}} (close) (requires weapon) | Genjuro tosses his opponent into the air, jumps after them, and hits them back down with a downward sword slash. This move is a grab that cannot be blocked.}} | {{MoveListRow | Shizuku Jin | {{RDP}} {{HS}} (close) (requires weapon) | Genjuro tosses his opponent into the air, jumps after them, and hits them back down with a downward sword slash. This move is a grab that cannot be blocked.}} | ||
| − | {{MoveListRow | Kurenai | {{ | + | {{MoveListRow | Kurenai | {{QCFD}} {{slash}} (requires weapon) | Genjuro pulls his katana back, as a hanafuda card begins to materialize a short distance in front of him, then slashes downward. If the opponent is inside the hanafuda card, they are hit as the card is sliced in two.}} |
{{MoveListRow | '''Super:''' Gokou Zan | {{right}} {{HCF}} {{LS}}+{{MS}} (close) (requires weapon) | Genjuro slashes his opponent into the air, jumps after them, and slashes them five times in midair.}} | {{MoveListRow | '''Super:''' Gokou Zan | {{right}} {{HCF}} {{LS}}+{{MS}} (close) (requires weapon) | Genjuro slashes his opponent into the air, jumps after them, and slashes them five times in midair.}} | ||
}} | }} | ||
| Line 128: | Line 128: | ||
{{MoveListRow | Sankuu Satsu | {{QCF}} {{slash}} (requires weapon) | Genjuro runs forward, then rises into the air with a sword slash. He can perform up to two more rising sword slashes by pressing {{QCF}} {{slash}} more times.}} | {{MoveListRow | Sankuu Satsu | {{QCF}} {{slash}} (requires weapon) | Genjuro runs forward, then rises into the air with a sword slash. He can perform up to two more rising sword slashes by pressing {{QCF}} {{slash}} more times.}} | ||
{{MoveListRow | Hyakki Satsu | {{right}} {{left}} {{right}} {{slash}} (requires weapon) | Genjuro slices his blade multiple times in front of him. He slices more times when a stronger button is used. If a slice connects, he impales the opponent on the blade, then pushes them off with his foot.}} | {{MoveListRow | Hyakki Satsu | {{right}} {{left}} {{right}} {{slash}} (requires weapon) | Genjuro slices his blade multiple times in front of him. He slices more times when a stronger button is used. If a slice connects, he impales the opponent on the blade, then pushes them off with his foot.}} | ||
| − | {{MoveListRow | Shigure | {{ | + | {{MoveListRow | Shigure | {{QCFD}} {{slash}} (requires weapon) | Genjuro pulls his katana back, as a hanafuda card begins to materialize a short distance in front of him, then slashes downward. If the opponent is inside the hanafuda card, they are hit as the card is sliced in two.}} |
{{MoveListRow | '''Super:''' Ura Gokou | {{right}} {{HCF}} {{HS}}+{{kick}} (close) (requires weapon) | Genjuro slashes his opponent into the air with a series of five slashes.}} | {{MoveListRow | '''Super:''' Ura Gokou | {{right}} {{HCF}} {{HS}}+{{kick}} (close) (requires weapon) | Genjuro slashes his opponent into the air with a series of five slashes.}} | ||
}} | }} | ||
| Line 143: | Line 143: | ||
{{MoveListRow | Ougi Shippuu Kogetsu Zan | {{DPF}} {{slash}} during dash (requires weapon) | Haohmaru swings his katana in a circle and jumps while dashing.}} | {{MoveListRow | Ougi Shippuu Kogetsu Zan | {{DPF}} {{slash}} during dash (requires weapon) | Haohmaru swings his katana in a circle and jumps while dashing.}} | ||
{{MoveListRow | Ougi Resshin Zan | {{RDP}} {{slash}} (requires weapon) | Haohmaru leaps forward and flips over with a falling sword cut. This move is an overhead attack that can hit characters who are crouch blocking. The distance of the leap depends on the strength of the button used.}} | {{MoveListRow | Ougi Resshin Zan | {{RDP}} {{slash}} (requires weapon) | Haohmaru leaps forward and flips over with a falling sword cut. This move is an overhead attack that can hit characters who are crouch blocking. The distance of the leap depends on the strength of the button used.}} | ||
| − | {{MoveListRow | Ougi Hishou Resshin Zan | {{QCB}} {{HS}} in midair (requires weapon) | Haohmaru drops with a falling sword cut | + | {{MoveListRow | Ougi Hishou Resshin Zan | {{QCB}} {{HS}} in midair (requires weapon) | Haohmaru drops with a falling sword cut.}} |
{{MoveListRow | Zankousen | {{HCB}} {{HS}} (requires weapon) | Haohmaru turns around, then performs a heavy downward slash. }} | {{MoveListRow | Zankousen | {{HCB}} {{HS}} (requires weapon) | Haohmaru turns around, then performs a heavy downward slash. }} | ||
{{MoveListRow | '''Super:''' Hiougi Tenha Fuujin Zan | {{DPF}} {{DPF}} {{LS}}+{{MS}} (requires weapon) | Haohmaru steps forward while spinning his katana in circles four times, rising into the air with the last slice.}} | {{MoveListRow | '''Super:''' Hiougi Tenha Fuujin Zan | {{DPF}} {{DPF}} {{LS}}+{{MS}} (requires weapon) | Haohmaru steps forward while spinning his katana in circles four times, rising into the air with the last slice.}} | ||
| Line 225: | Line 225: | ||
| desc=A Buddhist monk in training and the nephew of Nicotine Caffeine, a master swordsman who trained Haohmaru and Genjuro. He fights with a necklace of giant prayer beads. | | desc=A Buddhist monk in training and the nephew of Nicotine Caffeine, a master swordsman who trained Haohmaru and Genjuro. He fights with a necklace of giant prayer beads. | ||
{{MoveListTable | bordercolor=#800000 | desc=Slash (修羅) | | {{MoveListTable | bordercolor=#800000 | desc=Slash (修羅) | | ||
| − | {{MoveListRow | Buchinomeshi | {{down}}+{{HS}} in midair (requires weapon) | Gaira slams his prayer beads to the ground | + | {{MoveListRow | Buchinomeshi | {{down}}+{{HS}} in midair (requires weapon) | Gaira slams his prayer beads to the ground.}} |
| − | {{MoveListRow | Hyakkan Otoshi | {{down}}+{{kick}} in midair | Gaira falls with a knee strike | + | {{MoveListRow | Hyakkan Otoshi | {{down}}+{{kick}} in midair | Gaira falls with a knee strike.}} |
{{MoveListRow | Midare Uchi | {{QCF}} {{LS}}+{{MS}} (requires weapon) | Gaira swings his prayer beads back and forth in front of him four times, which knocks down his opponent on impact.}} | {{MoveListRow | Midare Uchi | {{QCF}} {{LS}}+{{MS}} (requires weapon) | Gaira swings his prayer beads back and forth in front of him four times, which knocks down his opponent on impact.}} | ||
{{MoveListRow | Jishin Gan | {{down}} {{down}} {{LS}}+{{MS}} (requires weapon) | Gaira hops forward, punching down while holding his prayer beads and causing the ground to shake. This move momentarily stuns opponents on the ground and pulls them closer to Gaira even if it does not connect.}} | {{MoveListRow | Jishin Gan | {{down}} {{down}} {{LS}}+{{MS}} (requires weapon) | Gaira hops forward, punching down while holding his prayer beads and causing the ground to shake. This move momentarily stuns opponents on the ground and pulls them closer to Gaira even if it does not connect.}} | ||
| Line 238: | Line 238: | ||
{{hr}} | {{hr}} | ||
{{MoveListTable | bordercolor=#000080 | desc=Bust (羅刹) | | {{MoveListTable | bordercolor=#000080 | desc=Bust (羅刹) | | ||
| − | {{MoveListRow | Hyakkan Otoshi | {{down}}+{{kick}} in midair | Gaira falls with a knee strike | + | {{MoveListRow | Hyakkan Otoshi | {{down}}+{{kick}} in midair | Gaira falls with a knee strike.}} |
{{MoveListRow | Buchikoroshi | {{QCF}} {{slash}} (requires weapon) | Gaira does an attack that knocks his opponent into the side of the screen. The opponent bounces off, then Gaira uppercuts the opponent as they fly over him. He does a headbutt with {{LS}} (only hits airborne opponents), a punch with {{MS}} (hits in front of him), or a shoulder charge with {{HS}} (slides forward a short distance before hitting).}} | {{MoveListRow | Buchikoroshi | {{QCF}} {{slash}} (requires weapon) | Gaira does an attack that knocks his opponent into the side of the screen. The opponent bounces off, then Gaira uppercuts the opponent as they fly over him. He does a headbutt with {{LS}} (only hits airborne opponents), a punch with {{MS}} (hits in front of him), or a shoulder charge with {{HS}} (slides forward a short distance before hitting).}} | ||
{{MoveListRow | Jishin Gan | {{down}} {{down}} {{LS}}+{{MS}} (requires weapon) | Gaira hops forward, punching down while holding his prayer beads and causing the ground to shake. This move momentarily stuns opponents on the ground and pulls them closer to Gaira even if it does not connect.}} | {{MoveListRow | Jishin Gan | {{down}} {{down}} {{LS}}+{{MS}} (requires weapon) | Gaira hops forward, punching down while holding his prayer beads and causing the ground to shake. This move momentarily stuns opponents on the ground and pulls them closer to Gaira even if it does not connect.}} | ||
| Line 282: | Line 282: | ||
{{MoveListRow | Hiken Sasameyuki (Damashi) | {{QCB}} {{kick}} | Ukyo tosses an apple into the air but does not slash his sword. This move is intended as a deception.}} | {{MoveListRow | Hiken Sasameyuki (Damashi) | {{QCB}} {{kick}} | Ukyo tosses an apple into the air but does not slash his sword. This move is intended as a deception.}} | ||
{{MoveListRow | Hiken Oboro Gatana | {{QCF}} {{slash}} (requires weapon) | Ukyo advances with afterimages of himself that perform sword slashes that knock the opponent over. He slashes one time with {{LS}}, two times with {{MS}}, and three times with {{HS}}.}} | {{MoveListRow | Hiken Oboro Gatana | {{QCF}} {{slash}} (requires weapon) | Ukyo advances with afterimages of himself that perform sword slashes that knock the opponent over. He slashes one time with {{LS}}, two times with {{MS}}, and three times with {{HS}}.}} | ||
| − | {{MoveListRow | Hiken Tsubame Gaeshi | {{downleft}} {{QCF}} {{slash}} in midair (requires weapon) | Ukyo slashes his sword in a semicircle, leaving a trail of fire in the air | + | {{MoveListRow | Hiken Tsubame Gaeshi | {{downleft}} {{QCF}} {{slash}} in midair (requires weapon) | Ukyo slashes his sword in a semicircle, leaving a trail of fire in the air.}} |
{{MoveListRow | Hiken Amatsu Kaze | {{HCB}} {{HS}}, then {{LS}} (requires weapon) | Ukyo charges his sword with fire. When {{LS}} is pressed, he runs forward and jumps over his opponent with an overhead slash (which can be avoided by ducking).}} | {{MoveListRow | Hiken Amatsu Kaze | {{HCB}} {{HS}}, then {{LS}} (requires weapon) | Ukyo charges his sword with fire. When {{LS}} is pressed, he runs forward and jumps over his opponent with an overhead slash (which can be avoided by ducking).}} | ||
{{MoveListRow | Hiken Shimo Kaze | {{HCB}} {{HS}}, then {{MS}} (requires weapon) | Ukyo charges his sword with fire. When {{MS}} is pressed, he runs forward and performs a low slash that sweeps the opponent (which can only be blocked low).}} | {{MoveListRow | Hiken Shimo Kaze | {{HCB}} {{HS}}, then {{MS}} (requires weapon) | Ukyo charges his sword with fire. When {{MS}} is pressed, he runs forward and performs a low slash that sweeps the opponent (which can only be blocked low).}} | ||
| Line 291: | Line 291: | ||
{{MoveListRow | Hiken Sasameyuki: Sen | {{QCB}} {{slash}} (requires weapon) | Ukyo tosses an apple into the air, then rapidly slashes his sword in front of him, destroying the apple. He slashes more times when a stronger button is used.}} | {{MoveListRow | Hiken Sasameyuki: Sen | {{QCB}} {{slash}} (requires weapon) | Ukyo tosses an apple into the air, then rapidly slashes his sword in front of him, destroying the apple. He slashes more times when a stronger button is used.}} | ||
{{MoveListRow | Hibari | {{left}} {{right}}+{{LS}} (requires weapon) | Ukyo jabs the pommel of his sword forward, stunning the opponent momentarily.}} | {{MoveListRow | Hibari | {{left}} {{right}}+{{LS}} (requires weapon) | Ukyo jabs the pommel of his sword forward, stunning the opponent momentarily.}} | ||
| − | {{MoveListRow | Hiken Tsubame Gaeshi | {{downleft}} {{QCF}} {{slash}} in midair (requires weapon) | Ukyo slashes his sword in a semicircle, leaving a trail of fire in the air | + | {{MoveListRow | Hiken Tsubame Gaeshi | {{downleft}} {{QCF}} {{slash}} in midair (requires weapon) | Ukyo slashes his sword in a semicircle, leaving a trail of fire in the air.}} |
{{MoveListRow | Hiken Kagerou | {{DPF}} {{slash}} (requires weapon) | Ukyo slashes the air, causing a wave-like projectile to travel across the screen. The stronger versions travel faster but have a longer startup time.}} | {{MoveListRow | Hiken Kagerou | {{DPF}} {{slash}} (requires weapon) | Ukyo slashes the air, causing a wave-like projectile to travel across the screen. The stronger versions travel faster but have a longer startup time.}} | ||
{{MoveListRow | Hiken Yume Gasumi | {{downright}} {{QCB}} {{right}} {{HS}} (requires weapon) | Ukyo holds his partially sheathed sword in front of him in a defensive pose. If he is hit by a mid-level attack, he parries the attack, then slashes the opponent away.}} | {{MoveListRow | Hiken Yume Gasumi | {{downright}} {{QCB}} {{right}} {{HS}} (requires weapon) | Ukyo holds his partially sheathed sword in front of him in a defensive pose. If he is hit by a mid-level attack, he parries the attack, then slashes the opponent away.}} | ||
| Line 307: | Line 307: | ||
{{MoveListRow | Rupush Tek Num (Chiu) | {{HCB}} {{MS}} (close) | Rimururu freezes her opponent, then shoves them to the ground. This move is a grab that cannot be blocked.}} | {{MoveListRow | Rupush Tek Num (Chiu) | {{HCB}} {{MS}} (close) | Rimururu freezes her opponent, then shoves them to the ground. This move is a grab that cannot be blocked.}} | ||
{{MoveListRow | Konru Nonno | {{DPF}} {{LS}} | Rimururu creates an ice lotus that flies straight upwards.}} | {{MoveListRow | Konru Nonno | {{DPF}} {{LS}} | Rimururu creates an ice lotus that flies straight upwards.}} | ||
| − | {{MoveListRow | Konru Memu | {{ | + | {{MoveListRow | Konru Memu | {{QCBD}} {{LS}} | Rimururu creates an ice puddle in front of her, which does no damage but causes her opponent to slip when walking over it, stunning them momentarily.}} |
{{MoveListRow | Kamui Shituki | {{QCB}} {{right}} {{HS}} | Rimururu creates an ice barrier in front of her. It hurts her opponent if the opponent touches or tries to attack it, and it reflects projectiles.}} | {{MoveListRow | Kamui Shituki | {{QCB}} {{right}} {{HS}} | Rimururu creates an ice barrier in front of her. It hurts her opponent if the opponent touches or tries to attack it, and it reflects projectiles.}} | ||
| − | {{MoveListRow | Konru Shiraru | {{ | + | {{MoveListRow | Konru Shiraru | {{QCFD}} {{LS}} in midair | Rimururu creates an ice platform beneath herself in midair, which then falls and harms her opponent if it hits. Rimururu can jump off it or fall with it.}} |
{{MoveListRow | '''Super:''' Rupush Kamui Emush | {{HCB}} {{HCB}} {{HS}}+{{kick}} | Rimururu jumps into the air, then shoots an ice block diagonally downwards that grows into a huge ice block when it hits the ground.}} | {{MoveListRow | '''Super:''' Rupush Kamui Emush | {{HCB}} {{HCB}} {{HS}}+{{kick}} | Rimururu jumps into the air, then shoots an ice block diagonally downwards that grows into a huge ice block when it hits the ground.}} | ||
}} | }} | ||
| Line 318: | Line 318: | ||
{{MoveListRow | Rupushi Tum | {{right}}+{{LS}}+{{MS}} | Rimururu slices her frozen kodachi upward, which freezes her opponent momentarily.}} | {{MoveListRow | Rupushi Tum | {{right}}+{{LS}}+{{MS}} | Rimururu slices her frozen kodachi upward, which freezes her opponent momentarily.}} | ||
{{MoveListRow | Upun Op | {{repeat|{{slash}}}} | Rimururu creates a wall of icy spears in front of her, then pushes them a short distance forward as one large ice spear.}} | {{MoveListRow | Upun Op | {{repeat|{{slash}}}} | Rimururu creates a wall of icy spears in front of her, then pushes them a short distance forward as one large ice spear.}} | ||
| − | {{MoveListRow | Konru Memu | {{ | + | {{MoveListRow | Konru Memu | {{QCBD}} {{LS}} | Rimururu creates an ice puddle in front of her, which does no damage but causes her opponent to slip when walking over it, stunning them momentarily.}} |
{{MoveListRow | Rupush Tek Num (Yaku) | {{HCB}} {{kick}} (close) | Rimururu freezes her opponent, then kicks them twice. This move is a grab that cannot be blocked.}} | {{MoveListRow | Rupush Tek Num (Yaku) | {{HCB}} {{kick}} (close) | Rimururu freezes her opponent, then kicks them twice. This move is a grab that cannot be blocked.}} | ||
| − | {{MoveListRow | Konru Shiraru | {{ | + | {{MoveListRow | Konru Shiraru | {{QCFD}} {{LS}} in midair | Rimururu creates an ice platform beneath herself in midair, which then falls and harms her opponent if it hits. Rimururu can jump off it or fall with it.}} |
{{MoveListRow | '''Super:''' Rupush Kamui Emushi | {{HCB}} {{HCB}} {{HS}}+{{kick}} | Rimururu jumps into the air, then shoots an ice block diagonally downwards that grows into a huge ice block when it hits the ground.}} | {{MoveListRow | '''Super:''' Rupush Kamui Emushi | {{HCB}} {{HCB}} {{HS}}+{{kick}} | Rimururu jumps into the air, then shoots an ice block diagonally downwards that grows into a huge ice block when it hits the ground.}} | ||
}} | }} | ||
| Line 332: | Line 332: | ||
{{MoveListRow | Sankaku Tobi | D-Pad in the opposite direction when jumping onto the edge of the screen | Nakoruru can jump off the edges of the screen.}} | {{MoveListRow | Sankaku Tobi | D-Pad in the opposite direction when jumping onto the edge of the screen | Nakoruru can jump off the edges of the screen.}} | ||
{{MoveListRow | Lela Kishima Tek | {{left}}+{{HS}} or {{right}}+{{HS}} in midair (close) | Nakoruru grabs and slams her opponent to the ground.}} | {{MoveListRow | Lela Kishima Tek | {{left}}+{{HS}} or {{right}}+{{HS}} in midair (close) | Nakoruru grabs and slams her opponent to the ground.}} | ||
| − | {{MoveListRow | Kamui Fum Kesupu | {{down}}+{{kick}} or {{right}}+{{kick}} in midair | Nakoruru does an axe kick in the air | + | {{MoveListRow | Kamui Fum Kesupu | {{down}}+{{kick}} or {{right}}+{{kick}} in midair | Nakoruru does an axe kick in the air.}} |
| − | {{MoveListRow | Annu Mutsube | {{ | + | {{MoveListRow | Annu Mutsube | {{QCBD}} {{slash}} (requires weapon) | Nakoruru flies along the ground while holding her kodachi in front of her, which knocks over and slides to the other side of her opponent. The distance traveled depends on the strength of the button used. This move can only be blocked low.}} |
{{MoveListRow | Lela Mutsube | {{QCF}} {{slash}} (requires weapon) | Nakoruru flies into the air while holding her kodachi in front of her. The distance and the height traveled depends on the strength of the button used.}} | {{MoveListRow | Lela Mutsube | {{QCF}} {{slash}} (requires weapon) | Nakoruru flies into the air while holding her kodachi in front of her. The distance and the height traveled depends on the strength of the button used.}} | ||
{{MoveListRow | Kamui Rimuse | {{RDP}} {{slash}} | Nakoruru whips her cape in circles. She whips it one time with {{LS}}, two times with {{MS}}, and three times with {{HS}}. She can follow up with an upward whip by pressing {{slash}} before she finishes.}} | {{MoveListRow | Kamui Rimuse | {{RDP}} {{slash}} | Nakoruru whips her cape in circles. She whips it one time with {{LS}}, two times with {{MS}}, and three times with {{HS}}. She can follow up with an upward whip by pressing {{slash}} before she finishes.}} | ||
| Line 348: | Line 348: | ||
{{MoveListRow | Sankaku Tobi | D-Pad in the opposite direction when jumping onto the edge of the screen | Nakoruru can jump off the edges of the screen.}} | {{MoveListRow | Sankaku Tobi | D-Pad in the opposite direction when jumping onto the edge of the screen | Nakoruru can jump off the edges of the screen.}} | ||
{{MoveListRow | Lela Kishima Tek | {{left}}+{{HS}} or {{right}}+{{HS}} in midair (close) | Nakoruru grabs and slams her opponent to the ground.}} | {{MoveListRow | Lela Kishima Tek | {{left}}+{{HS}} or {{right}}+{{HS}} in midair (close) | Nakoruru grabs and slams her opponent to the ground.}} | ||
| − | {{MoveListRow | Kamui Fum Kesupu | {{down}}+{{kick}} or {{right}}+{{kick}} in midair | Nakoruru does an axe kick in the air | + | {{MoveListRow | Kamui Fum Kesupu | {{down}}+{{kick}} or {{right}}+{{kick}} in midair | Nakoruru does an axe kick in the air.}} |
| − | {{MoveListRow | Annu Mutsube | {{ | + | {{MoveListRow | Annu Mutsube | {{QCBD}} {{slash}} (requires weapon) | Nakoruru flies along the ground while holding her kodachi in front of her, which knocks over and slides to the other side of her opponent. The distance traveled depends on the strength of the button used. This move can only be blocked low.}} |
{{MoveListRow | Lela Mutsube | {{QCF}} {{slash}} (requires weapon) | Nakoruru flies into the air while holding her kodachi in front of her. The distance and the height traveled depends on the strength of the button used.}} | {{MoveListRow | Lela Mutsube | {{QCF}} {{slash}} (requires weapon) | Nakoruru flies into the air while holding her kodachi in front of her. The distance and the height traveled depends on the strength of the button used.}} | ||
{{MoveListRow | Kamui Rimuse | {{RDP}} {{slash}} | Nakoruru whips her cape in circles. She whips it one time with {{LS}}, two times with {{MS}}, and three times with {{HS}}. She can follow up with an upward whip by pressing {{slash}} before she finishes.}} | {{MoveListRow | Kamui Rimuse | {{RDP}} {{slash}} | Nakoruru whips her cape in circles. She whips it one time with {{LS}}, two times with {{MS}}, and three times with {{HS}}. She can follow up with an upward whip by pressing {{slash}} before she finishes.}} | ||
{{MoveListRow | Shikuruu ni Nori | {{QCB}} {{kick}} | Nakoruru hops onto the back of her wolf Shikuruu until she is hit by the opponent or dismounts. While riding, Nakoruru can move with {{left}} or {{right}}, jump with {{up}}, dismount with {{kick}}, or slash her kodachi with {{slash}}.}} | {{MoveListRow | Shikuruu ni Nori | {{QCB}} {{kick}} | Nakoruru hops onto the back of her wolf Shikuruu until she is hit by the opponent or dismounts. While riding, Nakoruru can move with {{left}} or {{right}}, jump with {{up}}, dismount with {{kick}}, or slash her kodachi with {{slash}}.}} | ||
| − | {{MoveListRow | Mer Shikite | {{ | + | {{MoveListRow | Mer Shikite | {{QCBD}} {{HS}} while riding Shikuruu | Shikuruu runs forward. He can cross over to the other side of the opponent. Nakoruru can jump off and charge in a direction while holding her kodachi in front of her by holding any direction (except {{up}} or {{down}}) and {{HS}} simultaneously.}} |
{{MoveListRow | Kanto Shikite | {{QCF}} {{HS}} while riding Shikuruu | Shikuruu leaps into the air. Nakoruru can jump off and charge in a direction while holding her kodachi in front of her by holding any direction (except {{up}} or {{down}}) and {{HS}} simultaneously.}} | {{MoveListRow | Kanto Shikite | {{QCF}} {{HS}} while riding Shikuruu | Shikuruu leaps into the air. Nakoruru can jump off and charge in a direction while holding her kodachi in front of her by holding any direction (except {{up}} or {{down}}) and {{HS}} simultaneously.}} | ||
{{MoveListRow | Imeru Shikite | {{QCF}} {{HS}} in midair while riding Shikuruu | Shikuruu dives diagonally downwards while Nakoruru holds her kodachi out in front of her.}} | {{MoveListRow | Imeru Shikite | {{QCF}} {{HS}} in midair while riding Shikuruu | Shikuruu dives diagonally downwards while Nakoruru holds her kodachi out in front of her.}} | ||
| Line 408: | Line 408: | ||
{{MoveListRow | Tenshou Fuuou Jin | {{left}} {{right}} {{left}} {{right}} {{slash}} (requires weapon) | Amakusa throws his crystal ball in a fireball. The ball teleports a distance away, then shoots a short distance forward. If it touches the opponent, the opponent is swept up in a pillar of light, then dropped to the ground. The distance that the ball is teleported depends on the strength of the button used.}} | {{MoveListRow | Tenshou Fuuou Jin | {{left}} {{right}} {{left}} {{right}} {{slash}} (requires weapon) | Amakusa throws his crystal ball in a fireball. The ball teleports a distance away, then shoots a short distance forward. If it touches the opponent, the opponent is swept up in a pillar of light, then dropped to the ground. The distance that the ball is teleported depends on the strength of the button used.}} | ||
{{MoveListRow | Shouki Dan | {{RDP}} {{LS}} (requires weapon) | Amakusa crouches and spins in circles with his crystal ball, which can hit nearby grounded opponents, momentarily stunning them.}} | {{MoveListRow | Shouki Dan | {{RDP}} {{LS}} (requires weapon) | Amakusa crouches and spins in circles with his crystal ball, which can hit nearby grounded opponents, momentarily stunning them.}} | ||
| − | {{MoveListRow | Kairetsu Shou | {{ | + | {{MoveListRow | Kairetsu Shou | {{QCFD}} {{HS}} (close) | Amakusa slaps his opponent repeatedly.}} |
{{MoveListRow | '''Super:''' Kyoumei Jussatsu Jin | {{left}} {{DPF}} {{MS}}+{{HS}} (close) (requires weapon) | Amakusa throws his crystal ball a short distance forward. If it hits his opponent, it traps the opponent in a magic prison, then Amakusa retrieves the ball and uses it to shoot the opponent with violent energy.}} | {{MoveListRow | '''Super:''' Kyoumei Jussatsu Jin | {{left}} {{DPF}} {{MS}}+{{HS}} (close) (requires weapon) | Amakusa throws his crystal ball a short distance forward. If it hits his opponent, it traps the opponent in a magic prison, then Amakusa retrieves the ball and uses it to shoot the opponent with violent energy.}} | ||
}} | }} | ||
| Line 420: | Line 420: | ||
{{MoveListRow | Kouma Shourai Ha | {{left}} {{right}} {{left}} {{right}} {{slash}} (requires weapon) | Amakusa throws his crystal ball on the ground, which creates a dark portal that moves along the ground and sucks the opponent into it when close. A pillar of light blasts out from the portal, then the opponent is ejected from it. The distance traveled by the portal depends on the strength of the button used. This move can only be blocked low.}} | {{MoveListRow | Kouma Shourai Ha | {{left}} {{right}} {{left}} {{right}} {{slash}} (requires weapon) | Amakusa throws his crystal ball on the ground, which creates a dark portal that moves along the ground and sucks the opponent into it when close. A pillar of light blasts out from the portal, then the opponent is ejected from it. The distance traveled by the portal depends on the strength of the button used. This move can only be blocked low.}} | ||
{{MoveListRow | Shouki Dan | {{RDP}} {{LS}} (requires weapon) | Amakusa crouches and spins in circles with his crystal ball, which can hit nearby grounded opponents, momentarily stunning them.}} | {{MoveListRow | Shouki Dan | {{RDP}} {{LS}} (requires weapon) | Amakusa crouches and spins in circles with his crystal ball, which can hit nearby grounded opponents, momentarily stunning them.}} | ||
| − | {{MoveListRow | Kairetsu Shou | {{ | + | {{MoveListRow | Kairetsu Shou | {{QCFD}} {{HS}} (close) | Amakusa slaps his opponent repeatedly.}} |
{{MoveListRow | '''Super:''' Kyoumei Jussatsu Jin | {{left}} {{DPF}} {{MS}}+{{HS}} (close) (requires weapon) | Amakusa throws his crystal ball a short distance forward. If it hits his opponent, it traps the opponent in a magic prison, then Amakusa retrieves the ball and uses it to shoot the opponent with violent energy.}} | {{MoveListRow | '''Super:''' Kyoumei Jussatsu Jin | {{left}} {{DPF}} {{MS}}+{{HS}} (close) (requires weapon) | Amakusa throws his crystal ball a short distance forward. If it hits his opponent, it traps the opponent in a magic prison, then Amakusa retrieves the ball and uses it to shoot the opponent with violent energy.}} | ||
}} | }} | ||
| Line 443: | Line 443: | ||
Though he has both Slash and Bust alignments selectable, they have the same moveset and differ only in appearance. | Though he has both Slash and Bust alignments selectable, they have the same moveset and differ only in appearance. | ||
{{MoveListTable | | {{MoveListTable | | ||
| − | {{MoveListRow | Mugenryuu Tenchuu | {{down}}+{{HS}} in midair (requires weapon) | Zankuro slashes downward | + | {{MoveListRow | Mugenryuu Tenchuu | {{down}}+{{HS}} in midair (requires weapon) | Zankuro slashes downward.}} |
{{MoveListRow | Mugenryuu Shippuu Zan | {{QCF}} {{slash}} (requires weapon) | Zankuro slashes his glowing sword through the air, causing an energy wave to shoot across the ground.}} | {{MoveListRow | Mugenryuu Shippuu Zan | {{QCF}} {{slash}} (requires weapon) | Zankuro slashes his glowing sword through the air, causing an energy wave to shoot across the ground.}} | ||
{{MoveListRow | Mugenryuu Mugen Hou | {{QCB}} {{right}} {{slash}} (requires weapon) | Zankuro swings his sword upwards, creating an arc of energy that shocks opponents that it touches.}} | {{MoveListRow | Mugenryuu Mugen Hou | {{QCB}} {{right}} {{slash}} (requires weapon) | Zankuro swings his sword upwards, creating an arc of energy that shocks opponents that it touches.}} | ||
{{MoveListRow | Mugenryuu Tenpou Zan | {{DPF}} {{slash}} (requires weapon) | Zankuro charges forward with a shoulder ram, then follows up with an upward sword slash. The distance traveled depends on the strength of the button used.}} | {{MoveListRow | Mugenryuu Tenpou Zan | {{DPF}} {{slash}} (requires weapon) | Zankuro charges forward with a shoulder ram, then follows up with an upward sword slash. The distance traveled depends on the strength of the button used.}} | ||
| − | {{MoveListRow | Mugenryuu Ittou Zan | {{ | + | {{MoveListRow | Mugenryuu Ittou Zan | {{QCBD}} {{LS}}+{{MS}} (close) (requires weapon) | Zankuro kicks his opponent into the air, then slashes his sword twice.}} |
{{MoveListRow | Mugenryuu Muhou Ken | {{left}} {{right}}+{{LS}} | Zankuro charges forward with a glowing fist that knocks his opponent over.}} | {{MoveListRow | Mugenryuu Muhou Ken | {{left}} {{right}}+{{LS}} | Zankuro charges forward with a glowing fist that knocks his opponent over.}} | ||
{{MoveListRow | Mugenryuu Fudou | {{HCF}} {{kick}} (requires weapon) | Zankuro pulls his sword back and creates a glowing energy spike with his hand. If the opponent attacks while he is doing this, Zankuro knocks the opponent's weapon away, grabs them, then hits them with a downward sword slash.}} | {{MoveListRow | Mugenryuu Fudou | {{HCF}} {{kick}} (requires weapon) | Zankuro pulls his sword back and creates a glowing energy spike with his hand. If the opponent attacks while he is doing this, Zankuro knocks the opponent's weapon away, grabs them, then hits them with a downward sword slash.}} | ||
| Line 485: | Line 485: | ||
==Production credits== | ==Production credits== | ||
{{CreditsNeeded|pdf=Samurai Spirits III Saturn credits.pdf}} | {{CreditsNeeded|pdf=Samurai Spirits III Saturn credits.pdf}} | ||
| + | {{creditstable| | ||
| + | *'''Programmer:''' [[Kouichi Toya]]{{ref|1=https://x.com/motekin/status/1669197180253634562?s=20}} | ||
| + | | console=SAT | ||
| + | | source=Uncredited | ||
| + | }} | ||
==Magazine articles== | ==Magazine articles== | ||
Revision as of 02:28, 30 April 2024
| Samurai Spirits Zankurou Musouken | |||||||||||||||
|---|---|---|---|---|---|---|---|---|---|---|---|---|---|---|---|
| System(s): Sega Saturn | |||||||||||||||
| Publisher: SNK | |||||||||||||||
| Developer: SIMS | |||||||||||||||
| Supporting companies: Sega Digital Media[1] (audio) | |||||||||||||||
| Original system(s): Neo Geo | |||||||||||||||
| Developer(s) of original games: SNK | |||||||||||||||
| Sound driver: SCSP/CD-DA (36 tracks) | |||||||||||||||
| Peripherals supported: Extended RAM Cartridge (1MB/4MB) | |||||||||||||||
| Genre: Fighting Action/Kakutou Action (格闘アクション)[2], Action[3] | |||||||||||||||
| Number of players: 1-2 | |||||||||||||||
| |||||||||||||||
|

Samurai Spirits Zankurou Musouken (サムライスピリッツ 斬紅郎無双剣) is a 2D fighting game developed by SNK as part of the Samurai Spirits series. It was originally released for the Neo Geo in late 1995, then ported to the Sega Saturn nearly a full year later in 1996. The game requires an Extended RAM Cartridge to play.
Contents
Story
The first part of a two-chapter story that is chronologically set between the events of Samurai Spirits and Shin Samurai Spirits: Haohmaru Jigokuhen (Samurai Shodown and Samurai Shodown II in the West), the game follows the journey of a young semi-amnesic boy named Shizumaru Hisame. He and many other warriors seek out the powerful and dangerous swordsman Zankuro Minazuki, called "The Demon," for their own personal reasons.
Gameplay


The game is the third in a series of weapons-based fighting games set in Sakoku-period Japan. This entry has a notably darker aesthetic compared to its predecessors and introduces two selectable alignments for each character. Four new characters have been introduced, but several characters from the previous games have been left out. The referee and the delivery man no longer appear during matches (with items instead thrown in from off-screen). The game changes the control scheme from two pairs of weak and normal attack buttons, one for slashes and one for kicks (with the player able to press weak and normal together for a heavy attack), to three slash buttons and a single kick. It also adds an evade mechanic and aerial blocking.
As before, matches are fought to the best of three rounds. Characters can move (but not attack) before the round begins. Each round is timed (with the winner being the combatant with the most health remaining if time runs out). If the battle goes to four rounds, both characters start with full POW gauges and fight a shortened final round. Both players lose if the fourth round ends in a draw or a tie. Occasionally, pieces of meat are thrown into the battlefield, which restore partial health for a character when walked over. Sometimes bombs are thrown over instead, which explode and harm either fighter but can be blocked without taking damage.
Characters move with ![]() or
or ![]() . They backstep or dash with
. They backstep or dash with ![]()
![]() or
or ![]()
![]() . They jump upward with
. They jump upward with ![]() and jump behind and ahead with
and jump behind and ahead with ![]() or
or ![]() . They crouch with
. They crouch with ![]() . Characters can slash (or punch if disarmed) with
. Characters can slash (or punch if disarmed) with ![]() (weak),
(weak), ![]() (normal), or
(normal), or ![]() (heavy) and kick with
(heavy) and kick with ![]() . Heavy attacks do more damage but are significantly slower. Attacks can be done while standing, crouching, jumping, or dashing. Dashing heavy slashes have slow startup but cannot be blocked. Performing a counter-hit (hitting the opponent while the opponent is attacking) does extra damage. Characters can evade attacks with
. Heavy attacks do more damage but are significantly slower. Attacks can be done while standing, crouching, jumping, or dashing. Dashing heavy slashes have slow startup but cannot be blocked. Performing a counter-hit (hitting the opponent while the opponent is attacking) does extra damage. Characters can evade attacks with ![]() (or
(or ![]() +
+![]() ), which causes the character to quickly lean into the background, causing any attacks made in that moment to miss; however, the character is vulnerable for an instant when coming out of the dodge. If the character is close to the opponent, instead of dodging, the character passes to the other side of the opponent. This can also be used to evade an enemy strike, leaving the opponent open to counterattack if timed right.
), which causes the character to quickly lean into the background, causing any attacks made in that moment to miss; however, the character is vulnerable for an instant when coming out of the dodge. If the character is close to the opponent, instead of dodging, the character passes to the other side of the opponent. This can also be used to evade an enemy strike, leaving the opponent open to counterattack if timed right.
When characters slash each other at the same time or dash into each other (when both armed), they lock swords. Players must press the slash buttons rapidly to break the lock, with the player who loses the hold (by not pressing the buttons as fast as the opposing player) having the character knocked back and disarmed. A character can equip his or her weapon again by pressing a slash button while standing next to it. Weapons cannot be destroyed as in previous games. In addition to their standard attacks, characters can perform special moves using specific button combinations (though many special moves cannot be performed if the character is disarmed).
Guarding is done by holding the D-Pad away from the opponent. Guarding can be done while standing or crouching and can also be done in midair. Most attacks can be blocked while standing or crouching, but many attacks must specifically be blocked high or low. Every character has a sweep kick performed with ![]() +
+![]() (or
(or ![]() +
+![]() when facing left) that can only be blocked crouching and an overhead move performed with
when facing left) that can only be blocked crouching and an overhead move performed with ![]() (or
(or ![]() +
+![]() ) that can only be blocked standing. Jumping attacks must also be blocked standing. If a character is armed, the character can also perform a parry against a weapon attack by pressing
) that can only be blocked standing. Jumping attacks must also be blocked standing. If a character is armed, the character can also perform a parry against a weapon attack by pressing ![]()
![]()
![]()
![]()
![]() (or
(or ![]()
![]()
![]()
![]()
![]() when facing left) as the opponent is attacking in close range. The timing for this maneuver must be precise, but if successful, the character repels the opponent's attack, and the opponent is left vulnerable to counterattack for a moment. If the character is unarmed, this move instead disarms the opponent.
when facing left) as the opponent is attacking in close range. The timing for this maneuver must be precise, but if successful, the character repels the opponent's attack, and the opponent is left vulnerable to counterattack for a moment. If the character is unarmed, this move instead disarms the opponent.
Characters can become dizzy and stunned momentarily after taking repeated damage; they can recover more quickly by moving the D-Pad and pressing buttons rapidly. Characters can break an opponent's guard by holding ![]() or
or ![]() while pressing the heavy slash button in close range (replacing throws from previous games). This grabs and then pushes or pulls the opponent aside, which does no damage by itself but leaves the opponent open to attack. After a character has been knocked down, the character can roll away by holding
while pressing the heavy slash button in close range (replacing throws from previous games). This grabs and then pushes or pulls the opponent aside, which does no damage by itself but leaves the opponent open to attack. After a character has been knocked down, the character can roll away by holding ![]() or
or ![]() .
.
Each character has a "POW" (怒) gauge that fills as the player is hit by enemy attacks or guards against an attack. The gauge can also be filled by holding ![]() +
+![]() +
+![]() , though the character is vulnerable to attack while doing this. When the gauge is full, the character enters a "Rage explosion" mode (怒りモード) and turns red for a duration. Attacking extends the duration, but it cannot be extended indefinitely. During this state, the character attacks with increased strength and can perform a Weapon-Flipping Technique (武器飛ばし必殺技). These are super moves that do heavy damage and disarm the opponent, which are performed with special button combinations or by pressing
, though the character is vulnerable to attack while doing this. When the gauge is full, the character enters a "Rage explosion" mode (怒りモード) and turns red for a duration. Attacking extends the duration, but it cannot be extended indefinitely. During this state, the character attacks with increased strength and can perform a Weapon-Flipping Technique (武器飛ばし必殺技). These are super moves that do heavy damage and disarm the opponent, which are performed with special button combinations or by pressing ![]() . The gauge drains if the move hits the opponent (but not if it misses). The POW gauge stays permanently filled when a character's health gauge has depleted into the red area and started flashing.
. The gauge drains if the move hits the opponent (but not if it misses). The POW gauge stays permanently filled when a character's health gauge has depleted into the red area and started flashing.
Modes

In the single-player mode, the player chooses any of the twelve selectable characters and the character's alignment and then fights every character, including a fight against the referee Kuroko (who transforms into the player's chosen character but with the opposite alignment) midway through the game. The game ends with a battle against the final boss Zankuro Minazuki. There are eight difficulty levels. A second player can enter the game by pressing START on a second control pad.
There is also a dedicated two-player mode where two players can fight each other in single matches. Zankuro is playable in this mode after completing the game at least once.
In either mode, after choosing a character, the player can choose between two versions of the character: 修羅 (localized as "Slash" in other releases of the game) or 羅刹 ("Bust"). Slash is the the chivalrous alignment and represents the "normal" version of the character, while Bust is a darker, treacherous version with a modified moveset. Then the player chooses between three experience levels: 剣聖 (localized as "Upper Grade"), 剣豪 ("Medium Grade"), or 剣客 ("Beginner Grade"). Upper Grade gives the player a permanently full POW gauge (so the fighter always does increased damage and can perform unlimited "Rage" moves), though the character cannot guard at all (but can still dodge). Medium Grade is the normal game. The character can block, and the POW gauge fills normally. Beginner Grade gives the player five auto-guards (the computer blocks for the player when the character is not attacking). However, the POW gauge can only be charged by holding ![]() +
+![]() +
+![]() (which takes twice as long) and does not fill when the character is attacked, and attacks do less damage.
(which takes twice as long) and does not fill when the character is attacked, and attacks do less damage.
There are also options for setting the attack damage (0% for no damage, 30%, 50%, 100%, 200%, or "MAX" for one-hit kills), the time limit for each round (30, 60, or 99 seconds or unlimited), and the POW gauge (normal for empty or "MAX" for full). After completing the game, there is a Stage Select option that lets the player choose which fight to start from (1 through 12, Last Stage for the final battle against Zankuro, or Ending for the selected character's ending). The game saves high scores and completion status to the Saturn's internal memory.
Items
Though the delivery man, Hikyaku, no longer appears in the backgrounds of the stages, items are still occasionally thrown into the battlefield from off-screen.
| Meat | |
|---|---|
| Restores partial health for a character when walked over. | |
| Bomb | |
| Explodes and damages either fighter. It can be blocked without taking any damage. Bombs are often thrown when one player has not moved much in a while (to discourage players from playing too defensively). |

Characters
Note: Move lists assume that the character is facing right. When facing left, ![]() and
and ![]() should be reversed.
should be reversed.
| S | Any slash button |
| LS | Light slash |
| MS | Medium slash |
| HS | Hard slash |
| K | Kick |
Playable
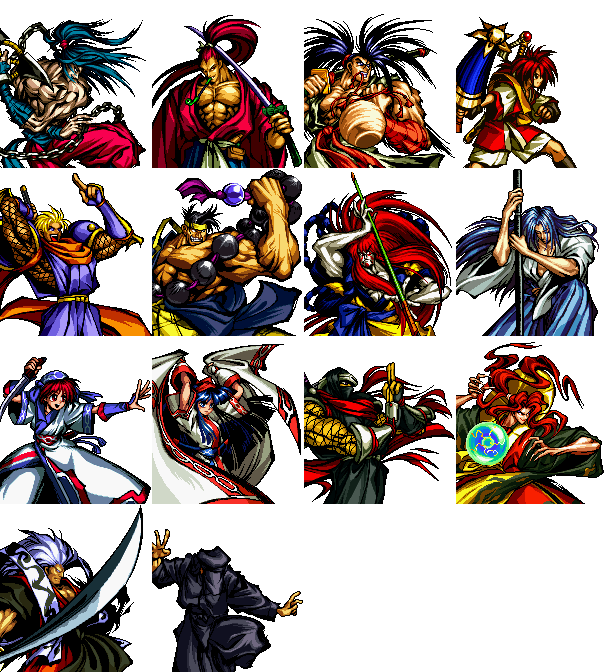
Genjuro was introduced in the previous game (not ported to any Sega console). Basara, Shizumaru, Gaira, and Rimururu are new characters introduced in this game. Amakusa, the boss of the first game, is now a normally playable character.
|
Basara Kubikiri | |||||||||||||||||||||||||||||||||||||||||||||||||||||||||||||||||||||||||||||||||||
A yuurei who was murdered, along with his lover Kagaribi, by the possessed swordsman Zankuro. He was mysteriously brought back to life and seeks revenge. He fights using a large, three-bladed shuriken attached to a chain.
| ||||||||||||||||||||||||||||||||||||||||||||||||||||||||||||||||||||||||||||||||||||
|
Genjuro Kibagami | |||||||||||||||||||||||||||||||||||||||||||||||||||||||||||||||||||||||||||||||||||
A merciless ronin who fights only for his love of violence and killing. He is a foil to Haohmaru and was trained by the same master. He wields a katana.
| ||||||||||||||||||||||||||||||||||||||||||||||||||||||||||||||||||||||||||||||||||||
|
Haohmaru | |||||||||||||||||||||||||||||||||||||||||||||||||||||||||||||||||||||||||||||||||||
A wandering samurai who fights to improve himself and to challenge evildoers. He wields a katana.
| ||||||||||||||||||||||||||||||||||||||||||||||||||||||||||||||||||||||||||||||||||||
|
Shizumaru Hisame | |||||||||||||||||||||||||||||||||||||||||||||||||||||||||||||||||||||||||||||||||||
An adolescent boy who has partially lost his memory and believes he has a "demon" residing within him. He wants vengeance because he believes that Zankuro murdered his family. He fights with a sword sheathed in a parasol.
| ||||||||||||||||||||||||||||||||||||||||||||||||||||||||||||||||||||||||||||||||||||
|
Galford D. Weller | |||||||||||||||||||||||||||||||||||||||||||||||||||||||||||||||||||||||||||||||||||
An American sailor who traveled to Japan to learn ninjutsu. He fights with his pet husky, Poppy (in Slash form only), and wields a ninjatou.
| ||||||||||||||||||||||||||||||||||||||||||||||||||||||||||||||||||||||||||||||||||||
|
Gaira Caffeine | |||||||||||||||||||||||||||||||||||||||||||||||||||||||||||||||||||||||||||||||||||
A Buddhist monk in training and the nephew of Nicotine Caffeine, a master swordsman who trained Haohmaru and Genjuro. He fights with a necklace of giant prayer beads.
| ||||||||||||||||||||||||||||||||||||||||||||||||||||||||||||||||||||||||||||||||||||
|
Kyoshiro Senryo | |||||||||||||||||||||||||||||||||||||||||||||||||||||||||||||||||||||||||||||||||||
A kabuki artist who mixes his performance style with fighting to create a beautiful combat art. He fights with a naginata.
| ||||||||||||||||||||||||||||||||||||||||||||||||||||||||||||||||||||||||||||||||||||
|
Ukyo Tachibana | |||||||||||||||||||||||||||||||||||||||||||||||||||||||||||||||||||||||||||||||||||
An expert iaijutsu swordsman who is suffering from tuberculosis. He vows revenge against the demonic Zankuro for slaughtering the disciples of his old training dojo. He wields a sword.
| ||||||||||||||||||||||||||||||||||||||||||||||||||||||||||||||||||||||||||||||||||||
|
Rimururu | |||||||||||||||||||||||||||||||||||||||||||||||||||||||||||||||||||||||||||||||||||
A priestess and the younger sister of Nakoruru. She can summon and control the ice spirit Konru and wields a kodachi (a short sword).
| ||||||||||||||||||||||||||||||||||||||||||||||||||||||||||||||||||||||||||||||||||||
|
Nakoruru | |||||||||||||||||||||||||||||||||||||||||||||||||||||||||||||||||||||||||||||||||||
A young girl who is a guardian of nature. She fights with her pet hawk, Mamahaha (in Slash form), or her wolf companion, Shikuruu (in Bust form), and wields a kodachi (a short sword).
| ||||||||||||||||||||||||||||||||||||||||||||||||||||||||||||||||||||||||||||||||||||
|
Hanzo Hattori | |||||||||||||||||||||||||||||||||||||||||||||||||||||||||||||||||||||||||||||||||||
A serious ninja and a master of stealth and deception. He fights with a ninjato.
| ||||||||||||||||||||||||||||||||||||||||||||||||||||||||||||||||||||||||||||||||||||
|
Shiro Tokisada Amakusa | |||||||||||||||||||||||||||||||||||||||||||||||||||||||||||||||||||||||||||||||||||
A powerful sorcerer who was resurrected by the dark god Ambrosia, then freed from his wicked possession.
|
Bosses
- Main article: Samurai Spirits Zankurou Musouken/Hidden content.
Zankuro is playable in the two-player versus mode after the player has completed the game with any other character.
|
Kuroko | ||||||||||||||||||||||||||
| The referee from the earlier games appears as a mid-boss after the player has defeated five opponents. Rather than being a unique character, he simply takes the form of the player's chosen character but with the opposite alignment. | |||||||||||||||||||||||||||
|
Zankuro Minazuki | ||||||||||||||||||||||||||
| A formidable swordsman who has been possessed by a demon and filled with bloodlust. He wields a zanbatou (a large sword). He is the final boss. After he is defeated in the first match, he returns with a full power gauge and must be defeated again in a one-round final match (which cannot be won by a time over).
Though he has both Slash and Bust alignments selectable, they have the same moveset and differ only in appearance.
|
Stages
Each character has his or her own stage where battles are hosted.
The stage background changes when both characters have flashing red health, when the third round is low on time, or during the fourth round.


Music and sound
CD audio tracks 32 to 35 contain vocal tracks where Nakoruru and Rimururu promote the Samurai Spirits RPG, Shinsetsu Samurai Spirits Bushidou Retsuden.
History
Release
Zankurou Musouken is the third main entry in the series. Had it been released in the Western world, it would have likely used the name Samurai Shodown III: Blades of Blood, like other ports.
Production credits
| This article needs a list of production credits, either from the game itself, a manual, or other reliable source. Source: Samurai Spirits III Saturn credits.pdf |
- Programmer: Kouichi Toya[5]
Magazine articles
- Main article: Samurai Spirits Zankurou Musouken/Magazine articles.
Promotional material
also published in:
- Sega Saturn Magazine (JP) #1996-20: "1996-20 (1996-11-22)" (1996-11-08)[6]

Physical scans
| Sega Retro Average | |||||||||||||||||||||||||||||||||||||||||||||||||
|---|---|---|---|---|---|---|---|---|---|---|---|---|---|---|---|---|---|---|---|---|---|---|---|---|---|---|---|---|---|---|---|---|---|---|---|---|---|---|---|---|---|---|---|---|---|---|---|---|---|
|
| 75 | |
|---|---|
| Based on 9 reviews | |
| Saturn, JP |
|---|
  Cover
|
Spinecard  Disc Manual |
| Saturn, JP (1MB RAM Pack) |
|---|
 _Saturn_JP_Box_Front_ST%E5%89%AF%E6%9C%AC.jpg) Cover
|
 Disc _Saturn_JP_Box_F_ront.jpg) Jewel Case |
Technical information
- Main article: Samurai Spirits Zankurou Musouken/Technical information.
References
- ↑ http://www.wave-master.com/wm/works/index.html (Wayback Machine: 2004-05-19 20:54)
- ↑ File:SSZM Saturn JP Box Back.jpg
- ↑ 3.0 3.1 https://sega.jp/fb/segahard/ss/soft_licensee2.html (Wayback Machine: 2020-03-20 23:05)
- ↑ 4.0 4.1 4.2 Sega Saturn Magazine, "1996-19 (1996-11-08)" (JP; 1996-10-25), page 115
- ↑ https://x.com/motekin/status/1669197180253634562?s=20
- ↑ Sega Saturn Magazine, "1996-20 (1996-11-22)" (JP; 1996-11-08), page 6
- ↑ Consoles +, "Janvier 1997" (FR; 199x-xx-xx), page 122
- ↑ Famitsu, "1996-11-08,15" (JP; 1996-10-25), page 1
- ↑ Fun Generation, "01/97" (DE; 1996-12-18), page 94
- ↑ MAN!AC, "01/97" (DE; 1996-12-11), page 64
- ↑ Mega Force, "Janvier/Février 1997" (FR; 199x-xx-xx), page 50
- ↑ Saturn Fan, "1996 No. 25" (JP; 1996-11-29), page 180
- ↑ Saturn Fan, "1996 No. 26" (JP; 1996-12-13), page 70
- ↑ Sega Saturn Magazine, "1996-19 (1996-11-08)" (JP; 1996-10-25), page 232
- ↑ Sega Saturn Magazine, "Readers rating final data" (JP; 2000-03), page 13
| Samurai Spirits Zankurou Musouken | |
|---|---|
|
Main page | Hidden content | Magazine articles | Reception | Technical information | |
| Samurai Shodown/Samurai Spirits games for Sega systems | |
|---|---|
| Samurai Shodown (1994) | |
| Samurai Shodown (1994) | |
| Samurai Shodown (1995) | |
| Samurai Spirits Zankurou Musouken (1996) | Shinsetsu Samurai Spirits Bushidou Retsuden (1997) | Samurai Spirits Amakusa Kourin (1997) | Samurai Spirits Best Collection (1998) | |
| Nakoruru: Anohito Kara no Okurimono (2002) | |
| Samurai Spirits Tenkaichi Kenkakuden (2005) | |
| Unlicensed Samurai Shodown/Samurai Spirits games for Sega systems | |
| Soul Edge vs. Samurai Spirits (1997) | Shin Samurai Spirits Haohmaru Jigokuhen (1998) | |