Difference between revisions of "The King of Fighters: Dream Match 1999"
From Sega Retro
(→Gameplay: Super Desperation moves) |
|||
| Line 46: | Line 46: | ||
As before, the playable characters are divided into multiple teams of three, though players can form a custom team consisting of any combination of characters (but not the same character more than once). Before each match, players arrange the team members in any order. For the first round of the match, the first member of each team fights. When a character is defeated, the following member of the team takes his or her place in the next round, while the character on the opposing team continues to fight and has a small portion of health restored (more health is restored if the round is completed faster). The other members of the team stand in the background of the stage during the fight. The match ends when all three members of either team are defeated. | As before, the playable characters are divided into multiple teams of three, though players can form a custom team consisting of any combination of characters (but not the same character more than once). Before each match, players arrange the team members in any order. For the first round of the match, the first member of each team fights. When a character is defeated, the following member of the team takes his or her place in the next round, while the character on the opposing team continues to fight and has a small portion of health restored (more health is restored if the round is completed faster). The other members of the team stand in the background of the stage during the fight. The match ends when all three members of either team are defeated. | ||
| − | Characters move with {{left}} and {{right}} and crouch with {{down}}. They jump upward with {{up}} and jump behind and ahead with {{upleft}} or {{upright}}. They can "super jump" (a faster and farther jump, trailed by afterimages) by pressing {{down}}, then {{upleft}} or {{upright}} quickly. Characters can perform a weak punch with {{X}}, a strong punch with {{Y}}, a weak kick with {{A}}, or a strong kick with {{B}}. Each character has a set of basic, unique, and special moves that can be performed by the player with a specific series of button inputs. | + | Characters move with {{left}} and {{right}} and crouch with {{down}}. They jump upward with {{up}} and jump behind and ahead with {{upleft}} or {{upright}}. They can "super jump" (a faster and farther jump, trailed by afterimages) by pressing {{down}}, then {{upleft}} or {{upright}} quickly. Characters can perform a weak punch with {{X}}, a strong punch with {{Y}}, a weak kick with {{A}}, or a strong kick with {{B}}. Each character has a set of basic, unique, and special moves that can be performed by the player with a specific series of button inputs. Characters have knockdown attacks, which knock the opponent over, that are performed with {{Y}}+{{B}}. This can be done while standing or jumping. |
| − | Characters | + | Characters can become dizzy from being attacked repeatedly; they are uncontrollable and vulnerable in this state but can recover more quickly by rapidly pressing back and forth on the D-Pad along with the attack buttons. When stunned or grabbed, characters can call an undefeated team member in for a special assist attack with {{X}}+{{Y}}+{{A}} if they are visible in frame in that moment. Most team members have a 50% chance of helping, but some always help or never help, depending on the relationships between the characters. For example, Sie Kensou always helps his teammate Athena Asamiya, while Billy Kane never helps the Bogard brothers. |
Blocking can be done by holding the D-Pad in the opposite direction of the opponent. Low attacks must be blocked crouching, while high attacks (including most jumping attacks) must be blocked standing. Special moves still do partial damage when blocked. Characters can also block special moves and aerial attacks (but not grounded normal moves or Desperation moves) in midair from a neutral or backwards jump (but not a forwards jump). Throws can be performed by holding {{left}} or {{right}} and pressing a strong punch or kick button when next to the opponent. While blocking, characters can guard cancel into a counterattack by pressing {{Y}}+{{B}}, at the cost of a level of the power gauge. Different characters have different throws available to them. Throws cannot be blocked, but they can be escaped by pressing {{X}}+{{A}} at the start of the grab. Characters can also recover from a knockdown by rolling away quickly by pressing {{X}}+{{A}} upon landing. | Blocking can be done by holding the D-Pad in the opposite direction of the opponent. Low attacks must be blocked crouching, while high attacks (including most jumping attacks) must be blocked standing. Special moves still do partial damage when blocked. Characters can also block special moves and aerial attacks (but not grounded normal moves or Desperation moves) in midair from a neutral or backwards jump (but not a forwards jump). Throws can be performed by holding {{left}} or {{right}} and pressing a strong punch or kick button when next to the opponent. While blocking, characters can guard cancel into a counterattack by pressing {{Y}}+{{B}}, at the cost of a level of the power gauge. Different characters have different throws available to them. Throws cannot be blocked, but they can be escaped by pressing {{X}}+{{A}} at the start of the grab. Characters can also recover from a knockdown by rolling away quickly by pressing {{X}}+{{A}} upon landing. | ||
| Line 64: | Line 64: | ||
Characters backstep or run with {{left}} {{left}} or {{right}} {{right}}. They can perform short hops by pressing {{upleft}}, {{up}}, or {{upright}}, followed by {{down}} quickly. Characters can perform evasive rolls with {{X}}+{{A}} to roll backward or {{right}}+{{X}}+{{A}} to roll forward (or {{left}}+{{X}}+{{A}} when facing left). Characters are invulnerable during most of the roll, though they can still be grabbed and thrown. They can roll through opponents when they are close. | Characters backstep or run with {{left}} {{left}} or {{right}} {{right}}. They can perform short hops by pressing {{upleft}}, {{up}}, or {{upright}}, followed by {{down}} quickly. Characters can perform evasive rolls with {{X}}+{{A}} to roll backward or {{right}}+{{X}}+{{A}} to roll forward (or {{left}}+{{X}}+{{A}} when facing left). Characters are invulnerable during most of the roll, though they can still be grabbed and thrown. They can roll through opponents when they are close. | ||
| − | The power gauge is filled by attacking the opponent with normal attacks (but not throws) or by performing special moves (regardless of whether they connect with the opponent). When the gauge is filled, it is kept in stock and reset, up to three times. A character can use one stock of the gauge to perform a Desperation move or to enter "MAX mode" by pressing {{X}}+{{Y}}+{{A}}, increasing the damage dealt by the character and reducing the damage taken from the opponent for a duration. Performing a Desperation move while in "MAX mode" performs a more powerful Super Desperation move | + | The power gauge is filled by attacking the opponent with normal attacks (but not throws) or by performing special moves (regardless of whether they connect with the opponent). When the gauge is filled, it is kept in stock and reset, up to three times. A character can use one stock of the gauge to perform a Desperation move or to enter "MAX mode" by pressing {{X}}+{{Y}}+{{A}}, increasing the damage dealt by the character and reducing the damage taken from the opponent for a duration. Performing a Desperation move (at the cost of another stock of the gauge) while in "MAX mode" performs a more powerful Super Desperation move and ends the "MAX mode" state. |
| − | When a character is defeated, the next character on the team starts the round with an additional stock of the power gauge (up to a maximum of five stocks). | + | Stored stocks of the power gauge are carried over to the next character when one character is defeated. When a character is defeated, the next character on the team starts the round with an additional stock of the power gauge (up to a maximum of five stocks). |
}} | }} | ||
{{InfoRow | {{InfoRow | ||
| Line 112: | Line 112: | ||
| portrait={{sprite | King of Fighters 98 DC, Characters.png | 1.5 | crop_width=96 | crop_height=112 | crop_x=0 | crop_y=0}} | | portrait={{sprite | King of Fighters 98 DC, Characters.png | 1.5 | crop_width=96 | crop_height=112 | crop_x=0 | crop_y=0}} | ||
| sprite={{sprite | King of Fighters 98 DC, Sprites, Kyo Kusanagi.gif}} | | sprite={{sprite | King of Fighters 98 DC, Sprites, Kyo Kusanagi.gif}} | ||
| − | | desc=The protagonist of the Orochi Saga. A Japanese high school student and heir of the Kusanagi clan, one of three clans that sealed away the legendary being known as Orochi. His clan possesses the Kusanagi Sword (草薙の剣). He has inherited his clan's ability to control fire. | + | | desc=The protagonist of the Orochi Saga. A Japanese high school student and heir of the Kusanagi clan, one of three clans that sealed away the legendary being known as Orochi. His clan possesses the Kusanagi Sword (草薙の剣), and his family crest is the sun, stylized as a halo of fire, which he wears on the back of his jacket. He has inherited his clan's ability to control fire. |
{{MoveListTable | desc=Special moves | | {{MoveListTable | desc=Special moves | | ||
{{MoveListRow | 114 Shiki: Aragami | {{QCF}} {{LP}} | Kyo lunges forward with an explosive hook punch using his following arm. While the move is being performed, it can be followed up by a fiery uppercut (128 Shiki: Kono Kizu) with {{QCF}} {{punch}} or an elbow smash (127 Shiki: Yano Sabi) with {{HCB}} {{punch}}. The follow-up move can be followed up with a downward punch (Ge Shiki: Migiri Ugachi) with {{punch}} or a side kick (125 Shiki: Nanase) with {{kick}}.}} | {{MoveListRow | 114 Shiki: Aragami | {{QCF}} {{LP}} | Kyo lunges forward with an explosive hook punch using his following arm. While the move is being performed, it can be followed up by a fiery uppercut (128 Shiki: Kono Kizu) with {{QCF}} {{punch}} or an elbow smash (127 Shiki: Yano Sabi) with {{HCB}} {{punch}}. The follow-up move can be followed up with a downward punch (Ge Shiki: Migiri Ugachi) with {{punch}} or a side kick (125 Shiki: Nanase) with {{kick}}.}} | ||
| Line 128: | Line 128: | ||
}} | }} | ||
{{MoveListTable | desc=Desperation moves | | {{MoveListTable | desc=Desperation moves | | ||
| − | {{MoveListRow | Ura 108 Shiki Orochi Nagi | {{down}} {{downleft}} {{HCF}} {{punch}} | Kyo holds a hand into the air and foments a flame while {{punch}} is held. When the button is released, he swipes his hand down, igniting the air around him, and slides forward while surrounded in flames.}} | + | {{MoveListRow | Ura 108 Shiki Orochi Nagi | {{down}} {{downleft}} {{HCF}} {{punch}} | Kyo holds a hand into the air and foments a flame while {{punch}} is held. When the button is released, he swipes his hand down, igniting the air around him, and slides forward while surrounded in flames. |
| − | {{MoveListRow | Saishuu Kessen Ougi "Mu Shiki" | {{QCF}} {{QCF}} {{punch}} | Kyo ignites his hand and throws a burst of fire onto the ground. He runs through the fire, setting himself ablaze, and performs several rapid punches.}} | + | {{ESMove | desc=Super Desperation move | Kyo does a version of the move that hits more times.}}}} |
| + | {{MoveListRow | Saishuu Kessen Ougi "Mu Shiki" | {{QCF}} {{QCF}} {{punch}} | Kyo ignites his hand and throws a burst of fire onto the ground. He runs through the fire, setting himself ablaze, and performs several rapid punches. | ||
| + | {{ESMove | desc=Super Desperation move | Kyo does a version of the move that hits more times and finishes with a Shiki Oni Yaki.}}}} | ||
}} | }} | ||
}} | }} | ||
| Line 151: | Line 153: | ||
}} | }} | ||
{{MoveListTable | desc=Desperation moves | | {{MoveListTable | desc=Desperation moves | | ||
| − | {{MoveListRow | Raikou Ken | {{QCF}} {{QCF}} {{punch}} | Benimaru pulls his fist back to charge it, then jabs in front of him with an electrically charged fist that explodes in an orb of lightning, hitting multiple times.}} | + | {{MoveListRow | Raikou Ken | {{QCF}} {{QCF}} {{punch}} | Benimaru pulls his fist back to charge it, then jabs in front of him with an electrically charged fist that explodes in an orb of lightning, hitting multiple times. |
| − | {{MoveListRow | Electro Trigger | {{HCB}} {{HCB}} {{punch}} (close) | Benimaru grabs and shocks his opponent with bolts of lightning, then throws them.}} | + | {{ESMove | desc=Super Desperation move | Benimaru does a version of the move that hits more times.}}}} |
| + | {{MoveListRow | Electro Trigger | {{HCB}} {{HCB}} {{punch}} (close) | Benimaru grabs and shocks his opponent with bolts of lightning, then throws them. | ||
| + | {{ESMove | desc=Super Desperation move | Benimaru does a version of the move that does more damage.}}}} | ||
}} | }} | ||
}} | }} | ||
| Line 175: | Line 179: | ||
}} | }} | ||
{{MoveListTable | desc=Desperation moves | | {{MoveListTable | desc=Desperation moves | | ||
| − | {{MoveListRow | Jigoku Gokuraku Otoshi | {{HCB}} {{HCB}} {{punch}} (close) | Daimon grabs and trips his opponent, then picks up and slams them back and forth three times before throwing them high into the air.}} | + | {{MoveListRow | Jigoku Gokuraku Otoshi | {{HCB}} {{HCB}} {{punch}} (close) | Daimon grabs and trips his opponent, then picks up and slams them back and forth three times before throwing them high into the air. |
| − | {{MoveListRow | Arashi Noyama: Nekko Meki | {{HCF}} {{HCF}} {{kick}} (close) | Daimon grabs his opponent, then jumps backward toward the ground with a slam. This can be followed up by another slam (Arashi Noyama: Zuko Kiri Kabu Gaeshi) by pressing {{HCF}} {{kick}} (in the opposite direction since Daimon turned around) near the end of the move. This can be followed by a final explosive slam (Arashi Noyama: Bukko Meki Ura Nage) by pressing {{DPF}} {{kick}} (again in the opposite direction since Daimon turned around again) near the end of the follow-up move.}} | + | {{ESMove | desc=Super Desperation move | Daimon grabs and trips his opponent, then picks up and slams them back and forth three times before throwing them high into the air, finishing by clapping the ground as the opponent hits it.}}}} |
| + | {{MoveListRow | Arashi Noyama: Nekko Meki | {{HCF}} {{HCF}} {{kick}} (close) | Daimon grabs his opponent, then jumps backward toward the ground with a slam. This can be followed up by another slam (Arashi Noyama: Zuko Kiri Kabu Gaeshi) by pressing {{HCF}} {{kick}} (in the opposite direction since Daimon turned around) near the end of the move. This can be followed by a final explosive slam (Arashi Noyama: Bukko Meki Ura Nage) by pressing {{DPF}} {{kick}} (again in the opposite direction since Daimon turned around again) near the end of the follow-up move. | ||
| + | {{ESMove | desc=Super Desperation move | Daimon does a version of the move where, for the last move, he slams the opponent back and forth seven times, throws them into the air, catches them, then slams them for a final explosive slam. The first two parts of the move are identical, so there is no difference unless the player performs the entire chain.}}}} | ||
}} | }} | ||
}} | }} | ||
| Line 201: | Line 207: | ||
}} | }} | ||
{{MoveListTable | desc=Desperation moves | | {{MoveListTable | desc=Desperation moves | | ||
| − | {{MoveListRow | Power Geyser | {{down}} {{downleft}} {{HCF}} {{punch}} | Terry punches the ground, causing a geyser of energy to erupt from the ground in front of him.}} | + | {{MoveListRow | Power Geyser | {{down}} {{downleft}} {{HCF}} {{punch}} | Terry punches the ground, causing a geyser of energy to erupt from the ground in front of him. |
| − | {{MoveListRow | High Angle Geyser | {{QCF}} {{QCF}} {{kick}} | Terry charges forward with a shoulder ram, then rises into the air with an uppercut and smashes | + | {{ESMove | desc=Super Desperation move | Terry punches the ground three times, causing an energy geyser to erupt from the ground with each hit, which can juggle the opponent from one into the next.}}}} |
| + | {{MoveListRow | High Angle Geyser | {{QCF}} {{QCF}} {{kick}} | Terry charges forward with a shoulder ram, then rises into the air with an uppercut and smashes the ground with a burning fist, causing an eruption of fire. | ||
| + | {{ESMove | desc=Super Desperation move | Terry does a version of the move where the ground smash creates a rolling wave of fire.}}}} | ||
}} | }} | ||
}} | }} | ||
| Line 222: | Line 230: | ||
}} | }} | ||
{{MoveListTable | desc=Desperation moves | | {{MoveListTable | desc=Desperation moves | | ||
| − | {{MoveListRow | Chou Reppa Dan | {{down}} {{downleft}} {{HCF}} {{kick}} | Andy launches off the ground with his hands, flying at his opponent with a flaming kick.}} | + | {{MoveListRow | Chou Reppa Dan | {{down}} {{downleft}} {{HCF}} {{kick}} | Andy launches off the ground with his hands, flying at his opponent with a flaming kick. The move hits more times when it is performed with {{HK}}. |
| − | {{MoveListRow | Hisho Ryusei Ken | {{QCF}} {{QCF}} {{punch}} | Andy swings his hands around and channels his ki into a concentrated burst.}} | + | {{ESMove | desc=Super Desperation move | Andy does a version of the move that hits more times.}}}} |
| + | {{MoveListRow | Hisho Ryusei Ken | {{QCF}} {{QCF}} {{punch}} | Andy swings his hands around and channels his ki into a concentrated burst. | ||
| + | {{ESMove | desc=Super Desperation move | Andy does a version of the move that finishes with three ki bursts.}}}} | ||
}} | }} | ||
}} | }} | ||
| Line 243: | Line 253: | ||
}} | }} | ||
{{MoveListTable | desc=Desperation moves | | {{MoveListTable | desc=Desperation moves | | ||
| − | {{MoveListRow | Screw Upper | {{QCF}} {{QCF}} {{punch}} | Joe punches into the air, generating a cyclone, then jumps into the air with an uppercut while generating a tall cyclone that covers the full height of the screen.}} | + | {{MoveListRow | Screw Upper | {{QCF}} {{QCF}} {{punch}} | Joe punches into the air, generating a cyclone, then jumps into the air with an uppercut while generating a tall cyclone that covers the full height of the screen. |
| − | {{MoveListRow | Baku Retsu Hurricane Tiger Kakato | {{QCF}} {{QCB}} {{punch}} | Joe slides forward with salvo of punches, then does two uppercuts that send cyclones flying and a rising knee strike, finishing with a kick in the air.}} | + | {{ESMove | desc=Super Desperation move | Joe does a version of the move that does more damage.}}}} |
| + | {{MoveListRow | Baku Retsu Hurricane Tiger Kakato | {{QCF}} {{QCB}} {{punch}} | Joe slides forward with salvo of punches, then does two uppercuts that send cyclones flying and a rising knee strike, finishing with a kick in the air. | ||
| + | {{ESMove | desc=Super Desperation move | Joe does a version of the move that hits more times.}}}} | ||
}} | }} | ||
}} | }} | ||
| Line 268: | Line 280: | ||
}} | }} | ||
{{MoveListTable | desc=Desperation moves | | {{MoveListTable | desc=Desperation moves | | ||
| − | {{MoveListRow | Haoh Shoukou Ken | {{right}} {{HCF}} {{punch}} | Ryo channels and throws a large fireball from both hands. The projectile moves faster when the move is performed with {{HP}}.}} | + | {{MoveListRow | Haoh Shoukou Ken | {{right}} {{HCF}} {{punch}} | Ryo channels and throws a large fireball from both hands. The projectile moves faster when the move is performed with {{HP}}. |
| − | {{MoveListRow | Ryuuko Ranbu | {{down}} {{downright}} {{HCB}} {{punch}} | Ryo rushes forward and unleashes a flurry of punches and kicks, then finishes with a Kohou.}} | + | {{ESMove | desc=Super Desperation move | Ryo does a version of the move that hits more times.}}}} |
| − | {{MoveListRow | Tenchi Haoh Ken | {{QCF}} {{QCF}} {{punch}} | Ryo performs a straight punch that sends his opponent flying away.}} | + | {{MoveListRow | Ryuuko Ranbu | {{down}} {{downright}} {{HCB}} {{punch}} | Ryo rushes forward and unleashes a flurry of punches and kicks, then finishes with a Kohou. |
| + | {{ESMove | desc=Super Desperation move | Ryo does a version of the move that hits more times, and he performs an additional Kohou.}}}} | ||
| + | {{MoveListRow | Tenchi Haoh Ken | {{QCF}} {{QCF}} {{punch}} | Ryo performs a straight punch that sends his opponent flying away. | ||
| + | {{ESMove | desc=Super Desperation move | Ryo does a version of the move that does more damage.}}}} | ||
}} | }} | ||
}} | }} | ||
| Line 291: | Line 306: | ||
}} | }} | ||
{{MoveListTable | desc=Desperation moves | | {{MoveListTable | desc=Desperation moves | | ||
| − | {{MoveListRow | Haoh Shoukou Ken | {{right}} {{HCF}} {{punch}} | Robert channels and throws a large fireball from both hands. The projectile moves faster when the move is performed with {{HP}}.}} | + | {{MoveListRow | Haoh Shoukou Ken | {{right}} {{HCF}} {{punch}} | Robert channels and throws a large fireball from both hands. The projectile moves faster when the move is performed with {{HP}}. |
| − | {{MoveListRow | Ryuuko Ranbu | {{down}} {{downright}} {{HCB}} {{punch}} (close) | Robert rushes forward and unleashes a flurry of punches and kicks, then finishes with a Ryuu Ga.}} | + | {{ESMove | desc=Super Desperation move | Robert does a version of the move that hits more times.}}}} |
| − | {{MoveListRow | Muei Shippuu Juudan Kyaku | {{QCF}} {{QCF}} {{kick}} | Robert jumps in the air with a blur of rapid kicks.}} | + | {{MoveListRow | Ryuuko Ranbu | {{down}} {{downright}} {{HCB}} {{punch}} (close) | Robert rushes forward and unleashes a flurry of punches and kicks, then finishes with a Ryuu Ga. |
| + | {{ESMove | desc=Super Desperation move | Robert does a version of the move that hits more times, and he performs an additional Ryuu Ga.}}}} | ||
| + | {{MoveListRow | Muei Shippuu Juudan Kyaku | {{QCF}} {{QCF}} {{kick}} | Robert jumps in the air with a blur of rapid kicks. | ||
| + | {{ESMove | desc=Super Desperation move | Robert does a version of the move that hits more times and ends with a backflip kick.}}}} | ||
}} | }} | ||
}} | }} | ||
| Line 313: | Line 331: | ||
}} | }} | ||
{{MoveListTable | desc=Desperation moves | | {{MoveListTable | desc=Desperation moves | | ||
| − | {{MoveListRow | Haoh Shokou Ken | {{right}} {{HCF}} {{punch}} | Yuri channels and throws a large fireball from both hands. The projectile moves faster when the move is performed with {{HP}}.}} | + | {{MoveListRow | Haoh Shokou Ken | {{right}} {{HCF}} {{punch}} | Yuri channels and throws a large fireball from both hands. The projectile moves faster when the move is performed with {{HP}}. |
| − | {{MoveListRow | Hien Hou'ou Kyaku | {{down}} {{downright}} {{HCB}} {{kick}} | Yuri dashes forward, then runs up her opponent with a series of stomps.}} | + | {{ESMove | desc=Super Desperation move | Yuri does a version of the move that hits more times.}}}} |
| − | {{MoveListRow | Hien Rekkou | {{QCF}} {{QCF}} {{ | + | {{MoveListRow | Hien Hou'ou Kyaku | {{down}} {{downright}} {{HCB}} {{kick}} | Yuri dashes forward, then runs up her opponent with a series of stomps. |
| + | {{ESMove | desc=Super Desperation move | Yuri does a version of the move that hits more times, and she finishes with a Rai'oh Ken.}}}} | ||
| + | {{MoveListRow | Hien Rekkou | {{QCF}} {{QCF}} {{punch}} | Yuri advances forward with two low jumping uppercuts, then a final, high jumping uppercut. | ||
| + | {{ESMove | desc=Super Desperation move | Yuri does a version of the move that hits more times.}}}} | ||
}} | }} | ||
}} | }} | ||
| Line 340: | Line 361: | ||
}} | }} | ||
{{MoveListTable | desc=Desperation moves | | {{MoveListTable | desc=Desperation moves | | ||
| − | {{MoveListRow | V-Slasher | {{down}} {{downright}} {{HCB}} {{punch}} in midair | Leona dives down with a hand chop, then cuts back into the air, forming a V-shaped explosion.}} | + | {{MoveListRow | V-Slasher | {{down}} {{downright}} {{HCB}} {{punch}} in midair | Leona dives down with a hand chop, then cuts back into the air, forming a V-shaped explosion. |
| − | {{MoveListRow | Gravity Storm | {{QCF}} {{QCF}} {{punch}} | Leona pulls her leg back, then swings it high up, turns around, and swings her leg back, rolling into a cartwheel and launching her opponent into the air. As the opponent is falling, she catches the opponent with two rising punches to the back.}} | + | {{ESMove | desc=Super Desperation move | Leona does a version of the move with a larger explosion that does more damage.}}}} |
| − | {{MoveListRow | Rebel Spark | {{down}} {{downleft}} {{HCF}} {{kick}} | Leona runs to her opponent and stabs them, causing sparks to fly out and then explode.}} | + | {{MoveListRow | Gravity Storm | {{QCF}} {{QCF}} {{punch}} | Leona pulls her leg back, then swings it high up, turns around, and swings her leg back, rolling into a cartwheel and launching her opponent into the air. As the opponent is falling, she catches the opponent with two rising punches to the back. |
| + | {{ESMove | desc=Super Desperation move | Leona rolls into three cartwheel kicks, launching her opponent into the air. As the opponent is falling, she catches the opponent with two rising punches to the back, then kicks the opponent away with an explosive stomp.}}}} | ||
| + | {{MoveListRow | Rebel Spark | {{down}} {{downleft}} {{HCF}} {{kick}} | Leona runs to her opponent and stabs them, causing sparks to fly out and then explode. | ||
| + | {{ESMove | desc=Super Desperation move | Leona, under the effects of the Riot of the Blood, runs to her opponent and penetrates them with an explosive, which detonates after she rolls away and roars.}}}} | ||
}} | }} | ||
}} | }} | ||
| Line 358: | Line 382: | ||
}} | }} | ||
{{MoveListTable | desc=Desperation moves | | {{MoveListTable | desc=Desperation moves | | ||
| − | {{MoveListRow | Bari Bari Vulcan Punch | {{down}} {{downright}} {{HCB}} {{punch}} | Ralf slides forward with an elbow strike, a spinning backhand, and a series of rapid explosive punches, then finishes with an uppercut.}} | + | {{MoveListRow | Bari Bari Vulcan Punch | {{down}} {{downright}} {{HCB}} {{punch}} | Ralf slides forward with an elbow strike, a spinning backhand, and a series of rapid explosive punches, then finishes with an uppercut. |
| − | {{MoveListRow | Unamori Vulcan Punch | {{down}} {{ | + | {{ESMove | desc=Super Desperation move | Ralf slides forward with an elbow strike and spinning backhand, then another elbow strike and spinning backhand, a series of rapid explosive punches, and multiple uppercuts, finally finishing with a jumping uppercut.}}}} |
| − | {{MoveListRow | Galactica Phantom | {{QCF}} {{QCF}} {{punch}} | Ralf pulls his arm back and winds up for a powerful, unblockable punch.}} | + | {{MoveListRow | Unamori Vulcan Punch | {{down}} {{downleft}} {{HCF}} {{kick}} | Ralf runs forward and pushes down his opponent, then pummels them with a series of explosive punches. |
| + | {{ESMove | desc=Super Desperation move | Ralf does a version of the move that hits more times.}}}} | ||
| + | {{MoveListRow | Galactica Phantom | {{QCF}} {{QCF}} {{punch}} | Ralf pulls his arm back and winds up for a powerful, unblockable punch. | ||
| + | {{ESMove | desc=Super Desperation move | Ralf does a version of the move that explodes and does more damage.}}}} | ||
}} | }} | ||
}} | }} | ||
| Line 381: | Line 408: | ||
}} | }} | ||
{{MoveListTable | desc=Desperation moves | | {{MoveListTable | desc=Desperation moves | | ||
| − | {{MoveListRow | Ultra Argentine Back Breaker | {{HCB}} {{HCB}} {{punch}} (close) | Clark tosses his opponent high into the air and catches them with a backbreaker three times, then slams the opponent into the ground.}} | + | {{MoveListRow | Ultra Argentine Back Breaker | {{HCB}} {{HCB}} {{punch}} (close) | Clark tosses his opponent high into the air and catches them with a backbreaker three times, then slams the opponent into the ground. |
| − | {{MoveListRow | Running Three | {{HCF}} {{HCF}} {{kick}} (close) | Clark grabs his opponent, turns around, points ahead, and runs to the end of the stage while carrying and then slamming the opponent.}} | + | {{ESMove | desc=Super Desperation move | Clark tosses his opponent high into the air and catches them with a backbreaker twice, then throws them high into the air again and jumps up to catch them between his legs, riding them down for a final slam.}}}} |
| + | {{MoveListRow | Running Three | {{HCF}} {{HCF}} {{kick}} (close) | Clark grabs his opponent, turns around, points ahead, and runs to the end of the stage while carrying and then slamming the opponent. | ||
| + | {{ESMove | desc=Super Desperation move | Clark performs the move three times in a row, turning around and running in the opposite direction each time.}}}} | ||
}} | }} | ||
}} | }} | ||
| Line 409: | Line 438: | ||
}} | }} | ||
{{MoveListTable | desc=Desperation moves | | {{MoveListTable | desc=Desperation moves | | ||
| − | {{MoveListRow | Shining Crystal Bit | {{ | + | {{MoveListRow | Shining Crystal Bit | {{HCB}} {{HCB}} {{punch}} | Athena hovers in the air and channels psychic energy while orbs revolve around her. This move can be performed in midair. The move can be canceled by pressing {{LP}}+{{HP}}+{{LK}}+{{HK}}. If the player presses {{QCB}} {{punch}} during the move, Athena points forward and shoots an energy orb across the screen (Crystal Shoot). She throws the orb straight ahead with {{LP}} or at an upward angle with {{HP}}. |
| − | {{MoveListRow | Phoenix Fang Arrow | {{QCF}} {{QCF}} {{ | + | {{ESMove | desc=Super Desperation move | Athena does a version of the move where she glows with power and does more damage.}}}} |
| + | {{MoveListRow | Phoenix Fang Arrow | {{QCF}} {{QCF}} {{kick}} in midair | Athena curls into a ball and repeatedly dives diagonally downwards while glowing like a meteor. | ||
| + | {{ESMove | desc=Super Desperation move | Athena does a version of the move that hits many more times.}}}} | ||
}} | }} | ||
}} | }} | ||
| Line 431: | Line 462: | ||
}} | }} | ||
{{MoveListTable | desc=Desperation moves | | {{MoveListTable | desc=Desperation moves | | ||
| − | {{MoveListRow | Shinryuu Seiou Kyaku | {{down}} {{downright}} {{HCB}} {{LK}} | Kensou leaps forward with a flying kick, followed by a front kick and a turning kick, then stands on his hands and propels himself into the air with a split-leg kick.}} | + | {{MoveListRow | Shinryuu Seiou Kyaku | {{down}} {{downright}} {{HCB}} {{LK}} | Kensou leaps forward with a flying kick, followed by a front kick and a turning kick, then stands on his hands and propels himself into the air with a split-leg kick. |
| − | {{MoveListRow | Shinryuu Tenbu Kyaku | {{down}} {{downright}} {{HCB}} {{HK}} | Kensou leaps forward with a flying kick, followed by a front kick and a turning kick while juggling the opponent into the air, then stands on his hands after landing and propels himself into the air with a split-leg kick.}} | + | {{ESMove | desc=Super Desperation move | Kensou does a version of the move where he glows with power and hits more times.}}}} |
| − | {{MoveListRow | Sen Ki Hakkei | {{QCF}} {{QCF}} {{punch}} (close) | Kensou thrusts his palms out and hits his opponent with an orb of psychic energy.}} | + | {{MoveListRow | Shinryuu Tenbu Kyaku | {{down}} {{downright}} {{HCB}} {{HK}} | Kensou leaps forward with a flying kick, followed by a front kick and a turning kick while juggling the opponent into the air, then stands on his hands after landing and propels himself into the air with a split-leg kick. |
| − | {{MoveListRow | Niku Man O Kuu | {{QCB}} {{QCB}} {{punch}} | Kensou eats a meat bun, which restores a small portion of his health.}} | + | {{ESMove | desc=Super Desperation move | Kensou does a version of the move where he glows with power and hits more times.}}}} |
| + | {{MoveListRow | Sen Ki Hakkei | {{QCF}} {{QCF}} {{punch}} (close) | Kensou thrusts his palms out and hits his opponent with an orb of psychic energy that sends them flying away. | ||
| + | {{ESMove | desc=Super Desperation move | Kensou does a version of the move that does more damage and sends both fighters flying away from each other.}}}} | ||
| + | {{MoveListRow | Niku Man O Kuu | {{QCB}} {{QCB}} {{punch}} | Kensou eats a meat bun, which restores a small portion of his health. | ||
| + | {{ESMove | desc=Super Desperation move | Kensou does a version of the move that restores more health, but then he chokes on it and loses all of the health that it restored.}}}} | ||
}} | }} | ||
}} | }} | ||
| Line 455: | Line 490: | ||
}} | }} | ||
{{MoveListTable | desc=Desperation moves | | {{MoveListTable | desc=Desperation moves | | ||
| − | {{MoveListRow | Gou Ran Enpou | {{QCF}} {{QCF}} {{punch}} | Chin takes a drink from his gourd, then breathes a stream of fire. He breathes the stream diagonally upwards with {{LP}} or straight ahead with {{HP}}.}} | + | {{MoveListRow | Gou Ran Enpou | {{QCF}} {{QCF}} {{punch}} | Chin takes a drink from his gourd, then breathes a stream of fire. He breathes the stream diagonally upwards with {{LP}} or straight ahead with {{HP}}. |
| − | {{MoveListRow | Gou En Shourai | {{down}} {{downright}} {{HCB}} {{punch}} | Chin takes a drink from his gourd and explodes with fire, then stumbles drunkenly forward.}} | + | {{ESMove | desc=Super Desperation move | Chin takes a drink from his gourd, then breathes a throng of fireballs in a wide fan pattern.}}}} |
| + | {{MoveListRow | Gou En Shourai | {{down}} {{downright}} {{HCB}} {{punch}} | Chin takes a drink from his gourd and explodes with fire, then stumbles drunkenly forward. | ||
| + | {{ESMove | desc=Super Desperation move | Chin does a version of the move that hits more times and ends with a rolling body attack.}}}} | ||
}} | }} | ||
}} | }} | ||
| Line 480: | Line 517: | ||
}} | }} | ||
{{MoveListTable | desc=Desperation moves | | {{MoveListTable | desc=Desperation moves | | ||
| − | {{MoveListRow | Ichimen Ikatsu San Rai no Fui Jin | {{QCF}} {{QCF}} {{kick}} | Chizuru creates a mirror image that twirls forward with her arms outstretched.}} | + | {{MoveListRow | Ichimen Ikatsu San Rai no Fui Jin | {{QCF}} {{QCF}} {{kick}} | Chizuru creates a mirror image that twirls forward with her arms outstretched. |
| + | {{ESMove | desc=Super Desperation move | Chizuru does a version of the move that hits many more times.}}}} | ||
{{MoveListRow | Ichimen 85 Katsu Reigi no Ishizue | {{down}} {{downleft}} {{HCF}} {{punch}} | Chizuru slides forward with a low strike. If it hits, the opponent glows and cannot perform special moves for a duration.}} | {{MoveListRow | Ichimen 85 Katsu Reigi no Ishizue | {{down}} {{downleft}} {{HCF}} {{punch}} | Chizuru slides forward with a low strike. If it hits, the opponent glows and cannot perform special moves for a duration.}} | ||
}} | }} | ||
| Line 506: | Line 544: | ||
}} | }} | ||
{{MoveListTable | desc=Desperation moves | | {{MoveListTable | desc=Desperation moves | | ||
| − | {{MoveListRow | Chou Hissatu Shinobibachi | {{down}} {{downleft}} {{HCF}} {{kick}} | Mai does a cartwheel kick, then flies through the air with an elbow strike while flames radiate from her body.}} | + | {{MoveListRow | Chou Hissatu Shinobibachi | {{down}} {{downleft}} {{HCF}} {{kick}} | Mai does a cartwheel kick, then flies through the air with an elbow strike while flames radiate from her body. |
| − | {{MoveListRow | Hou'ou no Mai | {{QCB}} {{QCB}} {{punch}} | Mai flips into the air, then spins downward in a ball while tailed by the sash around her waist, which is set alight.}} | + | {{ESMove | desc=Super Desperation move | Mai does a version of the move that hits more times.}}}} |
| − | {{MoveListRow | Sui Chou no Mai | {{QCF}} {{QCF}} {{punch}} | Mai throws three folding fans at her opponent.}} | + | {{MoveListRow | Hou'ou no Mai | {{QCB}} {{QCB}} {{punch}} | Mai flips into the air, then spins downward in a ball while tailed by the sash around her waist, which is set alight. |
| + | {{ESMove | desc=Super Desperation move | Mai does a version of the move that hits more times.}}}} | ||
| + | {{MoveListRow | Sui Chou no Mai | {{QCF}} {{QCF}} {{punch}} | Mai throws three folding fans at her opponent. | ||
| + | {{ESMove | desc=Super Desperation move | Mai throws flaming fans at her opponent that do more damage.}}}} | ||
}} | }} | ||
}} | }} | ||
| Line 528: | Line 569: | ||
}} | }} | ||
{{MoveListTable | desc=Desperation moves | | {{MoveListTable | desc=Desperation moves | | ||
| − | {{MoveListRow | Illusion Dance | {{down}} {{downright}} {{HCB}} {{kick}} | King does a backflip, then performs a series of rapid kicks, ending with a somersault kick and two leaping kicks.}} | + | {{MoveListRow | Illusion Dance | {{down}} {{downright}} {{HCB}} {{kick}} | King does a backflip, then performs a series of rapid kicks, ending with a somersault kick and two leaping kicks. |
| − | {{MoveListRow | Silent Flash | {{QCB}} {{QCB}} {{kick}} | King performs a somersault kick. If it hits, she follows up with a knee strike, then flies upward with an upside-down kick that launches her opponent into the air.}} | + | {{ESMove | desc=Super Desperation move | King does a version of the move that hits more times.}}}} |
| + | {{MoveListRow | Silent Flash | {{QCB}} {{QCB}} {{kick}} | King performs a somersault kick. If it hits, she follows up with a knee strike, then flies upward with an upside-down kick that launches her opponent into the air. | ||
| + | {{ESMove | desc=Super Desperation move | King does a version of the move where she does four somersault kicks before launching the opponent.}}}} | ||
}} | }} | ||
}} | }} | ||
| Line 555: | Line 598: | ||
}} | }} | ||
{{MoveListTable | desc=Desperation moves | | {{MoveListTable | desc=Desperation moves | | ||
| − | {{MoveListRow | Hou'ou Kyaku | {{down}} {{downleft}} {{HCF}} {{kick}} | Kim performs a series of rapid kicks, then | + | {{MoveListRow | Hou'ou Kyaku | {{down}} {{downleft}} {{HCF}} {{kick}} | Kim performs a series of rapid kicks, then finishes with a backflip kick. This move can be performed in midair. |
| − | {{MoveListRow | Hou'ou Tenbu Kyaku | {{down}} {{downright}} {{HCB}} {{kick}} in midair | Kim dives diagonally downward with a stomp, then flips in circles while kicking, ending with a | + | {{ESMove | desc=Super Desperation move | Kim performs a series of rapid kicks, then kicks the opponent into the air and finishes with a backflip kick.}}}} |
| + | {{MoveListRow | Hou'ou Tenbu Kyaku | {{down}} {{downright}} {{HCB}} {{kick}} in midair | Kim dives diagonally downward with a stomp, then flips in circles while kicking, ending with a spinning kick in midair. | ||
| + | {{ESMove | desc=Super Desperation move | Kim does a version of the move that hits more times and ends with multiple spinning kicks.}}}} | ||
}} | }} | ||
}} | }} | ||
| Line 574: | Line 619: | ||
}} | }} | ||
{{MoveListTable | desc=Desperation moves | | {{MoveListTable | desc=Desperation moves | | ||
| − | {{MoveListRow | Tekkyuu Dai Bousou | {{down}} {{downright}} {{HCB}} {{punch}} | Chang charges forward with a series of strikes, then swings his ball by its chain over his head and | + | {{MoveListRow | Tekkyuu Dai Bousou | {{down}} {{downright}} {{HCB}} {{punch}} | Chang charges forward with a series of strikes, then swings his ball by its chain over his head and finishes with one of several moves chosen at random. |
| − | {{MoveListRow | Tekkyu Dai Assatsu | {{QCF}} {{QCF}} {{punch}} | Chang flies diagonally upward, then falls with a body attack.}} | + | {{ESMove | desc=Super Desperation move | Chang does a version of the move that hits more times.}}}} |
| + | {{MoveListRow | Tekkyu Dai Assatsu | {{QCF}} {{QCF}} {{punch}} | Chang flies diagonally upward, then falls with a body attack. He moves forward a short distance before jumping when the move is performed with {{HP}}. | ||
| + | {{ESMove | desc=Super Desperation move | Chang does a version of the move where he flies much higher.}}}} | ||
}} | }} | ||
}} | }} | ||
| Line 597: | Line 644: | ||
}} | }} | ||
{{MoveListTable | desc=Desperation moves | | {{MoveListTable | desc=Desperation moves | | ||
| − | {{MoveListRow | Shin! Chouzetsu Tatsumaki Shinkuu Zan | {{HCB}} {{HCB}} {{punch}} | Choi spins on one leg, producing a large tornado that covers the full height of the screen. He can move with {{left}} or {{right}} while doing this.}} | + | {{MoveListRow | Shin! Chouzetsu Tatsumaki Shinkuu Zan | {{HCB}} {{HCB}} {{punch}} | Choi spins on one leg, producing a large tornado that covers the full height of the screen. He can move with {{left}} or {{right}} while doing this. |
| − | {{MoveListRow | Hou'ou Kyaku | {{down}} {{downright}} {{HCB}} {{ | + | {{ESMove | desc=Super Desperation move | Choi does a version of the move that lasts longer and does more damage.}}}} |
| + | {{MoveListRow | Hou'ou Kyaku | {{down}} {{downright}} {{HCB}} {{kick}} | Choi slides forward with a series of claw slashes, ending with a somersault kick. | ||
| + | {{ESMove | desc=Super Desperation move | Choi does a version of the move that can juggle the opponent repeatedly into the air.}}}} | ||
}} | }} | ||
}} | }} | ||
| Line 621: | Line 670: | ||
}} | }} | ||
{{MoveListTable | desc=Desperation moves | | {{MoveListTable | desc=Desperation moves | | ||
| − | {{MoveListRow | Million Bash Stream | {{down}} {{downleft}} {{HCF}} {{punch}} | Yashiro moves forward while swinging his arms back and forth, finishing with an uppercut that knocks the opponent into the air.}} | + | {{MoveListRow | Million Bash Stream | {{down}} {{downleft}} {{HCF}} {{punch}} | Yashiro moves forward while swinging his arms back and forth, finishing with an uppercut that knocks the opponent into the air. |
| − | {{MoveListRow | Final Impact | {{QCF}} {{QCF}} {{punch}} | Yashiro hits with a powerful punch that sends the opponent flying back. Holding {{punch}} charges the punch to do more damage.}} | + | {{ESMove | desc=Super Desperation move | Yashiro does a version of the move that hits more times and ends with a jumping uppercut.}}}} |
| + | {{MoveListRow | Final Impact | {{QCF}} {{QCF}} {{punch}} | Yashiro hits with a powerful punch that sends the opponent flying back. Holding {{punch}} charges the punch to do more damage. | ||
| + | {{ESMove | desc=Super Desperation move | Yashiro does a version of the move that does more damage.}}}} | ||
}} | }} | ||
}} | }} | ||
| Line 641: | Line 692: | ||
}} | }} | ||
{{MoveListTable | desc=Desperation moves | | {{MoveListTable | desc=Desperation moves | | ||
| − | {{MoveListRow | Shermie Flash | {{HCB}} {{HCB}} {{punch}} (close) | Shermie does a handstand on top of her opponent, then grabs them for a suplex slam.}} | + | {{MoveListRow | Shermie Flash | {{HCB}} {{HCB}} {{punch}} (close) | Shermie does a handstand on top of her opponent, then grabs them for a suplex slam. |
| − | {{MoveListRow | Shermie Carnival | {{HCF}} {{HCF}} {{punch}} (close) | Shermie grabs her opponent and performs | + | {{ESMove | desc=Super Desperation move | Shermie does a version of the move where she holds her opponent after the slam for more damage.}}}} |
| + | {{MoveListRow | Shermie Carnival | {{HCF}} {{HCF}} {{punch}} (close) | Shermie grabs her opponent and performs two suplexes in alternating directions, then falls on her back while tossing the opponent away. | ||
| + | {{ESMove | desc=Super Desperation move | Shermie grabs her opponent and performs four suplexes in alternating directions. She then tosses the opponent into the air, jumps to catch them, and falls to the ground with a spinning slam.}}}} | ||
}} | }} | ||
}} | }} | ||
| Line 665: | Line 718: | ||
}} | }} | ||
{{MoveListTable | desc=Desperation moves | | {{MoveListTable | desc=Desperation moves | | ||
| − | {{MoveListRow | Chain Slide Touch | {{QCF}} {{QCF}} {{punch}} | Chris produces multiple advancing duplicates that hold their hands out for palm strikes that knock the opponent back.}} | + | {{MoveListRow | Chain Slide Touch | {{QCF}} {{QCF}} {{punch}} | Chris produces multiple advancing duplicates that hold their hands out for palm strikes that knock the opponent back. |
| − | {{MoveListRow | Twister Drive | {{QCB}} {{QCB}} {{kick}} | Chris jumps into the air with multiple backflip kicks.}} | + | {{ESMove | desc=Super Desperation move | Chris does a version of the move that hits more times.}}}} |
| + | {{MoveListRow | Twister Drive | {{QCB}} {{QCB}} {{kick}} | Chris jumps into the air with multiple backflip kicks. | ||
| + | {{ESMove | desc=Super Desperation move | Chris performs the move twice in a row, jumping back into the air for more backflip kicks after landing the first time.}}}} | ||
}} | }} | ||
}} | }} | ||
| Line 692: | Line 747: | ||
{{MoveListRow | Bussashi | {{right}}+{{LP}} | Ryuji punches downward, which hits up to two times and can attack opponents who are crouch blocking.}} | {{MoveListRow | Bussashi | {{right}}+{{LP}} | Ryuji punches downward, which hits up to two times and can attack opponents who are crouch blocking.}} | ||
}} | }} | ||
| − | {{MoveListTable | desc= | + | {{MoveListTable | desc=Desperation moves | |
| − | {{MoveListRow | Guillotine | {{QCF}} {{QCF}} {{punch}} | Ryuji leaps forward, coming down with a flaming fist. If it connects, he drags his opponent along the ground with it before throwing them into the air.}} | + | {{MoveListRow | Guillotine | {{QCF}} {{QCF}} {{punch}} | Ryuji leaps forward, coming down with a flaming fist. If it connects, he drags his opponent along the ground with it before throwing them into the air. |
| − | {{MoveListRow | Yondan Drill Driller | {{HCB}} {{HCB}} (close) | Ryuji grabs and throws his opponent into the air, then pummels them with multiple strikes upon landing.}} | + | {{ESMove | desc=Super Desperation move | Ryuji does a version of the where he stomps the opponent repeatedly after dragging them, then kicks them into the air.}}}} |
| + | {{MoveListRow | Yondan Drill Driller | {{HCB}} {{HCB}} {{punch}} (close) | Ryuji grabs and throws his opponent into the air, then pummels them with multiple strikes upon landing. | ||
| + | {{ESMove | desc=Super Desperation move | Ryuji does a version of the move that hits more times.}}}} | ||
}} | }} | ||
}} | }} | ||
| Line 716: | Line 773: | ||
{{MoveListRow | Climbing Arrow | {{downright}}+{{LK}} | Mary does a donkey kick into the air.}} | {{MoveListRow | Climbing Arrow | {{downright}}+{{LK}} | Mary does a donkey kick into the air.}} | ||
}} | }} | ||
| − | {{MoveListTable | desc= | + | {{MoveListTable | desc=Desperation moves | |
| − | {{MoveListRow | Mary Typhoon | {{HCB}} {{HCB}} {{kick}} (close) | Mary climbs onto her opponent's shoulders, grabs their head between her feet, and slams them with her legs.}} | + | {{MoveListRow | Mary Typhoon | {{HCB}} {{HCB}} {{kick}} (close) | Mary climbs onto her opponent's shoulders, grabs their head between her feet, and slams them with her legs. |
| − | {{MoveListRow | Mary Splash Rose | {{down}} {{downright}} {{HCB}} {{punch}} | Mary dashes back and forward in front of her opponent, then does a jumping kick and knocks them into the air with multiple hand swipes.}} | + | {{ESMove | desc=Super Desperation move | Mary does a version of the move that does more damage.}}}} |
| − | {{MoveListRow | Mary Dynamite Swing | {{QCF}} {{QCF}} {{kick}} | Mary knocks her opponent into the air with a knee strike, grabs them in midair and drives them back to the ground, then grabs them again after they stand up and swings them around multiple times by the neck before letting go.}} | + | {{MoveListRow | Mary Splash Rose | {{down}} {{downright}} {{HCB}} {{punch}} | Mary dashes back and forward in front of her opponent, then does a jumping kick and knocks them into the air with multiple hand swipes. |
| + | {{ESMove | desc=Super Desperation move | Mary does a version of the move that hits more times.}}}} | ||
| + | {{MoveListRow | Mary Dynamite Swing | {{QCF}} {{QCF}} {{kick}} | Mary knocks her opponent into the air with a knee strike, grabs them in midair and drives them back to the ground, then grabs them again after they stand up and swings them around multiple times by the neck before letting go. | ||
| + | {{ESMove | desc=Super Desperation move | Mary does a version of the move where she does two suplexes before swinging the opponent by the neck.}}}} | ||
}} | }} | ||
}} | }} | ||
| Line 741: | Line 801: | ||
}} | }} | ||
{{MoveListTable | desc=Desperation moves | | {{MoveListTable | desc=Desperation moves | | ||
| − | {{MoveListRow | Chou Kaen Senpuukon | {{down}} {{downright}} {{HCB}} {{punch}} | Billy twirls his cudgel in front of him while the ends are on fire, creating a circle of flame that rolls forward a short distance. It rolls a longer distance when the move is performed with {{HP}}.}} | + | {{MoveListRow | Chou Kaen Senpuukon | {{down}} {{downright}} {{HCB}} {{punch}} | Billy twirls his cudgel in front of him while the ends are on fire, creating a circle of flame that rolls forward a short distance. It rolls a longer distance when the move is performed with {{HP}}. |
| − | {{MoveListRow | Dai Senpuu | {{QCF}} {{QCF}} {{punch}} | Billy swings his cudgel in a circle around him as it expands, then swings it down like a bat.}} | + | {{ESMove | desc=Super Desperation move | Billy does a version of the move that hits more times.}}}} |
| + | {{MoveListRow | Dai Senpuu | {{QCF}} {{QCF}} {{punch}} | Billy swings his cudgel in a circle around him as it expands, then swings it down like a bat. | ||
| + | {{ESMove | desc=Super Desperation move | Billy does a version of the move that hits more times.}}}} | ||
}} | }} | ||
}} | }} | ||
| Line 753: | Line 815: | ||
| portrait={{sprite | King of Fighters 98 DC, Characters.png | 1.5 | crop_width=96 | crop_height=112 | crop_x=288 | crop_y=336}} | | portrait={{sprite | King of Fighters 98 DC, Characters.png | 1.5 | crop_width=96 | crop_height=112 | crop_x=288 | crop_y=336}} | ||
| sprite={{sprite | King of Fighters 96 Saturn, Sprites, Iori Yagami.gif}} | | sprite={{sprite | King of Fighters 96 Saturn, Sprites, Iori Yagami.gif}} | ||
| − | | desc=The last heir to the Yagami clan (formerly known as the Yasakani Clan), one of the three clans that sealed away Orochi, and the rival of Kyo. His clan possesses the Yasakani Jewel (八尺瓊曲玉). | + | | desc=The last heir to the Yagami clan (formerly known as the Yasakani Clan), one of the three clans that sealed away Orochi, and the rival of Kyo. His clan possesses the Yasakani Jewel (八尺瓊曲玉), and his family crest is the crescent moon, which he wears on the back of his jacket. |
{{MoveListTable | desc=Special moves | | {{MoveListTable | desc=Special moves | | ||
{{MoveListRow | 108 Shiki Yami Barai | {{QCF}} {{punch}} | Iori throws fiery purple sparks across the ground. The projectile moves faster when the move is performed with {{HP}}.}} | {{MoveListRow | 108 Shiki Yami Barai | {{QCF}} {{punch}} | Iori throws fiery purple sparks across the ground. The projectile moves faster when the move is performed with {{HP}}.}} | ||
| Line 768: | Line 830: | ||
}} | }} | ||
{{MoveListTable | desc=Desperation moves | | {{MoveListTable | desc=Desperation moves | | ||
| − | {{MoveListRow | Kin 1211 Shiki Ya Otome | {{down}} {{downright}} {{HCB}} {{punch}} | Iori dashes forward and performs a series of hand strikes, ending by grabbing the opponent and creating an explosion of purple fire.}} | + | {{MoveListRow | Kin 1211 Shiki Ya Otome | {{down}} {{downright}} {{HCB}} {{punch}} | Iori dashes forward and performs a series of hand strikes, ending by grabbing the opponent and creating an explosion of purple fire. |
| − | {{MoveListRow | Ura 108 Shiki Ya Sakazuki | {{down}} {{downleft}} {{HCF}} {{punch}} | Iori throws fiery purple sparks that slide along the ground, | + | {{ESMove | desc=Super Desperation move | Iori, under the effects of the Riot of the Blood, grabs and takes down the opponent, then turns around and slashes them repeatedly. He pauses, then pounds the opponent repeatedly with both hands.}}}} |
| + | {{MoveListRow | Ura 108 Shiki Ya Sakazuki | {{down}} {{downleft}} {{HCF}} {{punch}} | Iori throws fiery purple sparks that slide along the ground, exploding in a pillar of purple fire when they reach the opponent or travel about half the width of the screen. If it hits, the opponent is trapped in a stasis effect until knocked out of it. The projectile moves faster when the move is performed with {{HP}}. | ||
| + | {{ESMove | desc=Super Desperation move | Iori does a version of the move where the sparks slide across the entire width of the screen, exploding into multiple successive pillars along the way.}}}} | ||
}} | }} | ||
}} | }} | ||
| Line 789: | Line 853: | ||
}} | }} | ||
{{MoveListTable | desc=Desperation moves | | {{MoveListTable | desc=Desperation moves | | ||
| − | {{MoveListRow | Heaven's Gate | {{down}} {{downleft}} {{HCF}} {{kick}} | Mature charges across the screen, tackling the opponent into the wall, which causes a pillar of dark energy to explode.}} | + | {{MoveListRow | Heaven's Gate | {{down}} {{downleft}} {{HCF}} {{kick}} | Mature charges across the screen, tackling the opponent into the wall, which causes a pillar of dark energy to explode. |
| − | {{MoveListRow | Nocturnal Lights | {{QCF}} {{QCF}} {{punch}} | Mature advances forward while slashing with her nails, finishing by slashing through the air in a large circle.}} | + | {{ESMove | desc=Super Desperation move | Mature does a version of the move that does more damage.}}}} |
| + | {{MoveListRow | Nocturnal Lights | {{QCF}} {{QCF}} {{punch}} | Mature advances forward while slashing with her nails, finishing by slashing through the air in a large circle. | ||
| + | {{ESMove | desc=Super Desperation move | Mature does a version of the move that hits more times.}}}} | ||
}} | }} | ||
}} | }} | ||
| Line 810: | Line 876: | ||
}} | }} | ||
{{MoveListTable | desc=Desperation moves | | {{MoveListTable | desc=Desperation moves | | ||
| − | {{MoveListRow | Negative Gain | {{HCB}} {{HCB}} {{kick}} (close) | Vice grabs her opponent by the neck with her legs, then slams them to the ground repeatedly.}} | + | {{MoveListRow | Negative Gain | {{HCB}} {{HCB}} {{kick}} (close) | Vice grabs her opponent by the neck with her legs, then slams them to the ground repeatedly. |
| − | {{MoveListRow | Withering Surface | {{QCF}} {{QCF}} {{punch}} (close) | Vice grabs her opponent, then lifts them over her head and slams them opponent into the ground multiple times. Then she jumps into the air with them and slams them into the ground again, which causes a pillar of dark energy to explode.}} | + | {{ESMove | desc=Super Desperation move | Vice does a version of the move where she slams the opponent five times.}}}} |
| + | {{MoveListRow | Withering Surface | {{QCF}} {{QCF}} {{punch}} (close) | Vice grabs her opponent, then lifts them over her head and slams them opponent into the ground multiple times. Then she jumps into the air with them and slams them into the ground again, which causes a pillar of dark energy to explode. | ||
| + | {{ESMove | desc=Super Desperation move | Vice does a version of the move where she tosses the opponent into the air an additional time, then jumps into the air to catch them and slam them into the ground again.}}}} | ||
}} | }} | ||
}} | }} | ||
| Line 835: | Line 903: | ||
}} | }} | ||
{{MoveListTable | desc=Desperation moves | | {{MoveListTable | desc=Desperation moves | | ||
| − | {{MoveListRow | Final Bringer | {{QCF}} {{QCF}} {{punch}} | Heidern flips through the air and tries to land on his opponent's head. If successful, he grabs his opponent and siphons some of their health away (and into his health bar).}} | + | {{MoveListRow | Final Bringer | {{QCF}} {{QCF}} {{punch}} | Heidern flips through the air and tries to land on his opponent's head. If successful, he grabs his opponent and siphons some of their health away (and into his health bar). |
| − | {{MoveListRow | Heidern End | {{down}} {{downleft}} {{HCF}} {{kick}} | Heidern dashes forward a short distance and stabs his opponent with his hand. If it connects, his hand explodes while he is grabbing his opponent.}} | + | {{ESMove | desc=Super Desperation move | Heidern does a version of the move that does more damage.}}}} |
| + | {{MoveListRow | Heidern End | {{down}} {{downleft}} {{HCF}} {{kick}} | Heidern dashes forward a short distance and stabs his opponent with his hand. If it connects, his hand explodes while he is grabbing his opponent. | ||
| + | {{ESMove | desc=Super Desperation move | Heidern does a version of the move that does more damage.}}}} | ||
}} | }} | ||
}} | }} | ||
| Line 857: | Line 927: | ||
}} | }} | ||
{{MoveListTable | desc=Desperation moves | | {{MoveListTable | desc=Desperation moves | | ||
| − | {{MoveListRow | Ryuuko Ranbu | {{down}} {{downright}} {{HCB}} {{punch}} | Takuma rushes forward and unleashes a flurry of punches and kicks, then hops back and performs a Haoh Shoukou Ken.}} | + | {{MoveListRow | Ryuuko Ranbu | {{down}} {{downright}} {{HCB}} {{punch}} | Takuma rushes forward and unleashes a flurry of punches and kicks, then hops back and performs a Haoh Shoukou Ken. |
| − | {{MoveListRow | Shin Kishin Geki | {{QCF}} {{QCF}} {{punch}} (close) | Takuma performs | + | {{ESMove | desc=Super Desperation move | Takuma does a version of the move that hits more times and ends by performing Haoh Shoukou Kens three times.}}}} |
| + | {{MoveListRow | Shin Kishin Geki | {{QCF}} {{QCF}} {{punch}} (close) | Takuma performs a hard-hitting hook, cross, and straight punch, sending the opponent flying away. | ||
| + | {{ESMove | desc=Super Desperation move | Takuma does a version of the move that adds a downward punch and an uppercut, launching the opponent high into the air.}}}} | ||
}} | }} | ||
}} | }} | ||
| Line 878: | Line 950: | ||
}} | }} | ||
{{MoveListTable | desc=Desperation moves | | {{MoveListTable | desc=Desperation moves | | ||
| − | {{MoveListRow | Ura 108 Shiki Orochi Nagi | {{down}} {{downleft}} {{HCF}} {{punch}} | Saisyu gathers a ball of fire between his hands, then dashes forward while his arms are spread apart and surrounded by flames.}} | + | {{MoveListRow | Ura 108 Shiki Orochi Nagi | {{down}} {{downleft}} {{HCF}} {{punch}} | Saisyu gathers a ball of fire between his hands, then dashes forward while his arms are spread apart and surrounded by flames. |
| − | {{MoveListRow | 1207 Shiki To Bou Gai | {{QCF}} {{QCF}} {{punch}} | Saisyu steps forward with a flaming punch and an uppercut, then he causes the ground to explode under the opponent into a pillar of red fire.}} | + | {{ESMove | desc=Super Desperation move | Saisyu does a version of the move that hits more times.}}}} |
| + | {{MoveListRow | 1207 Shiki To Bou Gai | {{QCF}} {{QCF}} {{punch}} | Saisyu steps forward with a flaming punch and an uppercut, then he causes the ground to explode under the opponent into a pillar of red fire. | ||
| + | {{ESMove | desc=Super Desperation move | Saisyu does a version of the move that ends with a flying uppercut inside the pillar of fire.}}}} | ||
}} | }} | ||
}} | }} | ||
| Line 893: | Line 967: | ||
{{MoveListTable | desc=Special moves | | {{MoveListTable | desc=Special moves | | ||
{{MoveListRow | Rolling Soul Diver | {{QCF}} {{punch}} | Heavy-D! slides forward with a jab while a vacuum whirls around his arm like a drill, hitting multiple times. He slides further when the move is performed with {{HP}}. | {{MoveListRow | Rolling Soul Diver | {{QCF}} {{punch}} | Heavy-D! slides forward with a jab while a vacuum whirls around his arm like a drill, hitting multiple times. He slides further when the move is performed with {{HP}}. | ||
| − | {{ESMove | desc=Shadow | If performed after Shadow, Heavy-D! follows up with a second punch with the other hand.}}}} | + | {{ESMove | desc=After Shadow | If performed after Shadow, Heavy-D! follows up with a second punch with the other hand.}}}} |
{{MoveListRow | Ducking Combination | {{QCB}} {{punch}} (up to 2 times) | Heavy-D! slides forward and swings with a hook punch with his following arm. The motion can be repeated a second time, in which case he does another hook with his leading arm. The second punch knocks the opponent over. He slides further when the move is performed with {{HP}}. | {{MoveListRow | Ducking Combination | {{QCB}} {{punch}} (up to 2 times) | Heavy-D! slides forward and swings with a hook punch with his following arm. The motion can be repeated a second time, in which case he does another hook with his leading arm. The second punch knocks the opponent over. He slides further when the move is performed with {{HP}}. | ||
| − | {{ESMove | desc=Shadow | If performed after Shadow, Heavy-D! does a hook punch followed by an uppercut when the motion is performed once. If the motion is repeated a second time, he does a hook punch with each arm, then a Rolling Soul Diver with {{LP}} or an uppercut with {{HP}}.}}}} | + | {{ESMove | desc=After Shadow | If performed after Shadow, Heavy-D! does a hook punch followed by an uppercut when the motion is performed once. If the motion is repeated a second time, he does a hook punch with each arm, then a Rolling Soul Diver with {{LP}} or an uppercut with {{HP}}.}}}} |
{{MoveListRow | Blast Upper | {{QCF}} {{kick}} | Heavy-D! swings his arm into the air, knocking a spray of dirt off the ground. He steps forward slightly when the move is performed with {{HK}}. | {{MoveListRow | Blast Upper | {{QCF}} {{kick}} | Heavy-D! swings his arm into the air, knocking a spray of dirt off the ground. He steps forward slightly when the move is performed with {{HK}}. | ||
| − | {{ESMove | desc=Shadow | If performed after Shadow, Heavy-D! quickly knocks another spray of dirt off the ground with his other arm.}}}} | + | {{ESMove | desc=After Shadow | If performed after Shadow, Heavy-D! quickly knocks another spray of dirt off the ground with his other arm.}}}} |
{{MoveListRow | Soul Flower | {{QCB}} {{kick}} | Heavy-D! punches the ground, causing a burst of energy to surround him. | {{MoveListRow | Soul Flower | {{QCB}} {{kick}} | Heavy-D! punches the ground, causing a burst of energy to surround him. | ||
| − | {{ESMove | desc=Shadow | If performed after Shadow, two bursts of energy explode from the ground after Heavy-D! punches it.}}}} | + | {{ESMove | desc=After Shadow | If performed after Shadow, two bursts of energy explode from the ground after Heavy-D! punches it.}}}} |
{{MoveListRow | Dancing Beat | {{DPF}} {{punch}} (close) | Heavy-D! does a combo of five quick punches that knocks his opponent over. | {{MoveListRow | Dancing Beat | {{DPF}} {{punch}} (close) | Heavy-D! does a combo of five quick punches that knocks his opponent over. | ||
| − | {{ESMove | desc=Shadow | If performed after Shadow, Heavy-D! does a six-punch combo instead.}}}} | + | {{ESMove | desc=After Shadow | If performed after Shadow, Heavy-D! does a six-punch combo instead.}}}} |
{{MoveListRow | Shadow | {{down}} {{down}} {{punch}} | Heavy-D! shadowboxes, which empowers his next special move.}} | {{MoveListRow | Shadow | {{down}} {{down}} {{punch}} | Heavy-D! shadowboxes, which empowers his next special move.}} | ||
}} | }} | ||
| Line 908: | Line 982: | ||
}} | }} | ||
{{MoveListTable | desc=Desperation moves | | {{MoveListTable | desc=Desperation moves | | ||
| − | {{MoveListRow | D.Magnum | {{QCF}} {{QCF}} {{punch}} | Heavy-D! | + | {{MoveListRow | D.Magnum | {{QCF}} {{QCF}} {{punch}} | Heavy-D! does a straight punch that shoots an explosive blast across the screen. |
| − | {{MoveListRow | D.Crazy | {{down}} {{downleft}} {{HCF}} {{punch}} | Heavy-D! hits his opponent with a barrage of punches, ending with an uppercut that launches the opponent into the air.}} | + | {{ESMove | desc=Super Desperation move | Heavy-D! does a version of the move that does more damage.}}}} |
| + | {{MoveListRow | D.Crazy | {{down}} {{downleft}} {{HCF}} {{punch}} | Heavy-D! hits his opponent with a barrage of punches, ending with an uppercut that launches the opponent into the air. | ||
| + | {{ESMove | desc=Super Desperation move | Heavy-D! does a version of the move that hits more times and continues to pummel the opponent as they land.}}}} | ||
}} | }} | ||
}} | }} | ||
| Line 930: | Line 1,006: | ||
}} | }} | ||
{{MoveListTable | desc=Desperation moves | | {{MoveListTable | desc=Desperation moves | | ||
| − | {{MoveListRow | Hell Bound | {{QCF}} {{QCF}} {{punch}} | Lucky touches the ground, causing a pillar of energy to explode from it.}} | + | {{MoveListRow | Hell Bound | {{QCF}} {{QCF}} {{punch}} | Lucky touches the ground, causing a pillar of energy to explode from it. |
| − | {{MoveListRow | Lucky Driver | {{QCF}} {{QCF}} {{kick}} | Lucky pounces forward, then propels himself into the air with a split-leg kick.}} | + | {{ESMove | desc=Super Desperation move | Lucky touches the ground, causing three bursts of energy to shoot out from it at a slight diagonal angle.}}}} |
| + | {{MoveListRow | Lucky Driver | {{QCF}} {{QCF}} {{kick}} | Lucky pounces forward, then propels himself into the air with a split-leg kick. | ||
| + | {{ESMove | desc=Super Desperation move | Lucky does a version of the move that hits more times and finishes with a basketball falling on the opponent for a final hit.}}}} | ||
}} | }} | ||
}} | }} | ||
| Line 950: | Line 1,028: | ||
}} | }} | ||
{{MoveListTable | desc=Desperation moves | | {{MoveListTable | desc=Desperation moves | | ||
| − | {{MoveListRow | American Supernova | {{QCF}} {{QCF}} {{punch}} | Brian jumps diagonally into the air to catch an airborne opponent. If it connects, he brings them down for a shoulder backbreaker, a piledriver, and finally a jumping powerbomb.}} | + | {{MoveListRow | American Supernova | {{QCF}} {{QCF}} {{punch}} | Brian jumps diagonally into the air to catch an airborne opponent. If it connects, he brings them down for a shoulder backbreaker, a piledriver, and finally a jumping powerbomb. |
| − | {{MoveListRow | Big Bang Tackle | {{QCF}} {{QCF}} {{kick}} | Brian dashes back and forth three times with a shoulder tackle that launches his opponent into the air each time.}} | + | {{ESMove | desc=Super Desperation move | Brian does a version of the move where he does two shoulder backbreakers and three piledrivers.}}}} |
| + | {{MoveListRow | Big Bang Tackle | {{QCF}} {{QCF}} {{kick}} | Brian dashes back and forth three times with a shoulder tackle that launches his opponent into the air each time. | ||
| + | {{ESMove | desc=Super Desperation move | Brian does a version of the move where he glows with power and does more damage.}}}} | ||
}} | }} | ||
}} | }} | ||
| Line 976: | Line 1,056: | ||
}} | }} | ||
{{MoveListTable | desc=Desperation moves | | {{MoveListTable | desc=Desperation moves | | ||
| − | {{MoveListRow | Burning Shingo | {{down}} {{downleft}} {{HCF}} {{punch}} | Shingo lunges forward with a hook punch using his following arm, then an uppercut, a downward punch, and a final uppercut that knocks his opponent back.}} | + | {{MoveListRow | Burning Shingo | {{down}} {{downleft}} {{HCF}} {{punch}} | Shingo lunges forward with a hook punch using his following arm, then an uppercut, a downward punch, and a final uppercut that knocks his opponent back. |
| − | {{MoveListRow | Ge Shiki Kake Hou Rin | {{QCF}} {{QCF}} {{punch}} | Shingo steps forward with a shoulder ram that knocks his opponent back.}} | + | {{ESMove | desc=Super Desperation move | Shingo does a version of the move that hits more times.}}}} |
| + | {{MoveListRow | Ge Shiki Kake Hou Rin | {{QCF}} {{QCF}} {{punch}} | Shingo steps forward with a shoulder ram that knocks his opponent back. | ||
| + | {{ESMove | desc=Super Desperation move | Shingo does a version of the move that does more damage.}}}} | ||
}} | }} | ||
}} | }} | ||
| Line 996: | Line 1,078: | ||
}} | }} | ||
{{MoveListTable | desc=Desperation moves | | {{MoveListTable | desc=Desperation moves | | ||
| − | {{MoveListRow | Gigatech Pressure | {{down}} {{downright}} {{HCB}} {{punch}} | Rugal charges across the screen, tackling the opponent into the wall, which causes a pillar of dark energy to explode.}} | + | {{MoveListRow | Gigatech Pressure | {{down}} {{downright}} {{HCB}} {{punch}} | Rugal charges across the screen, tackling the opponent into the wall, which causes a pillar of dark energy to explode. |
| − | {{MoveListRow | Dead End Screamer | {{QCF}} {{QCF}} {{kick}} | Rugal jumps in the air and stomps on his opponent's head, knocking them down, then he spins on top of the opponent.}} | + | {{ESMove | desc=Super Desperation move | Rugal does a version of the move where he finishes by tackling the opponent into the opposite wall, causing another pillar of dark energy to explode.}}}} |
| + | {{MoveListRow | Dead End Screamer | {{QCF}} {{QCF}} {{kick}} | Rugal jumps in the air and stomps on his opponent's head, knocking them down, then he spins on top of the opponent. | ||
| + | {{ESMove | desc=Super Desperation move | Rugal does a version of the move that hits more times.}}}} | ||
}} | }} | ||
}} | }} | ||
| Line 1,019: | Line 1,103: | ||
}} | }} | ||
{{MoveListTable | desc=Desperation moves | | {{MoveListTable | desc=Desperation moves | | ||
| − | {{MoveListRow | Gigatech Pressure | {{down}} {{downright}} {{HCB}} {{punch}} | Rugal charges across the screen, tackling the opponent into the wall, which causes a pillar of dark energy to explode.}} | + | {{MoveListRow | Gigatech Pressure | {{down}} {{downright}} {{HCB}} {{punch}} | Rugal charges across the screen, tackling the opponent into the wall, which causes a pillar of dark energy to explode. |
| − | {{MoveListRow | Destruction Omega | {{QCF}} {{QCF}} {{kick}} (close) | Rugal grabs and pummels his opponent with a series of strikes, ending with a jumping crescent kick.}} | + | {{ESMove | desc=Super Desperation move | Rugal does a version of the move where he finishes by tackling the opponent into the opposite wall, causing another pillar of dark energy to explode.}}}} |
| − | {{MoveListRow | Rugal Execution | {{QCF}} {{QCF}} {{punch}} | Rugal rushes at his opponent as his hand glows with green energy. If it connects, he grabs and lifts the opponent into the air and siphons health from them.}} | + | {{MoveListRow | Destruction Omega | {{QCF}} {{QCF}} {{kick}} (close) | Rugal grabs and pummels his opponent with a series of strikes, ending with a jumping crescent kick. |
| + | {{ESMove | desc=Super Desperation move | Rugal does a version of the move that hits more times.}}}} | ||
| + | {{MoveListRow | Rugal Execution | {{QCF}} {{QCF}} {{punch}} | Rugal rushes at his opponent as his hand glows with green energy. If it connects, he grabs and lifts the opponent into the air and siphons health from them. | ||
| + | {{ESMove | desc=Super Desperation move | Rugal does a version of the move that does more damage.}}}} | ||
}} | }} | ||
}} | }} | ||
| Line 1,045: | Line 1,132: | ||
}} | }} | ||
{{MoveListTable | desc=Desperation moves | | {{MoveListTable | desc=Desperation moves | | ||
| − | {{MoveListRow | Ankoku Jigoku Gokuraku Otoshi | {{HCB}} {{HCB}} {{punch}} (close) | Yashiro lifts his opponent up by the neck, then drops and kicks them. He then picks them up by the neck and slams them back and forth on the ground, ending by tossing them into the air.}} | + | {{MoveListRow | Ankoku Jigoku Gokuraku Otoshi | {{HCB}} {{HCB}} {{punch}} (close) | Yashiro lifts his opponent up by the neck, then drops and kicks them. He then picks them up by the neck and slams them back and forth on the ground, ending by tossing them into the air. |
| − | {{MoveListRow | Araburu Daichi | {{ | + | {{ESMove | desc=Super Desperation move | Yashiro does a version of the move where he slams the opponent more times. After he throws the opponent, a pillar of dark energy explodes from the ground before they land.}}}} |
| − | {{MoveListRow | Hoeru Daichi | {{QCF}} {{QCF}} {{punch}} (close) | Yashiro hits with a powerful blast of energy from his palm that sends the opponent flying back. Holding {{punch}} charges the blast to do more damage.}} | + | {{MoveListRow | Araburu Daichi | {{QCF}} {{QCF}} {{kick}} | Yashiro leaps forward and tries to grab his opponent's head. If successful, he rolls over to the other side of the opponent, then grabs them by the neck, jumps into the air, and slams them into the ground, then jumps higher into the air and throws them into the ground again, following up with a ground smash. |
| + | {{ESMove | desc=Super Desperation move | Yashiro does a version of the move where he slams the opponent more times before jumping.}}}} | ||
| + | {{MoveListRow | Hoeru Daichi | {{QCF}} {{QCF}} {{punch}} (close) | Yashiro hits with a powerful blast of energy from his palm that sends the opponent flying back. Holding {{punch}} charges the blast to do more damage. | ||
| + | {{ESMove | desc=Super Desperation move | Yashiro does a version of the move that does more damage.}}}} | ||
}} | }} | ||
}} | }} | ||
| Line 1,065: | Line 1,155: | ||
}} | }} | ||
{{MoveListTable | desc=Desperation moves | | {{MoveListTable | desc=Desperation moves | | ||
| − | {{MoveListRow | Ankoku Raikou Ken | {{QCF}} {{QCF}} {{punch}} | Shermie pulls her fist back to charge it, then jabs in front of her with an electrically charged fist that explodes in an orb of lightning, hitting multiple times.}} | + | {{MoveListRow | Ankoku Raikou Ken | {{QCF}} {{QCF}} {{punch}} | Shermie pulls her fist back to charge it, then jabs in front of her with an electrically charged fist that explodes in an orb of lightning, hitting multiple times. |
| − | {{MoveListRow | Shukumei, Genei, Shinshi | {{down}} {{downleft}} {{HCF}} {{ | + | {{ESMove | desc=Super Desperation move | Shermie does a version of the move that hits more times.}}}} |
| + | {{MoveListRow | Shukumei, Genei, Shinshi | {{down}} {{downleft}} {{HCF}} {{kick}} | Shermie shoots her body forward with an axle spin kick while her body courses with electricity. | ||
| + | {{ESMove | desc=Super Desperation move | Shermie does a version of the move that hits more times.}}}} | ||
}} | }} | ||
}} | }} | ||
| Line 1,086: | Line 1,178: | ||
}} | }} | ||
{{MoveListTable | desc=Desperation moves | | {{MoveListTable | desc=Desperation moves | | ||
| − | {{MoveListRow | Ankoku Orochi Nagi | {{down}} {{downleft}} {{HCF}} {{punch}} | Chris holds a finger into the air and foments a flame while {{punch}} is held. When the button is released, he swipes his hand down, igniting the air around him, and slides forward while surrounded in flames.}} | + | {{MoveListRow | Ankoku Orochi Nagi | {{down}} {{downleft}} {{HCF}} {{punch}} | Chris holds a finger into the air and foments a flame while {{punch}} is held. When the button is released, he swipes his hand down, igniting the air around him, and slides forward while surrounded in flames. |
| − | {{MoveListRow | Daichi o Harau Gouka | {{QCF}} {{QCF}} {{punch}} | Chris dashes forward while shielded by a barrier of purple fire, then jumps away in a roll.}} | + | {{ESMove | desc=Super Desperation move | Chris does a version of the move that hits more times.}}}} |
| + | {{MoveListRow | Daichi o Harau Gouka | {{QCF}} {{QCF}} {{punch}} | Chris dashes forward while shielded by a barrier of purple fire, then jumps away in a roll. | ||
| + | {{ESMove | desc=Super Desperation move | Chris does a version of the move where he dashes three times (in alternating directions) instead of only once.}}}} | ||
}} | }} | ||
}} | }} | ||
| Line 1,111: | Line 1,205: | ||
}} | }} | ||
{{MoveListTable | desc=Desperation moves | | {{MoveListTable | desc=Desperation moves | | ||
| − | {{MoveListRow | Ura 108 Shiki Orochi Nagi | {{down}} {{downleft}} {{HCF}} {{punch}} | Kyo holds a hand into the air and foments a flame while {{punch}} is held. When the button is released, he swipes his hand down, igniting the air around him, and slides forward while surrounded in flames.}} | + | {{MoveListRow | Ura 108 Shiki Orochi Nagi | {{down}} {{downleft}} {{HCF}} {{punch}} | Kyo holds a hand into the air and foments a flame while {{punch}} is held. When the button is released, he swipes his hand down, igniting the air around him, and slides forward while surrounded in flames. |
| + | {{ESMove | desc=Super Desperation move | Kyo does a version of the move that hits more times.}}}} | ||
}} | }} | ||
}} | }} | ||
| Line 1,131: | Line 1,226: | ||
}} | }} | ||
{{MoveListTable | desc=Desperation moves | | {{MoveListTable | desc=Desperation moves | | ||
| − | {{MoveListRow | Power Geyser | {{down}} {{downleft}} {{HCF}} {{punch}} | Terry punches the ground, causing a geyser of energy to erupt from the ground in front of him.}} | + | {{MoveListRow | Power Geyser | {{down}} {{downleft}} {{HCF}} {{punch}} | Terry punches the ground, causing a geyser of energy to erupt from the ground in front of him. |
| + | {{ESMove | desc=Super Desperation move | Terry punches the ground three times, causing an energy geyser to erupt from the ground with each hit, which can juggle the opponent from one into the next.}}}} | ||
}} | }} | ||
}} | }} | ||
| Line 1,150: | Line 1,246: | ||
}} | }} | ||
{{MoveListTable | desc=Desperation moves | | {{MoveListTable | desc=Desperation moves | | ||
| − | {{MoveListRow | Chou Reppa Dan | {{down}} {{downleft}} {{HCF}} {{kick}} | Andy launches off the ground with his hands, flying at his opponent with a flaming kick.}} | + | {{MoveListRow | Chou Reppa Dan | {{down}} {{downleft}} {{HCF}} {{kick}} | Andy launches off the ground with his hands, flying at his opponent with a flaming kick. |
| − | {{MoveListRow | Dan Da Dan | {{QCF}} {{QCF}} {{punch}} | Andy charges forward with a uppercut, then throws a straight punch that explodes with concentrated energy.}} | + | {{ESMove | desc=Super Desperation move | Andy does a version of the move that hits more times.}}}} |
| + | {{MoveListRow | Dan Da Dan | {{QCF}} {{QCF}} {{punch}} | Andy charges forward with a uppercut, then throws a straight punch that explodes with concentrated energy. | ||
| + | {{ESMove | desc=Super Desperation move | Andy does a version of the move that does more damage.}}}} | ||
}} | }} | ||
}} | }} | ||
| Line 1,170: | Line 1,268: | ||
}} | }} | ||
{{MoveListTable | desc=Desperation moves | | {{MoveListTable | desc=Desperation moves | | ||
| − | {{MoveListRow | Screw Upper | {{QCF}} {{QCF}} {{punch}} | Joe punches into the air, generating a tall cyclone that covers the full height of the screen.}} | + | {{MoveListRow | Screw Upper | {{QCF}} {{QCF}} {{punch}} | Joe punches into the air, generating a tall cyclone that covers the full height of the screen. |
| + | {{ESMove | desc=Super Desperation move | Joe does a version of the move that hits more times.}}}} | ||
}} | }} | ||
}} | }} | ||
| Line 1,188: | Line 1,287: | ||
}} | }} | ||
{{MoveListTable | desc=Desperation moves | | {{MoveListTable | desc=Desperation moves | | ||
| − | {{MoveListRow | Haoh Shoukou Ken | {{right}} {{HCF}} {{punch}} | Ryo channels and throws a large fireball from both hands. The projectile moves faster when the move is performed with {{HP}}.}} | + | {{MoveListRow | Haoh Shoukou Ken | {{right}} {{HCF}} {{punch}} | Ryo channels and throws a large fireball from both hands. The projectile moves faster when the move is performed with {{HP}}. |
| − | {{MoveListRow | Ryuuko Ranbu | {{down}} {{downright}} {{HCB}} {{punch}} | Ryo rushes forward and unleashes a flurry of punches and kicks, then finishes with a Kohou.}} | + | {{ESMove | desc=Super Desperation move | Ryo does a version of the move that hits more times.}}}} |
| + | {{MoveListRow | Ryuuko Ranbu | {{down}} {{downright}} {{HCB}} {{punch}} | Ryo rushes forward and unleashes a flurry of punches and kicks, then finishes with a Kohou. | ||
| + | {{ESMove | desc=Super Desperation move | Robert does a version of the move that hits more times, and he performs an additional Kohou.}}}} | ||
}} | }} | ||
}} | }} | ||
| Line 1,209: | Line 1,310: | ||
}} | }} | ||
{{MoveListTable | desc=Desperation moves | | {{MoveListTable | desc=Desperation moves | | ||
| − | {{MoveListRow | Haoh Shoukou Ken | {{right}} {{HCF}} {{punch}} | Robert channels and throws a large fireball from both hands. The projectile moves faster when the move is performed with {{HP}}.}} | + | {{MoveListRow | Haoh Shoukou Ken | {{right}} {{HCF}} {{punch}} | Robert channels and throws a large fireball from both hands. The projectile moves faster when the move is performed with {{HP}}. |
| − | {{MoveListRow | Ryuuko Ranbu | {{down}} {{downright}} {{HCB}} {{punch}} | Robert rushes forward and unleashes a flurry of punches and kicks, then finishes with a Ryuu Ga.}} | + | {{ESMove | desc=Super Desperation move | Robert does a version of the move that hits more times.}}}} |
| + | {{MoveListRow | Ryuuko Ranbu | {{down}} {{downright}} {{HCB}} {{punch}} | Robert rushes forward and unleashes a flurry of punches and kicks, then finishes with a Ryuu Ga. | ||
| + | {{ESMove | desc=Super Desperation move | Robert does a version of the move that hits more times, and he performs an additional Ryuu Ga.}}}} | ||
}} | }} | ||
}} | }} | ||
| Line 1,229: | Line 1,332: | ||
}} | }} | ||
{{MoveListTable | desc=Desperation moves | | {{MoveListTable | desc=Desperation moves | | ||
| − | {{MoveListRow | Haoh Shokou Ken | {{right}} {{HCF}} {{punch}} | Yuri channels and throws a large fireball from both hands. The projectile moves faster when the move is performed with {{HP}}.}} | + | {{MoveListRow | Haoh Shokou Ken | {{right}} {{HCF}} {{punch}} | Yuri channels and throws a large fireball from both hands. The projectile moves faster when the move is performed with {{HP}}. |
| − | {{MoveListRow | Hien Hou'ou Kyaku | {{down}} {{downright}} {{HCB}} {{kick}} | Yuri dashes forward, then runs up her opponent with a series of | + | {{ESMove | desc=Super Desperation move | Yuri does a version of the move that hits more times.}}}} |
| − | {{MoveListRow | Mekki Zan Kuu Ga | {{QCF}} {{QCF}} {{punch}} | Yuri jumps into the air while performing an uppercut, which knocks down her opponent on impact.}} | + | {{MoveListRow | Hien Hou'ou Kyaku | {{down}} {{downright}} {{HCB}} {{kick}} | Yuri dashes forward, then runs up her opponent with a series of stomps. |
| + | {{ESMove | desc=Super Desperation move | Yuri does a version of the move that hits more times, and she finishes with a Rai'oh Ken.}}}} | ||
| + | {{MoveListRow | Mekki Zan Kuu Ga | {{QCF}} {{QCF}} {{punch}} | Yuri jumps into the air while performing an uppercut, which knocks down her opponent on impact. | ||
| + | {{ESMove | desc=Super Desperation move | Yuri does a version of the move that does more damage.}}}} | ||
}} | }} | ||
}} | }} | ||
| Line 1,253: | Line 1,359: | ||
}} | }} | ||
{{MoveListTable | desc=Desperation moves | | {{MoveListTable | desc=Desperation moves | | ||
| − | {{MoveListRow | Chou Hissatu Shinobibachi | {{down}} {{downleft}} {{HCF}} {{kick}} | Mai does a cartwheel kick, then flies through the air with an elbow strike while flames radiate from her body.}} | + | {{MoveListRow | Chou Hissatu Shinobibachi | {{down}} {{downleft}} {{HCF}} {{kick}} | Mai does a cartwheel kick, then flies through the air with an elbow strike while flames radiate from her body. |
| − | {{MoveListRow | Hana Arashi | {{QCF}} {{QCF}} {{punch}} | Mai dashes forward a short distance, then twirls into the air while swinging her fans around her.}} | + | {{ESMove | desc=Super Desperation move | Mai does a version of the move that hits more times.}}}} |
| + | {{MoveListRow | Hana Arashi | {{QCF}} {{QCF}} {{punch}} | Mai dashes forward a short distance, then twirls into the air while swinging her fans around her. | ||
| + | {{ESMove | desc=Super Desperation move | Mai does a version of the move that hits more times.}}}} | ||
}} | }} | ||
}} | }} | ||
| Line 1,275: | Line 1,383: | ||
}} | }} | ||
{{MoveListTable | desc=Desperation moves | | {{MoveListTable | desc=Desperation moves | | ||
| − | {{MoveListRow | Chou Kaen Senpuukon | {{down}} {{downright}} {{HCB}} {{punch}} | Billy twirls his cudgel in front of him while the ends are on fire, creating a circle of flame that rolls forward a short distance. It rolls a longer distance when the move is performed with {{HP}}.}} | + | {{MoveListRow | Chou Kaen Senpuukon | {{down}} {{downright}} {{HCB}} {{punch}} | Billy twirls his cudgel in front of him while the ends are on fire, creating a circle of flame that rolls forward a short distance. It rolls a longer distance when the move is performed with {{HP}}. |
| − | {{MoveListRow | Salamander Stream | {{QCF}} {{QCF}} {{punch}} | Billy spins his cudgel around him in circles while it is on fire, then strikes the ground with it, causing a burst of flame to erupt.}} | + | {{ESMove | desc=Super Desperation move | Billy does a version of the move that hits more times.}}}} |
| + | {{MoveListRow | Salamander Stream | {{QCF}} {{QCF}} {{punch}} | Billy spins his cudgel around him in circles while it is on fire, then strikes the ground with it, causing a burst of flame to erupt. | ||
| + | {{ESMove | desc=Super Desperation move | Billy does a version of the move that hits more times.}}}} | ||
}} | }} | ||
}} | }} | ||
Revision as of 19:37, 16 April 2024
- For the unlicensed Sega Mega Drive game, see The King of Fighters '99 (Mega Drive).
| |||||||||||||||||||||||||
| The King of Fighters: Dream Match 1999 | |||||||||||||||||||||||||
|---|---|---|---|---|---|---|---|---|---|---|---|---|---|---|---|---|---|---|---|---|---|---|---|---|---|
| System(s): Sega Dreamcast | |||||||||||||||||||||||||
| Publisher: SNK | |||||||||||||||||||||||||
| Developer: SNK | |||||||||||||||||||||||||
| Original system(s): Neo Geo | |||||||||||||||||||||||||
| Peripherals supported: Dreamcast Arcade Stick, Neo Geo Pocket/Dreamcast Setsuzoku Cable, Visual Memory Unit | |||||||||||||||||||||||||
| Genre: Fighting Action/Kakutou Action (格闘アクション)[1][2], Action[3] | |||||||||||||||||||||||||
| Number of players: 1-2 | |||||||||||||||||||||||||
| Official in-game languages: | |||||||||||||||||||||||||
|


The King of Fighters: Dream Match 1999 (ザ・キング・オブ・ファイターズ ドリーム・マッチ 1999) is an entry in the The King of Fighters series, released by SNK for the Sega Dreamcast in 1999. It was not released in Europe. It is an enhanced version of The King of Fighters '98, originally released for the Neo Geo in 1998.
The game supports the Neo Geo Pocket/Dreamcast Setsuzoku Cable so players can transfer data between it and The King of Fighters R-2 for the Neo Geo Pocket Color.
Contents
- 1 Gameplay
- 1.1 Fighting styles
- 1.2 Modes
- 1.3 Characters
- 1.3.1 Hero Team
- 1.3.2 Fatal Fury Team
- 1.3.3 Art of Fighting Team
- 1.3.4 Ikari Warriors Team
- 1.3.5 Psycho Soldier Team
- 1.3.6 Women Fighters Team
- 1.3.7 Korea Justice Team
- 1.3.8 New Faces Team
- 1.3.9 '97 Special Team
- 1.3.10 Yagami Team
- 1.3.11 Masters Team
- 1.3.12 American Sports Team
- 1.3.13 Single-Entry Fighters
- 1.3.14 Bosses
- 1.3.15 Hidden
- 1.3.16 Special Edit Teams
- 1.4 Stages
- 2 History
- 3 Production credits
- 4 Magazine articles
- 5 Promotional material
- 6 Physical scans
- 7 Technical information
- 8 External links
- 9 External links
- 10 References
Gameplay


The game is a team fighting game based on The King of Fighters '98. It is a special, non-canonical "Dream Match" with no story (similar to Fatal Fury Special and Real Bout Garou Densetsu Special), released as an intermission between the conclusion of the Orochi Saga and the start of the next story arc. It collects most of the characters from the previous games and refines (but does not radically alter) the gameplay. As in The King of Fighters '97, players have a choice between two playing styles, Advanced and Extra, with a few slight modifications. In Advanced mode, performing a Super Desperation move while in "MAX mode" returns the character to a normal state. Another change is the addition of the "Advantage System"; when one character loses a round, the losing team is given a handicap in its favor. In Advanced mode, this means that the player's stock of power gauges is increased by one. In Extra mode, this means that the power gauge is shortened so it can be charged faster, and the maximum remaining health requirement for performing a Desperation move is increased. The Dreamcast version is mostly the same as the original release, but it adds an arranged soundtrack, an anime introduction cinematic, and 3D backgrounds and runs at 60 frames per second.
As before, the playable characters are divided into multiple teams of three, though players can form a custom team consisting of any combination of characters (but not the same character more than once). Before each match, players arrange the team members in any order. For the first round of the match, the first member of each team fights. When a character is defeated, the following member of the team takes his or her place in the next round, while the character on the opposing team continues to fight and has a small portion of health restored (more health is restored if the round is completed faster). The other members of the team stand in the background of the stage during the fight. The match ends when all three members of either team are defeated.
Characters move with ![]() and
and ![]() and crouch with
and crouch with ![]() . They jump upward with
. They jump upward with ![]() and jump behind and ahead with
and jump behind and ahead with ![]() or
or ![]() . They can "super jump" (a faster and farther jump, trailed by afterimages) by pressing
. They can "super jump" (a faster and farther jump, trailed by afterimages) by pressing ![]() , then
, then ![]() or
or ![]() quickly. Characters can perform a weak punch with
quickly. Characters can perform a weak punch with ![]() , a strong punch with
, a strong punch with ![]() , a weak kick with
, a weak kick with ![]() , or a strong kick with
, or a strong kick with ![]() . Each character has a set of basic, unique, and special moves that can be performed by the player with a specific series of button inputs. Characters have knockdown attacks, which knock the opponent over, that are performed with
. Each character has a set of basic, unique, and special moves that can be performed by the player with a specific series of button inputs. Characters have knockdown attacks, which knock the opponent over, that are performed with ![]() +
+![]() . This can be done while standing or jumping.
. This can be done while standing or jumping.
Characters can become dizzy from being attacked repeatedly; they are uncontrollable and vulnerable in this state but can recover more quickly by rapidly pressing back and forth on the D-Pad along with the attack buttons. When stunned or grabbed, characters can call an undefeated team member in for a special assist attack with ![]() +
+![]() +
+![]() if they are visible in frame in that moment. Most team members have a 50% chance of helping, but some always help or never help, depending on the relationships between the characters. For example, Sie Kensou always helps his teammate Athena Asamiya, while Billy Kane never helps the Bogard brothers.
if they are visible in frame in that moment. Most team members have a 50% chance of helping, but some always help or never help, depending on the relationships between the characters. For example, Sie Kensou always helps his teammate Athena Asamiya, while Billy Kane never helps the Bogard brothers.
Blocking can be done by holding the D-Pad in the opposite direction of the opponent. Low attacks must be blocked crouching, while high attacks (including most jumping attacks) must be blocked standing. Special moves still do partial damage when blocked. Characters can also block special moves and aerial attacks (but not grounded normal moves or Desperation moves) in midair from a neutral or backwards jump (but not a forwards jump). Throws can be performed by holding ![]() or
or ![]() and pressing a strong punch or kick button when next to the opponent. While blocking, characters can guard cancel into a counterattack by pressing
and pressing a strong punch or kick button when next to the opponent. While blocking, characters can guard cancel into a counterattack by pressing ![]() +
+![]() , at the cost of a level of the power gauge. Different characters have different throws available to them. Throws cannot be blocked, but they can be escaped by pressing
, at the cost of a level of the power gauge. Different characters have different throws available to them. Throws cannot be blocked, but they can be escaped by pressing ![]() +
+![]() at the start of the grab. Characters can also recover from a knockdown by rolling away quickly by pressing
at the start of the grab. Characters can also recover from a knockdown by rolling away quickly by pressing ![]() +
+![]() upon landing.
upon landing.
Characters can taunt with ![]() or
or ![]() which is a short animation during which the character is vulnerable to attack. Taunting an opponent can reduce their power gauge, slow down their manual charging, and stop them from reaching the maximum level.
which is a short animation during which the character is vulnerable to attack. Taunting an opponent can reduce their power gauge, slow down their manual charging, and stop them from reaching the maximum level.
Fighting styles
Players choose one of two modes before selecting their characters.
| Advanced | |
|---|---|
| The Advanced mode is a more offense-oriented playstyle based on the gameplay of The King of Fighters '96.
Characters backstep or run with The power gauge is filled by attacking the opponent with normal attacks (but not throws) or by performing special moves (regardless of whether they connect with the opponent). When the gauge is filled, it is kept in stock and reset, up to three times. A character can use one stock of the gauge to perform a Desperation move or to enter "MAX mode" by pressing Stored stocks of the power gauge are carried over to the next character when one character is defeated. When a character is defeated, the next character on the team starts the round with an additional stock of the power gauge (up to a maximum of five stocks). | |
| Extra | |
| The Extra mode is a more defense-oriented playstyle based on the gameplay of the first two games in the series, The King of Fighters '94 and The King of Fighters '95.
Characters hop back or forth with The power gauge is filled by blocking attacks or taking damage. It can also be filled manually, although it leaves the character vulnerable to an attack, by holding When a character is defeated, the power gauge is shortened for the next character on the team so that it charges faster, and the maximum remaining health requirement for performing a Desperation move is increased. |

Modes


The game has the following modes:
- Team Play: A single-player mode where the player forms a team of any three characters and fights three-on-three elimination matches against five randomly selected teams, then against one of the sub-boss teams (Yagami Team, Masters Team, or American Sports Team), and finally against Omega Rugal, for a total of 7 matches. This is the main mode.
- Team Vs: A two-player mode where each player forms a team of any three characters and fights a three-on-three elimination match. Players can choose a different team after each match, and the game keeps track of each player's wins and losses.
- Single Play: A single-player mode where the player chooses a character and fights one-on-one matches against five individual opponents, then against a member of one of the sub-boss teams (Yagami Team, Masters Team, or American Sports Team), and finally against Omega Rugal, for a total of 9 matches. Matches are fought to the best of three rounds.
- Single Vs: A two-player mode where each player chooses a single character and fights a one-on-one match to the best of three rounds. Players can choose a different character after each match, and the game keeps track of each player's wins and losses.
- Survivor: A single-player mode where the player chooses a character and fights one-on-three matches against five randomly selected teams, then against one of the sub-boss teams (Yagami Team, Masters Team, or American Sports Team), and finally against Omega Rugal, for a total of 7 matches. The character does not have any health restored between matches aside from the amount partially restored after each round (depending on the player's performance).
- Practice: A training mode where the player can choose any character and any opponent. There are options to set the behavior of the opponent (normal for active or stand, jump, or crouch for passive) and whether the opponent guards or not. There is no time limit, the power gauge is permanently charged (with the character's health in the red flashing zone), and the opponent has infinite health. Taunting causes the opponent to walk forward.
- Neo Geo Pocket: The game supports transferring save data to or from a Neo Geo Pocket Color via a Neo Geo Pocket/Dreamcast Setsuzoku Cable. Points can be earned by completing the game with any characters, then those points can be transferred to King of Fighters R-2 for the Neo Geo Pocket Color to unlock skills in its Making mode. Likewise, points earned in King of Fighters R-2 can be transferred to the Dreamcast to unlock ten art galleries, which feature artwork for The King of Fighters '99 (which would be ported to the Dreamcast as The King of Fighters: Evolution).
In any of the single-player modes, a second player can enter the game for a challenge match by pressing START on a second control pad. If certain conditions are met, Shingo challenges the player to a match before fighting the sub-boss team. There are eight difficulty levels (Beginner, Easy, Normal, Arcade, Hard, Very Hard, Hardest, Expert). When continuing a game, the player can optionally receive a bonus, such as lowering the difficulty or reducing the health of the opponent, selected similarly to playing a slot machine. Since the game has no storyline, none of the teams have endings, though every canonical team (and every Special Edit Team) has a special piece of artwork that appears after the credits roll.
Characters
Note: Move lists assume that the character is facing right. When facing left, ![]() and
and ![]() should be reversed.
should be reversed.
| P | Any punch button |
| LP | Light punch |
| HP | Hard punch |
| K | Any kick button |
| LK | Light kick |
| HK | Hard kick |
The game contains a total of 51 playable characters.
Almost of the characters from the previous games return, with the following exceptions:
- Eiji Kisaragi from The King of Fighters '95.
- Kasumi Todoh, the Boss Team (Geese Howard, Wolfgang Krauser, and Mr. Big), and Goenitz from The King of Fighters '96.
- Orochi from The King of Fighters '97.
Alternate versions of several characters, representing their movesets from other games, are also available.
Hero Team
A Japanese team consisting of Kyo Kusanagi, the main character of the Orochi Saga, and his friends.
|
Kyo Kusanagi | ||||||||||||||||||||||||||||||||||||||||||||
The protagonist of the Orochi Saga. A Japanese high school student and heir of the Kusanagi clan, one of three clans that sealed away the legendary being known as Orochi. His clan possesses the Kusanagi Sword (草薙の剣), and his family crest is the sun, stylized as a halo of fire, which he wears on the back of his jacket. He has inherited his clan's ability to control fire.
| |||||||||||||||||||||||||||||||||||||||||||||
|
Benimaru Nikaido | ||||||||||||||||||||||||||||||||||||||||||||
A young model and Kyo's best friend. He is a professional fighter and the son of a multimillionaire family. He fights with shootboxing and electrokinetic abilities.
| |||||||||||||||||||||||||||||||||||||||||||||
|
Goro Daimon | ||||||||||||||||||||||||||||||||||||||||||||
A former Olympic gold medalist judoka who has geokinetic abilities.
|
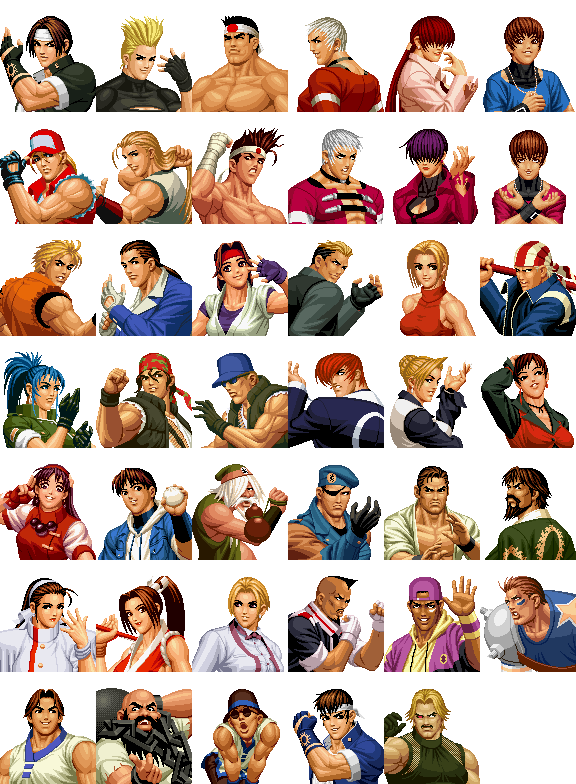
Fatal Fury Team
A team representing characters from the Fatal Fury series of fighting games.
|
Terry Bogard | ||||||||||||||||||||||||||||||||||||||
The protagonist of the Fatal Fury series. He was trained in various fighting styles such as karate, kickboxing, and kung fu by his late father and their master Tung Fu Rue.
| |||||||||||||||||||||||||||||||||||||||
|
Andy Bogard | ||||||||||||||||||||||||||||||||||||||
Terry's brother and a ninja of the Shiranui-ryuu style.
| |||||||||||||||||||||||||||||||||||||||
|
Joe Higashi | ||||||||||||||||||||||||||||||||||||||
A Muay Thai kickboxing champion and a good friend of the Bogard brothers.
|
Art of Fighting Team
A team representing characters from the Art of Fighting series of fighting games.
|
Ryo Sakazaki | |||||||||||||||||||||||||||||||||||||||||
The protagonist of the Art of Fighting series. He is a practitioner of Kyokugen-ryuu, a style of karate created by his father.
| ||||||||||||||||||||||||||||||||||||||||||
|
Robert Garcia | |||||||||||||||||||||||||||||||||||||||||
Ryo's best friend and friendly rival who fights using a kick-heavy version of Kyokugen-ryuu. He comes from a wealthy family.
| ||||||||||||||||||||||||||||||||||||||||||
|
Yuri Sakazaki | |||||||||||||||||||||||||||||||||||||||||
The younger sister of Ryo, who fights with an unorthodox take on Kyokugen-ryuu.
|
Ikari Warriors Team
A team representing characters from the Ikari Warriors series of run-and-gun games.
|
Leona | |||||||||||||||||||||||||||||||||||||||||
The adoptive daughter of Heidern, who found her after her village was destroyed and her family was murdered by the Hakkesshu. Though she has no memory of it, she is the daughter of a member of the Hakkesshu and a descendant of Orochi.
| ||||||||||||||||||||||||||||||||||||||||||
|
Ralf Jones | |||||||||||||||||||||||||||||||||||||||||
The protagonist of the Ikari Warriors series. He is a mercenary whose fighting style is based on hard punches.
| ||||||||||||||||||||||||||||||||||||||||||
|
Clark Still | |||||||||||||||||||||||||||||||||||||||||
Ralf's best friend and a former spy before joining the Ikari Warriors. He fights with a wrestling-based fighting style.
|
Psycho Soldier Team
A team representing characters from the Psycho Soldier series of platforming games.
|
Athena Asamiya | ||||||||||||||||||||||||||||||||||||||||||||
The protagonist of Psycho Soldier. She is a pop idol with powerful psychic abilities and kung fu training (with a greater emphasis on the former).
| |||||||||||||||||||||||||||||||||||||||||||||
|
Sie Kensou | ||||||||||||||||||||||||||||||||||||||||||||
The self-proclaimed love interest of Athena, who has the same psychic abilities and kung fu training as Athena (though his fighting style emphasizes the latter).
| |||||||||||||||||||||||||||||||||||||||||||||
|
Chin Gentsai | ||||||||||||||||||||||||||||||||||||||||||||
The master of Athena and Kensou and a master of various styles of kung fu, though he fights primarily with drunken boxing.
|
Women Fighters Team
A team consisting of female characters, formed by King from Art of Fighting.
|
Chizuru Kagura | |||||||||||||||||||||||||||||||||||||||||||||||||||||
The heiress of the Yata clan, one of the three clans to seal away Orochi. Her clan possesses the Yata Mirror (八汰鏡). She fights with dance-like motions and open-handed strikes and can create mirror images of herself. She is harmed if one of her mirror images is attacked.
| ||||||||||||||||||||||||||||||||||||||||||||||||||||||
|
Mai Shiranui | |||||||||||||||||||||||||||||||||||||||||||||||||||||
A kunoichi who practices her family's own martial art, Shiranui-ryuu Ninjutsu.
| ||||||||||||||||||||||||||||||||||||||||||||||||||||||
|
King | |||||||||||||||||||||||||||||||||||||||||||||||||||||
A bar owner who fights with her own kick-heavy take on Muay Thai.
|
Korea Justice Team
A Korean team consisting of Kim Kaphwan (from Fatal Fury) and two original characters.
|
Kim Kaphwan | |||||||||||||||||||||||||||||||||||||||||
A taekwondo master with a strong sense of justice who formed the Korea Justice Team in order to rehabilitate the two criminals on his team.
| ||||||||||||||||||||||||||||||||||||||||||
|
Chang Koehan | |||||||||||||||||||||||||||||||||||||||||
A very large criminal who fights with a big metal ball attached to a chain.
| ||||||||||||||||||||||||||||||||||||||||||
|
Choi Bounge | |||||||||||||||||||||||||||||||||||||||||
A very small criminal who fights with two clawed hands (resembling the horror movie villain Freddy Krueger).
|
New Faces Team
A team consisting of the members of the band C.Y.S., who are also members of the Hakkesshu and three of the four Heavenly Kings of Orochi.
|
Yashiro Nanakase | ||||||||||||||||||||||||||||||||||||||||||||
The guitarist for the band C.Y.S., who has a deep hated for Iori. His fighting style is focused on his hard punches.
| |||||||||||||||||||||||||||||||||||||||||||||
|
Shermie | ||||||||||||||||||||||||||||||||||||||||||||
A fashion designer and the keyboardist for the band C.Y.S. She fights using an acrobatic grappling style.
| |||||||||||||||||||||||||||||||||||||||||||||
|
Chris | ||||||||||||||||||||||||||||||||||||||||||||
The lead vocalist for the band C.Y.S. His fighting style is centered around his incredible speed.
|
'97 Special Team
A team of "outlaws" originating from the Fatal Fury series.
|
Ryuji Yamazaki | |||||||||||||||||||||||||||||||||||||||||||||||
A criminal who fights with one hand in his pocket. It is revealed that he is actually a descendant of the Hakkesshu, but he is immune to the effects of the Riot of the Blood because of his insanity.
| ||||||||||||||||||||||||||||||||||||||||||||||||
|
Blue Mary | |||||||||||||||||||||||||||||||||||||||||||||||
A freelance agent who is hired by Billy Kane, unknowingly working in the service of the criminal boss Geese Howard. She is a love interest of Terry Bogard, and she fights with grappling techniques, with a particular emphasis on flying jointlocks.
| ||||||||||||||||||||||||||||||||||||||||||||||||
|
Billy Kane | |||||||||||||||||||||||||||||||||||||||||||||||
The right-hand man of Geese Howard, who organizes the team under orders from Geese in order to investigate the power of Orochi.
|
Yagami Team
A team consisting of Iori Yagami, rival to protagonist Kyo Kusanagi, and two members of the Hakkesshu, Mature and Vice.
|
Iori Yagami | |||||||||||||||||||||||||||||||||||||||||
The last heir to the Yagami clan (formerly known as the Yasakani Clan), one of the three clans that sealed away Orochi, and the rival of Kyo. His clan possesses the Yasakani Jewel (八尺瓊曲玉), and his family crest is the crescent moon, which he wears on the back of his jacket.
| ||||||||||||||||||||||||||||||||||||||||||
|
Mature | |||||||||||||||||||||||||||||||||||||||||
A member of the Hakkesshu brotherhood. She fights with her sharp nails.
| ||||||||||||||||||||||||||||||||||||||||||
|
Vice | |||||||||||||||||||||||||||||||||||||||||
A member of the Hakkesshu brotherhood. She fights with her monstrous strength.
|
Masters Team
A team of masters who trained some of the other fighters in the game.
|
Heidern | ||||||||||||||||||||||||||||||||||||||
The commander of the Ikari Warriors, an elite mercenary unit, whose hands can cut like knives.
| |||||||||||||||||||||||||||||||||||||||
|
Takuma Sakazaki | ||||||||||||||||||||||||||||||||||||||
The father of Ryo and Yuri. He is the master and creator of Kyokugen-ryuu.
| |||||||||||||||||||||||||||||||||||||||
|
Saisyu Kusanagi | ||||||||||||||||||||||||||||||||||||||
Kyo's father and leader of the Kusanagi clan.
|
American Sports Team
An American team consisting of sports players. The team's only other appearance was in The King of Fighters '94.
|
Heavy-D! | ||||||||||||||||||||||||||||||||||||||
A former professional boxer who has been banned from normal competition after seriously injuring another fighter. He forms and leads the team.
| |||||||||||||||||||||||||||||||||||||||
|
Lucky Glauber | ||||||||||||||||||||||||||||||||||||||
A karate champion and former professional basketball player.
| |||||||||||||||||||||||||||||||||||||||
|
Brian Battler | ||||||||||||||||||||||||||||||||||||||
An American football player who loves tackling opponents.
|
Single-Entry Fighters
These characters are not members of any team.
|
Shingo Yabuki | ||||||||||||||||||||||||||||||||||||||
Kyo Kusanagi's biggest fan, who has imitated his style of dress and his fighting moves. Though he cannot control fire like Kyo can and often messes up or forgets moves (and must consult his notepad), he is good-natured and indefatigable. His moves uniquely have a chance of landing a "Critical Hit" that does extra damage. He can be fought as a secret challenger before the sub-boss team if certain conditions are fulfilled.
| |||||||||||||||||||||||||||||||||||||||
|
Rugal Bernstein | ||||||||||||||||||||||||||||||||||||||
A merciless crime lord who turns fallen fighters into statues for his trophy collection.
|
Bosses
Omega Rugal can be selected by holding START when selecting Rugal in any mode.
|
Omega Rugal | ||||||||||||||||||||||||||||||||
A version of Rugal that was revived with a small parcel of Orochi's blood. He is the final boss of the game.
|
Hidden
The alternate versions of the following characters can be selected by holding START when selecting their normal forms in any mode.
Awakened Orochi Team
|
Orochi Yashiro | |||||||||||||||||||||||||||||||||||
The true form of Yashiro. He was designed to be a darker counterpart to Goro Daimon and fights with a similar grappling style.
| ||||||||||||||||||||||||||||||||||||
|
Orochi Shermie | |||||||||||||||||||||||||||||||||||
The true form of Shermie. She is meant to be a darker counterpart to Benimaru Nikaido and possesses similar electrokinetic abilities.
| ||||||||||||||||||||||||||||||||||||
|
Orochi Chris | |||||||||||||||||||||||||||||||||||
The true form of Chris. He was designed to be a darker counterpart to Kyo Kusanagi and can control fire like him.
|
EX Characters
|
EX Kyo Kusanagi | |||||||||||||||||||||||||||||||||||||||||
A version of Ryo using his moveset from The King of Fighters '95.
| ||||||||||||||||||||||||||||||||||||||||||
|
EX Terry Bogard | |||||||||||||||||||||||||||||||||||||||||
A version of Terry using his moveset from Real Bout Fatal Fury 2.
| ||||||||||||||||||||||||||||||||||||||||||
|
EX Andy Bogard | |||||||||||||||||||||||||||||||||||||||||
A version of Andy using his moveset from Real Bout Fatal Fury 2.
| ||||||||||||||||||||||||||||||||||||||||||
|
EX Joe Higashi | |||||||||||||||||||||||||||||||||||||||||
A version of Joe using his moveset from The King of Fighters '94.
| ||||||||||||||||||||||||||||||||||||||||||
|
EX Ryo Sakazaki | |||||||||||||||||||||||||||||||||||||||||
A version of Ryo using his moveset from The King of Fighters '94.
| ||||||||||||||||||||||||||||||||||||||||||
|
EX Robert Garcia | |||||||||||||||||||||||||||||||||||||||||
A version of Robert using his moveset from The King of Fighters '94.
| ||||||||||||||||||||||||||||||||||||||||||
|
EX Yuri Sakazaki | |||||||||||||||||||||||||||||||||||||||||
A version of Yuri using her moveset from The King of Fighters '94.
| ||||||||||||||||||||||||||||||||||||||||||
|
EX Mai Shiranui | |||||||||||||||||||||||||||||||||||||||||
A version of Mai using her moveset from Real Bout Fatal Fury 2.
| ||||||||||||||||||||||||||||||||||||||||||
|
EX Billy Kane | |||||||||||||||||||||||||||||||||||||||||
A version of Billy using his moveset from Real Bout Fatal Fury 2.
|
Special Edit Teams
Special Edit Teams are hidden teams that have special ending artwork, which the player can form by selecting certain characters.
| Team | Characters | ||
|---|---|---|---|
| Three Sacred Treasures Team | Kyo Kusanagi | Iori Yagami | Chizuru Kagura |
| Shingo Team | Kyo Kusanagi | Iori Yagami | Shingo Yabuki |
| Rugal Team | Rugal Bernstein | Mature | Vice |
| SNK Heroes Team | Kyo Kusanagi | Terry Bogard | Ryo Sakazaki |
| No. 2 Team | Benimaru Nikaido | Andy Bogard | Robert Garcia |
| No. 3 Team | Goro Daimon | Joe Higashi | Yuri Sakazaki |
| Baseball Team | Ralf Jones | Blue Mary | Lucky Glauber |
| Father Team | Saisyu Kusanagi | Takuma Sakazaki | Kim Kaphwan |
| Rapid Punch Team | Billy Kane | Chang Koehan | Joe Higashi |
| Severely Burned Team | Kyo Kusanagi | Saisyu Kusanagi | Orochi Chris |
| Sakazaki Family Team | Ryo Sakazaki | Yuri Sakazaki | Takuma Sakazaki |
| Teen Team | Shingo Yabuki | Sie Kensou | Chris |
| Orochi Ladies Team | Shermie | Mature | Vice |
| Orochi Men Team | Yashiro Nanakase | Chris | Ryuji Yamazaki |
| Kusanagi Style Team | Kyo Kusanagi | Saisyu Kusanagi | Shingo Yabuki |
| Comedy Team | Robert Garcia | Sie Kensou | Choi Bounge |
| Cute Team | Choi Bounge | Chin Gentsai | Chang Koehan |
| Cap Team | Terry Bogard | Lucky Glauber | Clark Still |
| Other Hero Team | Benimaru Nikaido | Goro Daimon | Shingo Yabuki |
| Other Ikari Team | Leona | Ralf Jones | Heidern |
| Other Heroines Team | Athena Asamiya | Mai Shiranui | Yuri Sakazaki |
| Destructors Team | Ralf Jones | Brian Battler | Chang Koehan |
| April 8th Birthday Team | King | Mature | Shingo Yabuki |
Stages
The stages are the same as in King of Fighters '98 but modeled in 3D for the Dreamcast version. Several stages have variants for the second or third rounds. In the arcade modes, the stages for the first five teams are chosen randomly, but the sub-boss teams have their own associated stages: USA Yard for the Yagami Team, Japan Temple for the Masters Team, and USA Wharf for the American Sports Team. The final boss, Omega Rugal, is fought in the Sunken Ship stage.
An option to manually select the stage in the versus and practice modes can be enabled in the options. Holding START while selecting Japan Street, China, Spain, or USA Wharf selects the variant for the second round.


History
The game was once set to be a launch title for the Dreamcast in the US[7], but was delayed at the last minute, arriving in late October.
Sequels and re-releases
The popularity of King of Fighters '98 led it to receive two further revisions. The first was The King of Fighters '98: Ultimate Match for the Taito Type X arcade board in 2008 (and ported to the PlayStation 2 and Xbox 360 shortly thereafter). It completes the roster with the characters omitted from the earlier versions, plus more EX characters, and it adds a third fighting style, Ultimate. A third updated version titled The King of Fighters '98: Ultimate Match Final Edition was released to arcades in 2011 in Japan and on Steam in 2014. It is a version of Ultimate Match with some balance changes.
The game was followed by The King of Fighters: Evolution, which is based off the Neo Geo arcade version of The King of Fighters '99, leading to some name confusion among the entries.
Production credits
- Kyo: Masahiro Nonaka
- Daimon/Ryo: Masaki Usui
- Benimaru/Ralf/Choi: Monster Maetsuka
- Terry/Kim: Satoshi Hashimoto
- Andy: Keiichi Nanba
- Joe: Nobuyuki Hiyama
- Robert: Koichi Mantarou
- Yuri: Kaori Horie
- Leona/Vice: Masae Yumi
- Clark: Yoshinori Shima
- Athena: Haruna Ikezawa
- Kensou/Brian: Eiji Yano
- Chin/Heavy D!: Tosikazu Nisimura
- Chizuru: Akiko Saitou
- Lucky: Key Inage
- Mai: Akoya Sogi
- Chang: Hiroyuki Arita
- Yashiro: Makoto Awane
- Shermie: Hazuki Nishikawa
- Chris: Rio Ogata
- Yamazaki: Kouji Ishii
- Billy: Atsushi Yamanishi
- Rugal/Heidern: Toshimitsu Arai
- Takuma: Eiji Tsuda
- Saisyu: Keiichirou Sakaki
- King/Mary/Announce: Harumi Ikoma
- Mature: Hiroko Tsuji
- Shingo: Takehito Koyasu
- Iori: Kunihiko Yasui
- Producer: T.Nishiyama
- Chief Director: Toyochan, Go-1 Ridingmonkey, Vivide-Vavide-Bu., K.Nagahima, Strass (Woo)
- Design Director: Akihiro Yamada, Rabbit Maeda, Satoshi Yoshioka, Starfreet
- 3D Stage Designer: Yuji Wada, Se-Zi, Seri, Katakura, Masaya Kobayashi, A・K・A, Akira Mizuki, Iori, Miyakoda-TK., Atsushi Ota, Nobuyuki Yanai, Kyo_K., Mikiko Nagao, Asa-ko, Ume-Shirou
- 2D・3D Fix Designer: SP:Kane, R_Mo, Buchi, Nanako
- Program Director: Yukihiro Deguchi, Ryo Nasu
- Program: Urz_9th, Mambo, Mue, Maki, Takashi Nakano, Yuji Niida, Yoshiyuki Tanaka, Jeno, Babi
- Sound: Ackey, Marimo, Yassun, Koujirou, Hori_Hori
- Animation Staff: Kenichi Kasai, Kohji Watanabe, Hideki Hasimoto, Yosinobu Andoh, Kenji Kuroyanagi, Yosiki Mizuno, Ryohtaroh Akao, Sinya Uchida, Satosi Sisido, Tsutomu Sibuya, Akira Nakamura, Shoichi Sunahara, Buyu, Tokyo Animation Center, Chiho Nakamura, Tokyo Kids, Studio Cats, Sinichi Tanimura, Kuniharu Arai, Hiroaki Satoh, Yuko Yano, Akiko Isigami, Tomokazu Tokoro, Kohjiro Hayasi, Hiroo Yosioka, Mitsuhiro Karato, Naoki Kitamura, Sachiko Sakave "Ooz", Kohji Kajita, Masashi Tsukino, Yaoki Tokashiki, Sigemasa Oda, Animation Production Cooperation Digimation
- Special Thanks: Dai Yaman, Markey T., Mtaka, J.Kasahara, La'C++
- Chief Director: Toyohisa Tanabe
- Sub Director: Haruo Tomita, Honey-Bunny-Kaju, Tak.Yamashita, Hiroto Namada, T.Hosokawa, K."Yanya"Hikida, Tomonori Kamio
- System Editor: K.Nagashima
- Front Chief: Blaster-Lu
- Front Designer:
- Kyo: Akiko Yukawa
- Ryo: Mitsuru・Kawasaki, I・no・u・e
- Benimaru: M・Asakura
- Robert: Mitsuru・Kawasaki
- Daimon: S・Yamamoto
- Yuri: Mina Kawai
- Terry: S・Yamamoto
- Leona: Dear Ichi Jerry
- Andy: C Yamasaki
- Ralf: Dear Ichi Jerry
- Joe: Hiroto Kittaka
- Clark: Dear Ichi Jerry
- Athena: C Yamasaki
- Kim: I・no・u・e
- Kensou: 44Oka
- Chang: Tahara Ujyu-
- Chin: 44Oka
- Choi: 44Oka
- Chizuru: C Yamasaki
- Yashiro: Shio Shio Shio
- Mai: C Yamasaki
- Shermie: Miho Uematsu
- King: Miho Uematsu
- Chris: Hiroto Kittaka
- Yamazaki: M・Asakura
- Heavy D!: I・no・u・e
- Mary: Tahara Ujyu-
- Lucky: Mitsuru・Kawasaki
- Billy: Hiroto Kittaka
- Brian: Mina Kawai
- Heidern: Dear Ichi Jerry
- Iori: M・Asakura
- Takuma: S・Yamamoto
- Mature/Vice: Shio Shio Shio, Miho Uematsu, Akiko Yukawa
- Saisyu: Tahara Ujyu-
- Shingo: Akiko Yukawa
- Rugal: C Yamasaki
- Back Chief: Yurika
- Back Designer:
- JPN-Street Stage: Manoru
- USA-Yard Stage: Tohru Nakanishi
- China Stage: K.W
- JPN-Temple Stage: Yurika
- Korea Stage: Tsugumi A
- USA-Wharf Stage: Tsugumi A
- Mid-East Stage: Raishi
- Rugal Stage: Souzi Takamori
- Spain Stage: M.K
- Demo Designer: Kalkin, Dandy・Matuisan!, Yokoya・Mamasato
- Special Effect: Mika Nishida, Aoyama
- Program: S・Fujinuki, Cyber・Kondo, Souta Ichino
- Sound: Sha-V, Tate-Norio, Marimo
- Adjuster: K.Asai, Hataboh de Go!, M-Panic! Plus
- Bug Checker: Anne, Sanpo, H.Shimmei, R.Tsune, 8097:K.I (Non)
- Special Thanks: H.Kawano, Y.Inui, Takeshi & Mika, Yanosabi-Ibuki, and All Chupilars, Pe-Pe- Meguron, All SNK Staff
- Produced by: SNK
Magazine articles
- Main article: The King of Fighters: Dream Match 1999/Magazine articles.
Promotional material


also published in:
- Gamers' Republic (US) #19: "December 1999" (1999-11-15)[9]

also published in:
- Dreamcast Magazine (JP) #1999-15: "1999-15 (1999-05-07)" (1999-04-23)[10]
- Dreamcast Magazine (JP) #1999-16: "1999-16 (1999-05-14,21)" (1999-04-30)[11]
also published in:
- Dreamcast Magazine (JP) #1999-21: "1999-21 (1999-07-02)" (1999-06-18)[12]
- Dreamcast Magazine (JP) #1999-22: "1999-22 (1999-07-09,16)" (1999-06-25)[13]
Physical scans
| Sega Retro Average | ||||||||||||||||||||||||||||||||||||||||||||||||||||||||||||||||||||||||||||||||||||
|---|---|---|---|---|---|---|---|---|---|---|---|---|---|---|---|---|---|---|---|---|---|---|---|---|---|---|---|---|---|---|---|---|---|---|---|---|---|---|---|---|---|---|---|---|---|---|---|---|---|---|---|---|---|---|---|---|---|---|---|---|---|---|---|---|---|---|---|---|---|---|---|---|---|---|---|---|---|---|---|---|---|---|---|---|
|
| 73 | |
|---|---|
| Based on 16 reviews | |
| Dreamcast, JP |
|---|
  Cover
|
 Manual |
| Dreamcast, JP (Dorikore) |
|---|
 Cover
|
| Dreamcast, US |
|---|
  Cover
|
Manual  Inlay |
| Dreamcast, BR |
|---|
  Cover
|
 Disc  Manual  Inlay |
Technical information
- Main article: The King of Fighters: Dream Match 1999/Technical information.
ROM dump status
| System | Hash | Size | Build Date | Source | Comments | |||||||||
|---|---|---|---|---|---|---|---|---|---|---|---|---|---|---|
|
1,189,832,112 | 1999-08-31 | GD-ROM (US) | T-3101N V1.004 | ||||||||||
|
1,190,544,768 | 1999-05-14 | GD-ROM (JP) | T-3101M V1.004 |
External links
External links
- Sega of America webpage: Dreamcast
- Sega of Japan catalogue pages (Japanese): Dreamcast, Dreamcast (Dorikore)
References
- ↑ File:KoF99 DC JP Box Back.jpg
- ↑ 2.0 2.1 2.2 http://sega.jp/dc/990006/ (Wayback Machine: 2007-12-10 00:21)
- ↑ https://sega.jp/history/hard/dreamcast/software_l.html#tab01 (Wayback Machine: 2020-02-01 22:57)
- ↑ 4.0 4.1 http://sega.jp/dc/001227/ (Wayback Machine: 2014-08-03 11:18)
- ↑ http://www.sega.com:80/sega/catalog/SegaProduct.jhtml?PRODID=238 (Wayback Machine: 2002-04-06 05:27)
- ↑ 6.0 6.1 Official Dreamcast Magazine, "January 2000" (US; 1999-12-05), page 113
- ↑ Official Dreamcast Magazine, "September 1999" (US; 1999-08-24), page 17
- ↑ File:King of Fighters Dream Match 1999 DC credits.pdf
- ↑ Gamers' Republic, "December 1999" (US; 1999-11-15), page 21
- ↑ Dreamcast Magazine, "1999-15 (1999-05-07)" (JP; 1999-04-23), page 86
- ↑ Dreamcast Magazine, "1999-16 (1999-05-14,21)" (JP; 1999-04-30), page 70
- ↑ Dreamcast Magazine, "1999-21 (1999-07-02)" (JP; 1999-06-18), page 74
- ↑ Dreamcast Magazine, "1999-22 (1999-07-09,16)" (JP; 1999-06-25), page 66
- ↑ Computer & Video Games, "January 2000" (UK; 1999-12-15), page 34
- ↑ Consoles +, "Août 1999" (FR; 1999-0x-xx), page 82
- ↑ Dreamcast Magazine, "1999-21 (1999-07-02)" (JP; 1999-06-18), page 17
- ↑ Dreamcast Magazine, "No. 2" (UK; 1999-10-21), page 80
- ↑ Dorimaga, "2002-18 (2002-10-11)" (JP; 2002-09-27), page 34
- ↑ Dreamzone, "Octobre 1999" (FR; 1999-09-xx), page 84
- ↑ Electronic Gaming Monthly, "January 2000" (US; 1999-12-07), page 224
- ↑ Entsiklopediya igr dlya Dreamcast, "Izdaniye chetvertoye, dopolnennoye" (RU; 2002-xx-xx), page 107
- ↑ Famitsu, "1999-07-02" (JP; 1999-06-18), page 34
- ↑ GameFan, "Volume 7, Issue 9: September 1999" (US; 1999-xx-xx), page 20
- ↑ GamePro, "October 1999" (US; 1999-xx-xx), page 149
- ↑ Game Informer, "October 1999" (US; 1999-xx-xx), page 82
- ↑ MAN!AC, "09/99" (DE; 1999-08-04), page 42
- ↑ Next Generation, "November 1999" (US; 1999-10-19), page 118
- ↑ neXt Level, "September 1999" (DE; 1999-08-06), page 22
- ↑ Sega Magazin, "September 1999" (DE; 1999-08-04), page 18
| The King of Fighters games for Sega systems or published by Sega | |
|---|---|
| The King of Fighters '95 (1996) | The King of Fighters '96 (?) | The King of Fighters '96 + '95: Gentei KOF Double Pack (?) | The King of Fighters '97 (1998) | The King of Fighters Best Collection (1998) | |
| The King of Fighters: Dream Match 1999 (1999) | The King of Fighters: Evolution (2000) | The King of Fighters 2000 (2002) | The King of Fighters 2001 (2002) | The King of Fighters 2002 (2003) | |
| The King of Fighters Neowave (2004) | The King of Fighters XI (2005) | |
| The King of Fighters XIV (2016) | |
| Unlicensed The King of Fighters games for Sega systems | |
| King of Fighters 98' (1998) | The King of Fighters '99 (1999) | |
| Related games | |
| Capcom vs. SNK: Millennium Fight 2000 (2000) | Capcom vs. SNK Millennium Fight 2000 Pro (2000) | Capcom vs. SNK 2 Millionaire Fighting 2001 (2001) | NeoGeo Battle Coliseum (2005) | SNK Heroines: Tag Team Frenzy (2018) | |
- Dreamcast Arcade Stick-compatible games
- Neo Geo Pocket/Dreamcast Setsuzoku Cable-compatible games
- Visual Memory Unit-compatible games
- 1-2 player games
- JP Dreamcast games
- All JP games
- US Dreamcast games
- All US games
- BR Dreamcast games
- All BR games
- Dreamcast games
- 1999 Dreamcast games
- All 1999 games
- Dreamcast fighting games
- All fighting games
- Dreamcast games with Sofdec video
- All games
- Old-style rating (cvg)
- Update ratings template
- 1 old ratings
- Missing ROM hashes
- Old technical information
- The King of Fighters: Dream Match 1999
- The King of Fighters