Difference between revisions of "Street Fighter Zero 3"
From Sega Retro
(moves for returning characters) |
|||
| Line 24: | Line 24: | ||
| properties={{Properties|SAT|qsound}} | | properties={{Properties|SAT|qsound}} | ||
}} | }} | ||
| − | '''''{{PAGENAME}}''''' (ストリートファイターZERO 3) is a 1998 fighting game by [[Capcom]] originally released for Capcom CPS | + | '''''{{PAGENAME}}''''' (ストリートファイターZERO 3) is a 1998 fighting game by [[Capcom]] originally released for Capcom CPS-2 arcade hardware. It is the third game in the ''Street Fighter Zero'' (''Street Fighter Alpha'' in the West) series, following ''[[Street Fighter Zero]]'' and ''[[Street Fighter Zero 2]]''. |
| − | This [[Sega Saturn]] version of ''Street Fighter Zero 3'' was released in 1999 in Japan only, shortly after a [[Street Fighter Alpha 3|Dreamcast version]]. It requires the use of the 4MB [[Extended RAM Cartridge]] to | + | This [[Sega Saturn]] version of ''Street Fighter Zero 3'' was released in 1999 in Japan only, shortly after a [[Street Fighter Alpha 3|Dreamcast version]]. It requires the use of the 4MB [[Extended RAM Cartridge]] to function. |
==Gameplay== | ==Gameplay== | ||
| + | {{ScreenThumb|Sf3charselsaturn.png|width=200|Character select}} | ||
The gameplay system from the previous ''Zero'' games was given a complete overhaul with the addition of three selectable fighting styles, a much larger roster of characters, and for the first time since the original ''Street Fighter II'', new theme music for all the returning characters. | The gameplay system from the previous ''Zero'' games was given a complete overhaul with the addition of three selectable fighting styles, a much larger roster of characters, and for the first time since the original ''Street Fighter II'', new theme music for all the returning characters. | ||
The controls for several actions has been modified from previous ''Zero'' games: the level of a Super Combo move in Z-ism is now determined by the strength of the attack button pressed (i.e. Medium Punch or Kick for a Lv. 2 Super Combo), rather than the number of buttons pushed; and throwing is now done by pressing two punch or kick buttons simultaneously. | The controls for several actions has been modified from previous ''Zero'' games: the level of a Super Combo move in Z-ism is now determined by the strength of the attack button pressed (i.e. Medium Punch or Kick for a Lv. 2 Super Combo), rather than the number of buttons pushed; and throwing is now done by pressing two punch or kick buttons simultaneously. | ||
| + | |||
| + | The Saturn game contains all of the features added to a previous [[PlayStation]] port of the game, save for the usage of polygons and the PocketStation mode. It uses the extra RAM to include more frames of animation than the PlayStation version. Evil Ryu, Shin Akuma and Guile are immediately selectable. While the World Tour and Survival modes are virtually unchanged from the PlayStation version, Dramatic Battle received major improvements with the addition of Reverse Dramatic Battle and allowing three different characters to be used. | ||
===ISMs=== | ===ISMs=== | ||
The most obvious change in ''Street Fighter Zero 3'' is the introduction of three different playing styles known as "ISMs". | The most obvious change in ''Street Fighter Zero 3'' is the introduction of three different playing styles known as "ISMs". | ||
| + | {{InfoTable| | ||
| + | {{InfoRow | ||
| + | | title=X-ism | ||
| + | | sprite={{sprite | Street Fighter Zero 3, Isms.png | crop_width=92 | crop_height=72 | crop_x=0 | crop_y=0}} | ||
| + | | desc=Simple style based on ''Super Street Fighter II Turbo'' (unusually, even localized versions keep the reference to the Japanese title, ''Super Street Fighter II X''), in which the player has a single-level Super Combo gauge and access to a single (but powerful) Super Combo move, though players cannot air-block or use ''Zero'' Counters. | ||
| + | }} | ||
| + | {{InfoRow | ||
| + | | title=Z-ism | ||
| + | | sprite={{sprite | Street Fighter Zero 3, Isms.png | crop_width=92 | crop_height=72 | crop_x=0 | crop_y=72}} | ||
| + | | desc=The standard playing style. It based on the previous ''Zero'' games, in which the player has a three-level Super Combo gauge with access to various Super Combo moves. | ||
| + | }} | ||
| + | {{InfoRow | ||
| + | | title=V-ism | ||
| + | | sprite={{sprite | Street Fighter Zero 3, Isms.png | crop_width=92 | crop_height=72 | crop_x=0 | crop_y=144}} | ||
| + | | desc=It is a unique style that allows the player to perform custom combos similar to ''Street Fighter Zero 2''. ''Zero 3'' also introduces a "Guard Power Gauge" which depletes each time the player blocks - if the gauge is completely depleted, then the player will remain vulnerable for an attack. | ||
| + | }} | ||
| + | }} | ||
| + | |||
| + | ===Characters=== | ||
| + | Move lists assume the player is facing right. If facing left, {{left}} and {{right}} should be reversed. {{punch}} refers to any of the punch buttons, while {{kick}} refers to any of the kick buttons. | ||
| − | + | All 21 characters from ''[[Street Figher Zero 2]]'' return (including Cammy from ''[[Street Fighter Zero 2 Dash]]'' and the hidden characters Evil Ryu and Shin Gouki). E. Honda, Blanka, M. Bison, Balrog, Fei Long, Dee Jay, T. Hawk, and Guile return from ''[[Street Fighter II]]'', completing the roster from that series, and Cody returns from ''[[Final Fight]]''. The characters Karin, R. Mika, and the Shadaloo "Dolls," Juli and Juni debut in this game | |
| − | |||
| − | |||
| − | |||
| − | |||
| − | |||
| − | + | Evil Ryu, Shin Gouki, Dee Jay, Fei Long, T. Hawk, and Guile were all exclusive to the console releases of the game. | |
| − | |||
{{InfoTable| | {{InfoTable| | ||
{{InfoRow | {{InfoRow | ||
| title=Ryu | | title=Ryu | ||
| image= | | image= | ||
| − | | | + | | info1name=Originally appeared in |
| + | | info1=''Street Fighter'' | ||
| + | | info2name=Fifth battle | ||
| + | | info2=Rose | ||
| + | | info3name=Ninth battle | ||
| + | | info3=Ken | ||
| + | | info4name=Final battle | ||
| + | | info4=Final Vega | ||
| + | | desc=Ryu | ||
| + | {{MoveListTable | desc=Special moves | | ||
| + | {{MoveListRow | Hadouken | {{Ism|X}} {{Ism|Z}} {{Ism|V}} {{QCF}} {{punch}} | Ryu focuses energy through his palms and fires a surging punch across the screen.}} | ||
| + | {{MoveListRow | Shakunetsu Hadouken | {{Ism|X}} {{Ism|Z}} {{Ism|V}} {{HCF}} {{punch}} | Ryu shoots a flaming variant of the Hadouken, which can knockover opponents in close range.}} | ||
| + | {{MoveListRow | Shouryuuken | {{Ism|X}} {{Ism|Z}} {{Ism|V}} {{DPF}} {{punch}} | Ryu rises off the ground while punching upwards, knocking down his opponent on impact.}} | ||
| + | {{MoveListRow | Tatsumaki Senpuukyaku | {{Ism|X}} {{Ism|Z}} {{Ism|V}} {{QCB}} {{kick}} | Ryu jumps into the air and spins around an axis with his leg extended, knocking down his opponent on impact. This move can be performed in midair.}} | ||
| + | {{MoveListRow | Hadou no Kamae | {{Ism|x}} {{Ism|Z}} {{Ism|v}} {{QCF}} {{button|text=TAUNT}} | Ryu performs the motion for a fireball but does not fire one. The purpose of this move is to confuse opponents. The recovery time for this move is much faster than a real fireball.}} | ||
| + | }} | ||
| + | {{MoveListTable | desc=Command normals | | ||
| + | {{MoveListRow | Sakotsu Wari | {{Ism|X}} {{Ism|Z}} {{Ism|V}} {{right}}+{{button|text=MP}} | Ryu pulls his fist back and strikes forward and down, potentially hitting twice. This is an overhead strike that can hit characters who are crouch blocking.}} | ||
| + | {{MoveListRow | Seichuu Nidan Tsuki | {{Ism|X}} {{Ism|z}} {{Ism|V}} {{right}}+{{button|text=HP}} | Ryu slides forward with an elbow strike, potentially hitting twice.}} | ||
| + | {{MoveListRow | Senpuu Kyaku | {{Ism|x}} {{Ism|Z}} {{Ism|V}} {{right}}+{{button|text=MK}} | Ryu leaps forward, doing a single spinning kick similar to a Tatsumaki Senpuukyaku.}} | ||
| + | {{MoveListRow | Kakato Otoshi | {{Ism|x}} {{Ism|z}} {{Ism|V}} {{left}}+{{button|text=HK}} | Ryu does an axe kick, potentially hitting twice.}} | ||
| + | }} | ||
| + | {{MoveListTable | desc=Super Combos | | ||
| + | {{MoveListRow | Shinkuu Hadouken | {{Ism|X}} {{Ism|Z}} {{Ism|v}} {{QCF}} {{QCF}} {{punch}} | Ryu fires a version of the Hadouken Fireball that can hit his opponent multiple times. At its highest level, it has a fire effect.}} | ||
| + | {{MoveListRow | Shinkuu Tatsumaki Senpuukyaku | {{Ism|x}} {{Ism|Z}} {{Ism|v}} {{QCB}} {{QCB}} {{kick}} | Ryu performs a version of the Tatsumaki Senpuukyaku that draws his opponent in and potentially hits multiple times.}} | ||
| + | {{MoveListRow | Metsu Shouryuuken | {{Ism|x}} {{Ism|Z}} {{Ism|v}} {{QCF}} {{QCF}} {{kick}} | Ryu slides forward with an elbow strike, then follows it up with a Shouryuuken.}} | ||
| + | {{MoveListRow | Zero Counter | {{Ism|x}} {{Ism|Z}} {{Ism|V}} {{left}} {{downleft}} {{down}} {{punch}} or {{kick}} while blocking}} | ||
| + | }} | ||
}} | }} | ||
{{InfoRow | {{InfoRow | ||
| − | | title= | + | | title=E. Honda |
| image= | | image= | ||
| − | | | + | | info1name=Originally appeared in |
| + | | info1=''Street Fighter II'' | ||
| + | | info2name=Fifth battle | ||
| + | | info2=Ryu | ||
| + | | info3name=Ninth battle | ||
| + | | info3=Sodom | ||
| + | | info4name=Final battle | ||
| + | | info4=Final Vega | ||
| + | | desc=E. Honda | ||
}} | }} | ||
{{InfoRow | {{InfoRow | ||
| − | | title= | + | | title=Blanka |
| image= | | image= | ||
| − | | | + | | info1name=Originally appeared in |
| + | | info1=''Street Fighter II'' | ||
| + | | info2name=Fifth battle | ||
| + | | info2=Dan | ||
| + | | info3name=Ninth battle | ||
| + | | info3=Zangief | ||
| + | | info4name=Final battle | ||
| + | | info4=Juli & Juni, Final Vega | ||
| + | | desc=Blanka | ||
}} | }} | ||
{{InfoRow | {{InfoRow | ||
| − | | title= | + | | title=Chun-Li |
| image= | | image= | ||
| − | | | + | | info1name=Originally appeared in |
| + | | info1=''Street Fighter II'' | ||
| + | | info2name=Fifth battle | ||
| + | | info2=Birdie | ||
| + | | info3name=Ninth battle | ||
| + | | info3=Cammy | ||
| + | | info4name=Final battle | ||
| + | | info4=Juli & Juni, Final Vega | ||
| + | | desc=Chun-Li | ||
| + | {{MoveListTable | desc=Special moves | | ||
| + | {{MoveListRow | Hyakuretsu Kyaku | {{Ism|X}} {{Ism|Z}} {{Ism|V}} {{repeat|{{kick}}}} | Chun-Li unleashes a flurry of rapid kicks.}} | ||
| + | {{MoveListRow | Tenshou Kyaku | {{Ism|X}} {{Ism|Z}} {{Ism|V}} Hold {{down}} for 2 seconds, then {{up}}+{{kick}} | Chun-Li jumps high into the air while spinning her legs around in kicks. In X-ism, this move can only be performed as a reversal.}} | ||
| + | {{MoveListRow | Kikouken | {{Ism|x}} {{Ism|Z}} {{Ism|V}} {{HCF}} {{punch}} | Chun-Li shoots an energy ball across the screen.}} | ||
| + | {{MoveListRow | Sen'en Shuu | {{Ism|x}} {{Ism|Z}} {{Ism|V}} {{HCB}} {{kick}} | Chun-Li does a handstand and then kicks downward with a straight leg.}} | ||
| + | {{MoveListRow | Spinning Bird Kick | {{Ism|X}} {{Ism|z}} {{Ism|v}} Hold {{left}} for 2 seconds, then {{right}}+{{kick}} | Chun-Li flips upside down and spins her legs while moving forward. This move can also be performed in midair.}} | ||
| + | {{MoveListRow | Sou Hakkei | {{Ism|X}} {{Ism|z}} {{Ism|v}} Hold {{left}} for 2 seconds, then {{right}}+{{punch}} | Chun-Li thrusts her palms out, repelling opponents.}} | ||
| + | }} | ||
| + | {{MoveListTable | desc=Command normals | | ||
| + | {{MoveListRow | Wall Jump | {{Ism|X}} {{Ism|Z}} {{Ism|V}} D-Pad in the opposite direction when jumping onto the edge of the screen | Chun-Li can jump off the edges of the screen.}} | ||
| + | {{MoveListRow | Yosokyaku | {{Ism|X}} {{Ism|Z}} {{Ism|V}} {{down}}+{{button|text=MK}} in midair | Chun-Li holds a straight leg in a head stomp.}} | ||
| + | {{MoveListRow | Kouhou Kaiten Kyaku | {{Ism|X}} {{Ism|Z}} {{Ism|V}} {{downright}}+{{button|text=MK}} | Chun-Li flips backwards high into the air, coming down with a kick.}} | ||
| + | {{MoveListRow | Kaku Kyaku Raku | {{Ism|X}} {{Ism|Z}} {{Ism|V}} {{downright}}+{{button|text=HK}} | Chun-Li flips forwards high into the air, coming down with a kick.}} | ||
| + | }} | ||
| + | {{MoveListTable | desc=Super Combos | | ||
| + | {{MoveListRow | Senretsu Kyaku | {{Ism|X}} {{Ism|Z}} {{Ism|v}} Hold {{left}} for 2 seconds, then {{right}} {{left}} {{right}}+{{kick}} | Chun-Li moves forward quickly while performing a series of Lightning Kicks. She has a brief period of invulnerability at the beginning of the move (allowing her to pass through projectiles).}} | ||
| + | {{MoveListRow | Kikoushou | {{Ism|x}} {{Ism|Z}} {{Ism|v}} {{QCF}} {{QCF}} {{punch}} | Chun-Li produces a large fireball directly in front of her.}} | ||
| + | {{MoveListRow | Hazan Tenshoukyaku | {{Ism|x}} {{Ism|Z}} {{Ism|v}} Hold {{downleft}} for 2 seconds, then {{downright}} {{downleft}} {{upright}}+{{kick}} | Chun-Li performs a more powerful version of her Spinning Air Kick.}} | ||
| + | {{MoveListRow | Zero Counter | {{Ism|x}} {{Ism|Z}} {{Ism|V}} {{left}} {{downleft}} {{down}} {{punch}} or {{kick}} while blocking}} | ||
| + | }} | ||
}} | }} | ||
{{InfoRow | {{InfoRow | ||
| title=Zangief | | title=Zangief | ||
| image= | | image= | ||
| − | | | + | | info1name=Originally appeared in |
| + | | info1=''Street Fighter II'' | ||
| + | | info2name=Fifth battle | ||
| + | | info2=Rolento | ||
| + | | info3name=Ninth battle | ||
| + | | info3=Chun-Li | ||
| + | | info4name=Final battle | ||
| + | | info4=Final Vega | ||
| + | | desc=Zangief | ||
| + | {{MoveListTable | desc=Special moves | | ||
| + | {{MoveListRow | Double Lariat | {{Ism|X}} {{Ism|Z}} {{Ism|V}} All three {{punch}} simultaneously | Zangief spins around with his arms outstretched, knocking anyone who wanders into him. He is invulnerable above the waist while performing this move, allowing most projectiles to pass through him. He can move with {{left}} and {{right}} while spinning.}} | ||
| + | {{MoveListRow | Quick Double Lariat | {{Ism|X}} {{Ism|Z}} {{Ism|V}} All three {{kick}} simultaneously | Zangief performs a Double Lariat that is faster but has a shorter duration. He can move with {{left}} and {{right}} while spinning.}} | ||
| + | {{MoveListRow | Spinning Piledriver | {{Ism|X}} {{Ism|Z}} {{Ism|V}} D-Pad in a 360° rotation, then {{punch}} | Zangief grabs his opponent, jumps high into the air, then drives them head first into the ground while spinning.}} | ||
| + | {{MoveListRow | Flying Power Bomb | {{Ism|X}} {{Ism|Z}} {{Ism|V}} D-Pad in a 360° rotation, then {{kick}} (far away) | Zangief grabs his opponent, jumps, and and slams them into the ground.}} | ||
| + | {{MoveListRow | Atomic Suplex | {{Ism|X}} {{Ism|Z}} {{Ism|V}} D-Pad in a 360° rotation, then {{kick}} (close) | Zangief grabs his opponent and performs a series of rolling suplexes.}} | ||
| + | {{MoveListRow | Banishing Fist | {{Ism|X}} {{Ism|z}} {{Ism|v}} {{HCB}} {{punch}}<br>{{Ism|x}} {{Ism|Z}} {{Ism|V}} {{DPF}} {{punch}} | Zangief takes a step forward and does a low back hand slap. This move can neutralize projectiles.}} | ||
| + | }} | ||
| + | {{MoveListTable | desc=Command normals | | ||
| + | {{MoveListRow | Flying Body Attack | {{Ism|X}} {{Ism|Z}} {{Ism|V}} {{down}}+{{button|text=HP}} while jumping diagonally | Zangief falls down with a diving splash.}} | ||
| + | {{MoveListRow | Double Knee Drop | {{Ism|X}} {{Ism|Z}} {{Ism|V}} {{down}}+{{button|text=LK}} or {{button|text=MK}} while jumping diagonally | Zangief falls with his knees forward.}} | ||
| + | {{MoveListRow | Russian Kick | {{Ism|X}} {{Ism|Z}} {{Ism|V}} {{downleft}}+{{button|text=MK}} or {{button|text=HK}} | Zangief does a low kick.}} | ||
| + | {{MoveListRow | Headbutt | {{Ism|X}} {{Ism|z}} {{Ism|v}} {{right}}+{{button|text=HP}}<br>{{Ism|x}} {{Ism|z}} {{Ism|V}} {{right}}+{{button|text=MP}} | Zangief hops into the air and does a headbutt.}} | ||
| + | {{MoveListRow | Kuuchuu Headbutt | {{Ism|X}} {{Ism|Z}} {{Ism|V}} {{up}}+{{button|text=MP}} or {{button|text=HP}} in midair | Zangief performs a headbutt in midair.}} | ||
| + | }} | ||
| + | {{MoveListTable | desc=Super Combos | | ||
| + | {{MoveListRow | Final Atomic Buster | {{Ism|X}} {{Ism|Z}} {{Ism|v}} D-Pad in a 360° rotation twice, then {{punch}} | Zangief performs two Atomic Suplexes followed by a Spinning Piledriver.}} | ||
| + | {{MoveListRow | Aerial Russian Slam | {{Ism|x}} {{Ism|Z}} {{Ism|v}} {{QCF}} {{QCF}} {{kick}} | Zangief jumps in front of him and tries to grab his opponent (if airborne) to slam them into the ground.}} | ||
| + | {{MoveListRow | Zero Counter | {{Ism|x}} {{Ism|Z}} {{Ism|V}} {{left}} {{downleft}} {{down}} {{punch}} or {{kick}} while blocking}} | ||
| + | }} | ||
}} | }} | ||
{{InfoRow | {{InfoRow | ||
| − | | title= | + | | title=Dhalsim |
| image= | | image= | ||
| − | | | + | | info1name=Originally appeared in |
| + | | info1=''Street Fighter II'' | ||
| + | | info2name=Fifth battle | ||
| + | | info2=Rose | ||
| + | | info3name=Ninth battle | ||
| + | | info3=Birdie | ||
| + | | info4name=Final battle | ||
| + | | info4=Juli & Juni, Final Vega | ||
| + | | desc=Dhalsim | ||
| + | {{MoveListTable | desc=Special moves | | ||
| + | {{MoveListRow | Yoga Fire | {{Ism|X}} {{Ism|Z}} {{Ism|V}} {{QCF}} {{punch}} | Dhalsim spits out a fireball that scorches whoever it touches. It travels the full width of the screen with X-ism, but it stops slightly shorter with Z-ism and V-ism.}} | ||
| + | {{MoveListRow | Yoga Flame | {{Ism|X}} {{Ism|z}} {{Ism|v}} {{HCF}} {{punch}}<br>{{Ism|x}} {{Ism|Z}} {{Ism|V}} {{HCB}} {{punch}} | Dhalsim breathes a large mass of flame in front of him.}} | ||
| + | {{MoveListRow | Yoga Blast | {{Ism|X}} {{Ism|z}} {{Ism|v}} {{HCF}} {{kick}}<br>{{Ism|x}} {{Ism|Z}} {{Ism|V}} {{HCB}} {{kick}} | Dhalsim breathes a large mass of flame at a diagonal angle in front of him.}} | ||
| + | {{MoveListRow | Yoga Teleport Forward | {{Ism|x}} {{Ism|Z}} {{Ism|V}} {{DPF}} + all three {{punch}} or {{kick}} simultaneously | Dhalsim disappears and reappears an the entire screen ahead with {{punch}} or half the screen ahead with {{kick}}.}} | ||
| + | {{MoveListRow | Yoga Teleport Backward | {{Ism|x}} {{Ism|Z}} {{Ism|V}} {{RDP}} + all three {{punch}} or {{kick}} simultaneously | Dhalsim disappears and reappears an entire screen back with {{punch}} or half the screen back with {{kick}}.}} | ||
| + | {{MoveListRow | Yoga Escape | {{Ism|x}} {{Ism|Z}} {{Ism|V}} {{RDP}} {{kick}} when knocked down | Dhalsim teleports away after being knocked down.}} | ||
| + | }} | ||
| + | {{MoveListTable | desc=Command normals | | ||
| + | {{MoveListRow | Kuuchuu Chouhatsu | {{Ism|x}} {{Ism|Z}} {{Ism|V}} {{button|text=TAUNT}} | Dhalsim can perform his taunt in midair.}} | ||
| + | {{MoveListRow | Short Attacks | {{Ism|x}} {{Ism|Z}} {{Ism|V}} {{left}}+{{punch}} or {{kick}} | Dhalsim can perform shorter, quicker attacks without stretching his arms by holding {{left}}. This works while standing, crouching, or jumping.}} | ||
| + | {{MoveListRow | Forward Chop | {{Ism|x}} {{Ism|Z}} {{Ism|V}} {{right}}+{{button|text=LP}} | Dhalsim quickly jabs his open hand forward.}} | ||
| + | {{MoveListRow | Downward Chop | {{Ism|x}} {{Ism|Z}} {{Ism|v}} {{left}}+{{button|text=LP}} | Dhalsim chops his hand downward. He holds his hand up while the button is held and chops when it is released, allowing the player to time the attack (though he chops eventually even if the button is still held). If held for at least a second, it is an overhead strike that can hit characters who are crouch blocking.}} | ||
| + | {{MoveListRow | Headbutt | {{Ism|x}} {{Ism|Z}} {{Ism|V}} {{left}}+{{button|text=HP}} | Dhalsim headbutts his opponent, hitting up to two times.}} | ||
| + | {{MoveListRow | Yoga Mummy | {{Ism|X}} {{Ism|Z}} {{Ism|V}} {{down}}+{{button|text=HP}} in midair | Dhalsim spins downward head first like a drill.}} | ||
| + | {{MoveListRow | Yoga Spear | {{Ism|X}} {{Ism|Z}} {{Ism|V}} {{down}}+{{kick}} in midair | Dhalsim spins downward feet first like a drill. The angle depends on the button used, with {{button|text=LK}} being the closest to 0° and {{button|text=HK}} being the closest to 270°.}} | ||
| + | }} | ||
| + | {{MoveListTable | desc=Super Combos | | ||
| + | {{MoveListRow | Yoga Tempest | {{Ism|X}} {{Ism|z}} {{Ism|v}} {{HCF}} {{HCF}} {{punch}} | Dhalsim breathes a large mass in front of him, similar to the Yoga Flame but lasting longer and potentially hitting more times.}} | ||
| + | {{MoveListRow | Yoga Inferno | {{Ism|x}} {{Ism|Z}} {{Ism|v}} {{QCF}} {{QCF}} {{punch}} | Dhalsim belches a chain of fireballs in front of him.}} | ||
| + | {{MoveListRow | Yoga Strike | {{Ism|x}} {{Ism|Z}} {{Ism|v}} {{QCF}} {{QCF}} {{kick}} | Dhalsim jumps in front of him and tries to grab his opponent (if airborne) to slam them into the ground.}} | ||
| + | {{MoveListRow | Yoga Stream | {{Ism|x}} {{Ism|Z}} {{Ism|v}} {{HCB}} {{HCB}} {{punch}} | Dhalsim sets the ground in front of him on fire with his breath, which can hit opponents who are blocking high.}} | ||
| + | {{MoveListRow | Zero Counter | {{Ism|x}} {{Ism|Z}} {{Ism|V}} {{left}} {{downleft}} {{down}} {{punch}} or {{kick}} while blocking}} | ||
| + | }} | ||
}} | }} | ||
{{InfoRow | {{InfoRow | ||
| − | | title= | + | | title=Ken |
| image= | | image= | ||
| − | | | + | | info1name=Originally appeared in |
| + | | info1=''Street Fighter'' | ||
| + | | info2name=Fifth battle | ||
| + | | info2=Karin | ||
| + | | info3name=Ninth battle | ||
| + | | info3=Sakura | ||
| + | | info4name=Final battle | ||
| + | | info4=Final Vega | ||
| + | | desc=Ken | ||
| + | {{MoveListTable | desc=Special moves | | ||
| + | {{MoveListRow | Hadouken | {{Ism|X}} {{Ism|Z}} {{Ism|V}} {{QCF}} {{punch}} | Ken focuses energy through his palms and fires a surging punch across the screen.}} | ||
| + | {{MoveListRow | Shouryuuken | {{Ism|X}} {{Ism|Z}} {{Ism|V}} {{DPF}} {{punch}} | Ken rises off the ground while punching upwards. When performed with {{button|text=HP}}, Ken has a flaming fist and can hit his opponent up to three times.}} | ||
| + | {{MoveListRow | Tatsumaki Senpuukyaku | {{Ism|X}} {{Ism|Z}} {{Ism|V}} {{QCB}} {{kick}} | Ken jumps into the air and spins around an axis with his leg extended, potentially hitting his opponent up to five times if performed with {{button|text=HK}}. This move can be performed in midair.}} | ||
| + | {{MoveListRow | Zenpou Tenshin | {{Ism|x}} {{Ism|Z}} {{Ism|V}} {{QCB}}+{{punch}} | Ken rolls forward, the distance depending on the strength of the punch used.}} | ||
| + | {{MoveListRow | Zentou | {{Ism|x}} {{Ism|Z}} {{Ism|V}} {{QCF}} {{button|text=TAUNT}} | Ken rolls a short distance forward, falls, then flips back to a standing position. The purpose of this move is to confuse opponents. He is vulnerable while doing this.}} | ||
| + | }} | ||
| + | {{MoveListTable | desc=Command normals | | ||
| + | {{MoveListRow | Inazuma Kakato Wari | {{Ism|X}} {{Ism|Z}} {{Ism|V}} {{right}}+{{button|text=MK}} | Ken kicks high into the air, then brings his leg down like an axe chop, hitting up to two times. This is an overhead strike that can hit characters who are crouch blocking.}} | ||
| + | {{MoveListRow | Izumu Kakato Wari | {{Ism|x}} {{Ism|z}} {{Ism|V}} {{left}}+{{button|text=MK}} | Ken performs a roundhouse kick, hitting up to two times.}} | ||
| + | {{MoveListRow | Ushiro Mawashi-geri | {{Ism|X}} {{Ism|Z}} {{Ism|V}} {{right}}+{{button|text=HK}} | Ken turns around with a heel kick that knocks down opponents.}} | ||
| + | }} | ||
| + | {{MoveListTable | desc=Super Combos | | ||
| + | {{MoveListRow | Shouryuu Reppa | {{Ism|X}} {{Ism|Z}} {{Ism|v}} {{QCF}} {{QCF}} {{punch}} | Ken performs a series of low Shouryuukens while moving across the screen, culminating in a high Shouryuuken.}} | ||
| + | {{MoveListRow | Shinryuuken | {{Ism|x}} {{Ism|Z}} {{Ism|v}} {{QCF}} {{QCF}} {{kick}} | Ken performs a powerful spinning Shouryuuken that ascends upward, drawing in nearby opponents.}} | ||
| + | {{MoveListRow | Shippuujinrai Kyaku | {{Ism|x}} {{Ism|Z}} {{Ism|v}} {{QCB}} {{QCB}} {{kick}} | Ken moves forward while delivering a series of fast kicks before launching his opponent into the air with a rising Tatsumaki Senpuukyaku.}} | ||
| + | {{MoveListRow | Zero Counter | {{Ism|x}} {{Ism|Z}} {{Ism|V}} {{left}} {{downleft}} {{down}} {{punch}} or {{kick}} while blocking}} | ||
| + | }} | ||
}} | }} | ||
{{InfoRow | {{InfoRow | ||
| − | | title= | + | | title=Gouki (Akuma) |
| image= | | image= | ||
| − | | | + | | info1name=Originally appeared in |
| + | | info1=''Super Street Fighter II X'' | ||
| + | | info2name=Fifth battle | ||
| + | | info2=Adon | ||
| + | | info3name=Ninth battle | ||
| + | | info3=Guy | ||
| + | | info4name=Final battle | ||
| + | | info4=Final Vega | ||
| + | | desc=Gouki | ||
| + | {{MoveListTable | desc=Special moves | | ||
| + | {{MoveListRow | Gou Hadouken | {{Ism|X}} {{Ism|Z}} {{Ism|V}} {{QCF}} {{punch}} | Gouki focuses energy through his palms and fires a surging punch across the screen.}} | ||
| + | {{MoveListRow | Zankuu Hadouken | {{Ism|X}} {{Ism|Z}} {{Ism|V}} {{QCF}} {{punch}} in midair | Gouki shoots a single-handed Hadouken at a diagonal angle downward in midair.}} | ||
| + | {{MoveListRow | Shakunetsu Hadouken | {{Ism|X}} {{Ism|Z}} {{Ism|V}} {{HCB}} {{punch}} | Gouki shoots a flaming variant of the Hadouken.}} | ||
| + | {{MoveListRow | Gou Shouryuken | {{Ism|X}} {{Ism|Z}} {{Ism|V}} {{DPF}} {{punch}} | Gouki rises off the ground while punching upwards. Hits up to two times with a {{button|text=MP}} or three times with {{button|text=HP}}.}} | ||
| + | {{MoveListRow | Tatsumaki Zankuukyaku | {{Ism|X}} {{Ism|Z}} {{Ism|V}} {{QCB}} {{kick}} | Gouki jumps into the air and spins around an axis with his leg extended, knocking down his opponent on impact. This move can be performed in midair.}} | ||
| + | {{MoveListRow | Hyakki Shuu | {{Ism|x}} {{Ism|Z}} {{Ism|V}} {{QCF}} {{upright}} {{punch}} | Gouki somersaults forward. He performs a sliding sweep when he lands. Alternatively, the move can be followed up with {{punch}} for a palm strike or {{kick}} for a falling kick. When Gouki is near his opponent, he can throw them with {{left}}+{{punch}} or {{kick}} or {{right}}+{{punch}} or {{kick}} instead.}} | ||
| + | {{MoveListRow | Zenpou Tenshin | {{Ism|x}} {{Ism|Z}} {{Ism|V}} {{QCB}}+{{punch}} | Gouki jumps forward, then rolls along the ground.}} | ||
| + | {{MoveListRow | Ashura Senkuu Forward | {{Ism|X}} {{Ism|Z}} {{Ism|V}} {{DPF}} + all three {{punch}} or {{kick}} simultaneously | Gouki glides forward. He is invulnerable in this state. He moves across the entire screen with {{punch}} or half the screen with {{kick}}.}} | ||
| + | {{MoveListRow | Ashura Senkuu Backward | {{Ism|X}} {{Ism|Z}} {{Ism|V}} {{RDP}} + all three {{punch}} or {{kick}} simultaneously | Gouki glides backward. He is invulnerable in this state. He moves across the entire screen with {{punch}} or half the screen with {{kick}}.}} | ||
| + | }} | ||
| + | {{MoveListTable | desc=Command normals | | ||
| + | {{MoveListRow | Tenma Kuujin Kyaku | {{Ism|X}} {{Ism|Z}} {{Ism|V}} {{down}}+{{button|text=MK}} before the apex of the jump while flipping forward in the air | Gouki dive kicks diagonally downward.}} | ||
| + | {{MoveListRow | Zugai Hasatsu | {{Ism|X}} {{Ism|Z}} {{Ism|V}} {{right}}+{{button|text=MP}} | Gouki performs an open-handed chop, potentially hitting twice. This is an overhead strike that can hit characters who are crouch blocking.}} | ||
| + | {{MoveListRow | Senpuu Kyaku | {{Ism|X}} {{Ism|Z}} {{Ism|V}} {{right}}+{{button|text=MK}} | Gouki leaps forward, doing a single spinning kick similar to a Tatsumaki Senpuukyaku.}} | ||
| + | }} | ||
| + | {{MoveListTable | desc=Super Combos | | ||
| + | {{MoveListRow | Shun Goku Satsu | {{Ism|X}} {{Ism|z}} {{Ism|v}} {{button|text=LP}} {{button|text=LP}} {{right}} {{button|text=LK}} {{button|text=HP}} (at max level) | Gouki glides to his opponent, then performs a series of attacks that cannot be seen as the screen flashes white. The Super Combo gauge must be at level 3 to perform this move.}} | ||
| + | {{MoveListRow | Messatsu Gou Hadou | {{Ism|X}} {{Ism|Z}} {{Ism|v}} {{HCB}} {{HCB}} {{punch}} | Gouki fires a version of the Gou Hadouken Fireball that can hit his opponent multiple times.}} | ||
| + | {{MoveListRow | Messatsu Gou Shouryuu | {{Ism|X}} {{Ism|Z}} {{Ism|v}} {{QCF}} {{QCF}} {{punch}} | Gouki performs a series of low Shouryukens while moving across the screen, culminating in a high Shouryuken.}} | ||
| + | {{MoveListRow | Tenma Gou Zankuu | {{Ism|X}} {{Ism|Z}} {{Ism|v}} {{QCF}} {{QCF}} {{punch}} in midair | Gouki fires a larger, more powerful Zankuu Hadouken at his opponent.}} | ||
| + | {{MoveListRow | Zero Counter | {{Ism|x}} {{Ism|Z}} {{Ism|V}} {{left}} {{downleft}} {{down}} {{punch}} or {{kick}} while blocking}} | ||
| + | }} | ||
}} | }} | ||
{{InfoRow | {{InfoRow | ||
| − | | title= | + | | title=Nash (Charlie) |
| image= | | image= | ||
| − | | | + | | info1name=Originally appeared in |
| + | | info1=''Street Fighter Zero'' | ||
| + | | info2name=Fifth battle | ||
| + | | info2=Cammy | ||
| + | | info3name=Ninth battle | ||
| + | | info3=Rolento | ||
| + | | info4name=Final battle | ||
| + | | info4=Final Vega | ||
| + | | desc=Nash | ||
| + | {{MoveListTable | desc=Special moves | | ||
| + | {{MoveListRow | Sonic Boom | {{Ism|X}} {{Ism|Z}} {{Ism|V}} Hold {{left}} for 2 seconds, then {{right}}+{{punch}} | Nash fires a circular energy wave across the screen by swinging his arm.}} | ||
| + | {{MoveListRow | Somersault Shell | {{Ism|X}} {{Ism|Z}} {{Ism|V}} Hold {{down}} for 2 seconds, then {{up}}+{{kick}} | Nash somersaults upward while performing two kicks.}} | ||
| + | }} | ||
| + | {{MoveListTable | desc=Command normals | | ||
| + | {{MoveListRow | Dash | {{Ism|x}} {{Ism|Z}} {{Ism|V}} {{right}} {{right}} | Nash dashes forward.}} | ||
| + | {{MoveListRow | Knee Bazooka | {{Ism|X}} {{Ism|z}} {{Ism|v}} {{left}}+{{button|text=LK}} or {{right}}+{{button|text=LK}}<br>{{Ism|x}} {{Ism|Z}} {{Ism|V}} {{kick}} while dashing | Nash hops forward with a knee strike.}} | ||
| + | {{MoveListRow | Jump Sobat | {{Ism|X}} {{Ism|Z}} {{Ism|V}} {{left}}+{{button|text=MK}} or {{right}}+{{button|text=MK}} | Nash hops toward his opponent with a turning kick. This is an overhead strike that can hit characters who are crouch blocking.}} | ||
| + | {{MoveListRow | Step Kick | {{Ism|X}} {{Ism|Z}} {{Ism|V}} {{left}}+{{button|text=HK}} or {{right}}+{{button|text=HK}} | Nash takes a step forward and kicks.}} | ||
| + | }} | ||
| + | {{MoveListTable | desc=Super Combos | | ||
| + | {{MoveListRow | Somersault Justice | {{Ism|X}} {{Ism|Z}} {{Ism|v}} Hold {{downleft}} for 2 seconds, then {{downright}} {{downleft}} {{upright}}+{{kick}} | Nash performs two Somersault Shells in succession.}} | ||
| + | {{MoveListRow | Sonic Barrage | {{Ism|x}} {{Ism|Z}} {{Ism|v}} Hold {{left}} for 2 seconds, then {{right}} {{left}} {{right}}+{{punch}} | Nash fires a Sonic Boom. He can launch multiple Sonic Booms in a row (two at level 1, three at level 2, and four at level 3) by continuing to press {{punch}}.}} | ||
| + | {{MoveListRow | Crossfire Blitz | {{Ism|x}} {{Ism|Z}} {{Ism|v}} Hold {{left}} for 2 seconds, then {{right}} {{left}} {{right}}+{{kick}} | Nash dashes forward while performing a series of fast kicks.}} | ||
| + | {{MoveListRow | Zero Counter | {{Ism|x}} {{Ism|Z}} {{Ism|V}} {{left}} {{downleft}} {{down}} {{punch}} or {{kick}} while blocking}} | ||
| + | }} | ||
}} | }} | ||
{{InfoRow | {{InfoRow | ||
| − | | title= | + | | title=Cammy |
| image= | | image= | ||
| − | | | + | | info1name=Originally appeared in |
| + | | info1=''Super Street Fighter II'' | ||
| + | | info2name=Fifth battle | ||
| + | | info2=Dhalsim | ||
| + | | info3name=Ninth battle | ||
| + | | info3=Balrog | ||
| + | | info4name=Final battle | ||
| + | | info4=Juli & Juni, Final Vega | ||
| + | | desc=Cammy | ||
| + | {{MoveListTable | desc=Special moves | | ||
| + | {{MoveListRow | Spiral Arrow | {{Ism|X}} {{Ism|Z}} {{Ism|V}} {{QCF}} {{kick}} | Cammy spirals forward feet first like a spinning arrow.}} | ||
| + | {{MoveListRow | Cannon Spike | {{Ism|X}} {{Ism|Z}} {{Ism|V}} {{DPF}} {{kick}} | Cammy leaps into the air with a front kick.}} | ||
| + | {{MoveListRow | Axle Spin Knuckle | {{Ism|X}} {{Ism|Z}} {{Ism|v}} {{HCB}} {{punch}} | Cammy hops forward and does an elbow smash and a punch. This move passes through projectiles.}} | ||
| + | {{MoveListRow | Cannon Revenge | {{Ism|x}} {{Ism|z}} {{Ism|V}} {{QCB}}+{{punch}} | Cammy holds her arm up and taunts her opponent. If she is attacked from above while holding her arm up, she counters with a Cannon Spike.}} | ||
| + | {{MoveListRow | Cannon Strike | {{Ism|x}} {{Ism|z}} {{Ism|V}} {{QCB}}+{{kick}} before the apex of the jump while flipping forward in the air | Cammy dive kicks diagonally downward.}} | ||
| + | {{MoveListRow | Hooligan Combination | {{Ism|X}} {{Ism|Z}} {{Ism|V}} {{HCF}} {{upright}} {{punch}} | Cammy curls into a ball and hurls herself at her opponent. If no button is pressed, she ends with a sweep when she lands. When Cammy is near the opponent's neck or waist, the player can perform a takedown by pressing {{kick}} while holding a direction toward the opponent.}} | ||
| + | }} | ||
| + | {{MoveListTable | desc=Super Combos | | ||
| + | {{MoveListRow | Spin Drive Smasher | {{Ism|X}} {{Ism|Z}} {{Ism|v}} {{QCF}} {{QCF}}+{{kick}} | Cammy performs a Spiral Arrow followed by a Cannon Spike.}} | ||
| + | {{MoveListRow | Reverse Shaft Breaker | {{Ism|x}} {{Ism|Z}} {{Ism|v}} Hold {{left}} for 2 seconds, then {{right}} {{left}} {{right}}+{{punch}} | Cammy performs a Spiral Arrow straight upward that hits multiple times and pulls nearby opponents inward.}} | ||
| + | {{MoveListRow | Killer Bee Assault | {{Ism|x}} {{Ism|Z}} {{Ism|v}} Hold {{downleft}} for 2 seconds, then {{downright}} {{downleft}} {{upright}}+{{kick}} (at max level) | Cammy jumps to the corner of the screen, then performs four side-to-side flying kicks and finishes with a stomp. The Super Combo gauge must be at level 3 to perform this move.}} | ||
| + | {{MoveListRow | Zero Counter | {{Ism|x}} {{Ism|Z}} {{Ism|V}} {{left}} {{downleft}} {{down}} {{punch}} or {{kick}} while blocking}} | ||
| + | }} | ||
}} | }} | ||
{{InfoRow | {{InfoRow | ||
| − | | title= | + | | title=M. Bison (Balrog) |
| image= | | image= | ||
| − | | | + | | info1name=Originally appeared in |
| + | | info1=''Street Fighter II'' | ||
| + | | info2name=Fifth battle | ||
| + | | info2=Gen | ||
| + | | info3name=Ninth battle | ||
| + | | info3=Birdie | ||
| + | | info4name=Final battle | ||
| + | | info4=Final Vega | ||
| + | | desc=M. Bison | ||
}} | }} | ||
{{InfoRow | {{InfoRow | ||
| − | | title= | + | | title=Balrog (Vega) |
| image= | | image= | ||
| − | | | + | | info1name=Originally appeared in |
| + | | info1=''Street Fighter II'' | ||
| + | | info2name=Fifth battle | ||
| + | | info2=Zangief | ||
| + | | info3name=Ninth battle | ||
| + | | info3=Cammy | ||
| + | | info4name=Final battle | ||
| + | | info4=Final Vega | ||
| + | | desc=Balrog | ||
}} | }} | ||
{{InfoRow | {{InfoRow | ||
| − | | title= | + | | title=Sagat |
| image= | | image= | ||
| − | | | + | | info1name=Originally appeared in |
| + | | info1=''Street Fighter'' | ||
| + | | info2name=Fifth battle | ||
| + | | info2=Dan | ||
| + | | info3name=Ninth battle | ||
| + | | info3=Ryu | ||
| + | | info4name=Final battle | ||
| + | | info4=Final Vega | ||
| + | | desc=Sagat | ||
| + | {{MoveListTable | desc=Special moves | | ||
| + | {{MoveListRow | Tiger Shot | {{Ism|X}} {{Ism|Z}} {{Ism|V}} {{QCF}} {{punch}} or {{kick}} | Sagat punches into the air, shooting a crescent-shaped projectile across the screen. If performed with {{punch}}, he shoots a high shot while standing; if performed with {{kick}}, he shoots a low shot while kneeling.}} | ||
| + | {{MoveListRow | Tiger Uppercut | {{Ism|X}} {{Ism|z}} {{Ism|v}} {{DPF}} {{upright}} {{punch}} | Sagat rises off the ground while punching upwards, hitting up to two times and knocking his opponent over.}} | ||
| + | {{MoveListRow | Tiger Blow | {{Ism|x}} {{Ism|Z}} {{Ism|V}} {{DPF}} {{punch}} | Sagat rises off the ground while punching upwards, hitting up to five times with {{button|text=MP}} or seven times with {{button|text=HP}} before knocking the opponent down.}} | ||
| + | {{MoveListRow | Tiger Knee | {{Ism|X}} {{Ism|z}} {{Ism|v}} {{QCF}} {{upright}} {{kick}} | Sagat jumps forward, ramming his opponent with his knee, knocking his opponent over.}} | ||
| + | {{MoveListRow | Tiger Crush | {{Ism|x}} {{Ism|Z}} {{Ism|V}} {{DPF}} {{kick}} | Sagat jumps forward, ramming his opponent with his knee, hitting up to two times and knocking his opponent over.}} | ||
| + | }} | ||
| + | {{MoveListTable | desc=Super Combos | | ||
| + | {{MoveListRow | Tiger Genocide | {{Ism|X}} {{Ism|Z}} {{Ism|v}} {{QCF}} {{QCF}} {{kick}} | Sagat leaps ahead with a Tiger Crush and follows it up with a Tiger Blow.}} | ||
| + | {{MoveListRow | Tiger Cannon | {{Ism|x}} {{Ism|Z}} {{Ism|v}} {{QCF}} {{QCF}} {{punch}} | Sagat fires a large Tiger Shot that can hit multiple times.}} | ||
| + | {{MoveListRow | Tiger Raid | {{Ism|x}} {{Ism|Z}} {{Ism|v}} {{QCB}} {{QCB}} {{kick}} | Sagat performs a barrage of kicks, finishing with a flying side kick.}} | ||
| + | {{MoveListRow | Angry Charge | {{Ism|x}} {{Ism|Z}} {{Ism|v}} {{QCF}}+{{button|text=TAUNT}} | The scar on Sagat's chest glows, momentarily pausing gameplay, and he clutches it, which empowers his next Tiger Uppercut.}} | ||
| + | {{MoveListRow | Zero Counter | {{Ism|x}} {{Ism|Z}} {{Ism|V}} {{left}} {{downleft}} {{down}} {{kick}} while blocking}} | ||
| + | }} | ||
}} | }} | ||
{{InfoRow | {{InfoRow | ||
| − | | title= | + | | title=Vega (M. Bison) |
| image= | | image= | ||
| − | | desc= | + | | info1name=Originally appeared in |
| + | | info1=''Street Fighter II'' | ||
| + | | info2name=Fifth battle | ||
| + | | info2=Gouki | ||
| + | | info3name=Ninth battle | ||
| + | | info3=Sagat | ||
| + | | info4name=Final battle | ||
| + | | info4=Ryu | ||
| + | | desc=Vega | ||
| + | {{MoveListTable | desc=Special moves | | ||
| + | {{MoveListRow | Psycho Crusher | {{Ism|X}} {{Ism|z}} {{Ism|v}} Hold {{left}} for 2 seconds, then {{right}}+{{punch}} | Vega spirals toward his opponent while infused with psycho energy.}} | ||
| + | {{MoveListRow | Psycho Shot | {{Ism|x}} {{Ism|Z}} {{Ism|V}} Hold {{left}} for 2 seconds, then {{right}}+{{punch}} | Vega throws a fireball across the screen.}} | ||
| + | {{MoveListRow | Double Knee Press | {{Ism|X}} {{Ism|Z}} {{Ism|V}} Hold {{left}} for 2 seconds, then {{right}}+{{kick}} | Vega leaps forward while kicking.}} | ||
| + | {{MoveListRow | Head Stomp | {{Ism|X}} {{Ism|Z}} {{Ism|V}} Hold {{down}} for 2 seconds, then {{up}}+{{kick}} | Vega flies into the air and stomps his opponent's head. After bouncing off his opponent's head, he can dive down again with a Psycho Fist by pressing {{punch}}.}} | ||
| + | {{MoveListRow | Skull Diver | {{Ism|X}} {{Ism|Z}} {{Ism|V}} Hold {{down}} for 2 seconds, then {{up}}+{{punch}} | Vega flies into the air toward his opponent. This move can be followed by {{punch}} to dive his opponent with a Psycho Fist.}} | ||
| + | {{MoveListRow | Warp Forward | {{Ism|x}} {{Ism|Z}} {{Ism|V}} {{DPF}} + all three {{punch}} or {{kick}} simultaneously | Vega disappears and reappears an the entire screen ahead with {{punch}} or half the screen ahead with {{kick}}.}} | ||
| + | {{MoveListRow | Warp Backward | {{Ism|x}} {{Ism|Z}} {{Ism|V}} {{RDP}} + all three {{punch}} or {{kick}} simultaneously | Vega disappears and reappears an entire screen back with {{punch}} or half the screen back with {{kick}}.}} | ||
| + | }} | ||
| + | {{MoveListTable | desc=Super Combos | | ||
| + | {{MoveListRow | Knee Press Nightmare | {{Ism|X}} {{Ism|Z}} {{Ism|v}} Hold {{left}} for 2 seconds, then {{right}} {{left}} {{right}}+{{punch}} | Vega does two consecutive Double Knee Press maneuvers.}} | ||
| + | {{MoveListRow | Psycho Crusher | {{Ism|x}} {{Ism|Z}} {{Ism|v}} Hold {{left}} for 2 seconds, then {{right}} {{left}} {{right}}+{{punch}} | Vega spirals toward his opponent while infused with psycho energy.}} | ||
| + | {{MoveListRow | Zero Counter | {{Ism|x}} {{Ism|Z}} {{Ism|V}} {{left}} {{downleft}} {{down}} {{punch}} or {{kick}} while blocking}} | ||
| + | }} | ||
}} | }} | ||
{{InfoRow | {{InfoRow | ||
| − | | title= | + | | title=Adon |
| image= | | image= | ||
| − | | desc= | + | | info1name=Originally appeared in |
| + | | info1=''Street Fighter'' | ||
| + | | info2name=Fifth battle | ||
| + | | info2=Ken | ||
| + | | info3name=Ninth battle | ||
| + | | info3=Rose | ||
| + | | info4name=Final battle | ||
| + | | info4=Final Vega | ||
| + | | desc=Adon | ||
| + | {{MoveListTable | desc=Special moves | | ||
| + | {{MoveListRow | Rising Jaguar | {{Ism|X}} {{Ism|Z}} {{Ism|V}} {{DPF}} {{kick}} | Adon leaps diagonally into the air with a knee strike, which hits up to two times and knocks his opponent down.}} | ||
| + | {{MoveListRow | Jaguar Tooth | {{Ism|X}} {{Ism|Z}} {{Ism|V}} {{HCB}} {{kick}} | Adon somersaults forward while swinging his leg around.}} | ||
| + | {{MoveListRow | Jaguar Kick | {{Ism|X}} {{Ism|z}} {{Ism|v}} {{kick}} in midair<br>{{Ism|x}} {{Ism|Z}} {{Ism|V}} {{RDP}} {{kick}} | Adon jumps high into the air and thrusts downward toward his opponent with a kick.}} | ||
| + | }} | ||
| + | {{MoveListTable | desc=Command normals | | ||
| + | {{MoveListRow | Jaguar Crunch | {{Ism|X}} {{Ism|Z}} {{Ism|V}} {{right}}+{{button|text=MP}} | Adon takes a step forward and strikes with his elbow, potentially hitting twice. This is an overhead strike that can hit characters who are crouch blocking.}} | ||
| + | }} | ||
| + | {{MoveListTable | desc=Super Combos | | ||
| + | {{MoveListRow | Jaguar Variable Assault | {{Ism|X}} {{Ism|Z}} {{Ism|v}} {{QCF}} {{QCF}} {{punch}} | Adon dashes forward and hits his opponent with a series of quick strikes, ending in the air.}} | ||
| + | {{MoveListRow | Jaguar Revolver | {{Ism|x}} {{Ism|Z}} {{Ism|v}} {{QCF}} {{QCF}} {{kick}} | Adon performs a high Jaguar Kick followed by two quick Jaguar Kicks.}} | ||
| + | {{MoveListRow | Zero Counter | {{Ism|x}} {{Ism|Z}} {{Ism|V}} {{left}} {{downleft}} {{down}} {{punch}} or {{kick}} while blocking}} | ||
| + | }} | ||
}} | }} | ||
{{InfoRow | {{InfoRow | ||
| − | | title= | + | | title=Gen |
| image= | | image= | ||
| − | | | + | | info1name=Originally appeared in |
| + | | info1=''Street Fighter'' | ||
| + | | info2name=Fifth battle | ||
| + | | info2=Ryu | ||
| + | | info3name=Ninth battle | ||
| + | | info3=Gouki | ||
| + | | info4name=Final battle | ||
| + | | info4=Final Vega | ||
| + | | desc=Gen | ||
| + | |||
| + | Gen has two fighting stances with entirely different movesets that he can switch between at any time. | ||
| + | |||
| + | The Mantis stance is a more defensive stance with faster but lighter attacks. | ||
| + | {{MoveListTable | desc=Special moves (Mantis stance) | | ||
| + | {{MoveListRow | Ansatsu Ken: Ki-ryuu | {{Ism|X}} {{Ism|Z}} {{Ism|V}} All three {{kick}} simultaneously | Gen changes to his Crane stance.}} | ||
| + | {{MoveListRow | Hyakurenkou | {{Ism|X}} {{Ism|Z}} {{Ism|V}} {{repeat|{{punch}}}} | Gen chops his hand furiously in front of him.}} | ||
| + | {{MoveListRow | Gekirou | {{Ism|X}} {{Ism|Z}} {{Ism|V}} {{DPF}} {{kick}} | Gen jumps into the air while kicking diagonally upward.}} | ||
| + | }} | ||
| + | {{MoveListTable | desc=Super Combos (Mantis stance) | | ||
| + | {{MoveListRow | Zan'ei | {{Ism|X}} {{Ism|Z}} {{Ism|v}} {{QCF}} {{QCF}} {{punch}} | Gen charges through his opponent, continuing to cause injury even after he has moved through them.}} | ||
| + | {{MoveListRow | Shitenshuu | {{Ism|x}} {{Ism|Z}} {{Ism|v}} {{QCB}} {{QCB}} {{punch}} | Gen unleashes a fury of hand chops before poking his opponent with a single finger. If the finger jab connects, a counter begins counting down above the opponent's head, causing damage on every second. The timer can be ended by attacking Gen. If the timer reaches zero without the opponent interrupting it, the opponent is knocked out and dizzied.}} | ||
| + | {{MoveListRow | Zero Counter | {{Ism|x}} {{Ism|Z}} {{Ism|V}} {{left}} {{downleft}} {{down}} {{punch}} or {{kick}} while blocking}} | ||
| + | }} | ||
| + | The Crane stance is a more offensive stance with slower but stronger attacks. His normals are complex but generally have superior reach and often can hit multiple times. | ||
| + | {{MoveListTable | desc=Special moves (Crane stance) | | ||
| + | {{MoveListRow | Ansatsu Ken: Sou-ryuu | {{Ism|X}} {{Ism|Z}} {{Ism|V}} All three {{punch}} simultaneously | Gen changes to his Mantis stance.}} | ||
| + | {{MoveListRow | Jyasen | {{Ism|X}} {{Ism|Z}} {{Ism|V}} Hold {{left}} for 2 seconds, then {{right}}+{{punch}} | Gen rolls along the ground, then unravels with an open-handed strike.}} | ||
| + | {{MoveListRow | Ouga | {{Ism|x}} {{Ism|Z}} {{Ism|V}} Hold {{down}} for 2 seconds, then {{up}}+{{kick}} | Gen jumps to the corner of the screen. If no direction is held, he drops a short distance down with a kick. If {{left}} is held, he drops down to the ground. If {{right}} is held, he kicks downward across the screen. If {{up}} is held, he jumps off the screen and darts across the screen over his opponent, and the player can again hold a direction to determine Gen's next action. If no direction is held, he flies over to the other side of the opponent. If {{down}} is held (or the opponent is at the end of the stage and cannot move further back), Gen falls with a downward kick. If {{downleft}} or {{downright}} is held, Gen does a diagonal kick in either direction.}} | ||
| + | }} | ||
| + | {{MoveListTable | desc=Super Combos (Crane stance) | | ||
| + | {{MoveListRow | Kouga | {{Ism|x}} {{Ism|Z}} {{Ism|v}} {{QCB}} {{QCB}} {{kick}} in midair | Gen does multiple wall jumps and diving kicks.}} | ||
| + | {{MoveListRow | Jakouha | {{Ism|x}} {{Ism|Z}} {{Ism|v}} {{QCF}} {{QCF}} {{kick}} | Gen jumps in front of him and tries to grab his opponent (if airborne) to slam them into the ground.}} | ||
| + | {{MoveListRow | Zero Counter | {{Ism|x}} {{Ism|Z}} {{Ism|V}} {{left}} {{downleft}} {{down}} {{punch}} or {{kick}} while blocking}} | ||
| + | }} | ||
}} | }} | ||
{{InfoRow | {{InfoRow | ||
| − | | title= | + | | title=Birdie |
| image= | | image= | ||
| − | | desc= | + | | info1name=Originally appeared in |
| + | | info1=''Street Fighter'' | ||
| + | | info2name=Fifth battle | ||
| + | | info2=E. Honda | ||
| + | | info3name=Ninth battle | ||
| + | | info3=Blanka | ||
| + | | info4name=Final battle | ||
| + | | info4=Juli & Juni, Final Vega | ||
| + | | desc=Birdie | ||
| + | {{MoveListTable | desc=Special moves | | ||
| + | {{MoveListRow | Bullhead | {{Ism|X}} {{Ism|Z}} {{Ism|V}} Hold {{left}} for 2 seconds, then {{right}}+{{punch}} | Birdie dashes forward and headbutts his opponent.}} | ||
| + | {{MoveListRow | Bullhorn | {{Ism|X}} {{Ism|Z}} {{Ism|V}} Hold any two {{punch}} or {{kick}} buttons for 1 second, then release | Birdie turns around and headbutts his opponent. It does more damage if the buttons are held for longer.}} | ||
| + | {{MoveListRow | Murderer Chain | {{Ism|X}} {{Ism|Z}} {{Ism|V}} D-Pad in a 360° rotation, then {{punch}} (close) | Birdie grabs his opponent and slams them to the ground multiple times with his chain.}} | ||
| + | {{MoveListRow | Bandit Chain | {{Ism|X}} {{Ism|Z}} {{Ism|V}} D-Pad in a 360° rotation, then {{kick}} (close) | Birdie grabs his opponent and slams them to the ground multiple times with his chain.}} | ||
| + | }} | ||
| + | {{MoveListTable | desc=Command normals | | ||
| + | {{MoveListRow | Body Press | {{Ism|X}} {{Ism|Z}} {{Ism|V}} {{down}}+{{button|text=HP}} | Birdie falls down with a diving splash.}} | ||
| + | {{MoveListRow | Bull Drop | {{Ism|X}} {{Ism|Z}} {{Ism|V}} {{right}}+{{button|text=HK}} | Birdie kicks downward.}} | ||
| + | {{MoveListRow | Bad Hammer | {{Ism|X}} {{Ism|z}} {{Ism|v}} Hold {{up}} while hitting opponent with standing {{button|text=HP}} | After hitting his opponent with his standing {{button|text=HP}}, which knocks them into the air, Birdie jumps and bashes them with both fists.}} | ||
| + | }} | ||
| + | {{MoveListTable | desc=Super Combos | | ||
| + | {{MoveListRow | The Birdie | {{Ism|X}} {{Ism|Z}} {{Ism|v}} Hold {{left}} for 2 seconds, then {{right}} {{left}} {{right}}+{{punch}} | Birdie dashes forward and headbutts his opponent multiple times.}} | ||
| + | {{MoveListRow | Bull Revenger | {{Ism|x}} {{Ism|Z}} {{Ism|v}} {{QCF}} {{QCF}} {{punch}} or {{kick}} | Birdie leaps into the air from across the screen, grabs his opponent, and slams them into the ground with his chain. He leaps close with {{punch}} and far with {{kick}}.}} | ||
| + | {{MoveListRow | Zero Counter | {{Ism|x}} {{Ism|Z}} {{Ism|V}} {{left}} {{downleft}} {{down}} {{punch}} or {{kick}} while blocking}} | ||
| + | }} | ||
}} | }} | ||
{{InfoRow | {{InfoRow | ||
| − | | title= | + | | title=Cody |
| image= | | image= | ||
| − | | | + | | info1name=Originally appeared in |
| + | | info1=''Final Fight'' | ||
| + | | info2name=Fifth battle | ||
| + | | info2=Birdie | ||
| + | | info3name=Ninth battle | ||
| + | | info3=Guy | ||
| + | | info4name=Final battle | ||
| + | | info4=Final Vega | ||
| + | | desc=Cody | ||
}} | }} | ||
{{InfoRow | {{InfoRow | ||
| − | | title= | + | | title=Guy |
| image= | | image= | ||
| − | | | + | | info1name=Originally appeared in |
| + | | info1=''Final Fight'' | ||
| + | | info2name=Fifth battle | ||
| + | | info2=Karin | ||
| + | | info3name=Ninth battle | ||
| + | | info3=Gen | ||
| + | | info4name=Final battle | ||
| + | | info4=Final Vega | ||
| + | | desc=Guy | ||
| + | {{MoveListTable | desc=Special moves | | ||
| + | {{MoveListRow | Air Suplex | {{Ism|X}} {{Ism|Z}} {{Ism|V}} {{QCF}} {{punch}} | Guy curls into a ball and leaps across the screen in an arc, with stronger punches traveling further. This maneuver can be interrupted at any time by pressing {{punch}}: if he is next to his opponent, he performs a body slam (Bushin Izuna Otoshi); otherwise, he performs an elbow drop (Izuna no Hiji Otoshi).}} | ||
| + | {{MoveListRow | Hayagake | {{Ism|X}} {{Ism|Z}} {{Ism|V}} {{QCF}} {{kick}} | Guy runs towards his opponent, which can be followed up with another {{kick}}. The effect of the follow-up depends on the initial button used: Guy stops short with {{button|text=LK}} (Kyuuteishi), does a sweep kick with {{button|text=MK}} (Kage Sukui), or does a jumping turnaround kick with {{button|text=HK}} (Kubikari).}} | ||
| + | {{MoveListRow | Bushin Senpuu Kyaku | {{Ism|X}} {{Ism|Z}} {{Ism|V}} {{QCB}} {{kick}} | Guy jumps into the air and spins around an axis with his leg extended. It is similar to the Tatsumaki Senpuukyaku performed by Ryu and Ken but has more vertical jump height (with stronger kicks flying higher).}} | ||
| + | {{MoveListRow | Houzantou | {{Ism|X}} {{Ism|Z}} {{Ism|V}} {{QCB}} {{punch}} | Guy crouches and spins around, then charges at his opponent with his shoulder.}} | ||
| + | }} | ||
| + | {{MoveListTable | desc=Command normals | | ||
| + | {{MoveListRow | Wall Jump | {{Ism|X}} {{Ism|Z}} {{Ism|V}} D-Pad in the opposite direction when jumping onto the edge of the screen | Guy can jump off the edges of the screen.}} | ||
| + | {{MoveListRow | Hiji Otoshi | {{Ism|X}} {{Ism|Z}} {{Ism|V}} {{down}}+{{button|text=MP}} in midair | Guy thrusts downward with an elbow.}} | ||
| + | {{MoveListRow | Kubi Kudaki | {{Ism|X}} {{Ism|Z}} {{Ism|V}} {{right}}+{{button|text=MP}} | Guy smashes downward with an elbow, hitting up to two times. This is an overhead strike that can hit characters who are crouch blocking.}} | ||
| + | {{MoveListRow | Kamaitachi | {{Ism|X}} {{Ism|Z}} {{Ism|V}} {{downright}}+{{button|text=HK}} | Guy does a backflip kick.}} | ||
| + | }} | ||
| + | {{MoveListTable | desc=Super Combos | | ||
| + | {{MoveListRow | Bushin Muso Renge | {{Ism|X}} {{Ism|Z}} {{Ism|v}} {{HCB}} {{HCB}} {{punch}} | Guy performs a barrage of punches and kicks, with the screen flashing on each attack.}} | ||
| + | {{MoveListRow | Bushin Hassou Ken | {{Ism|x}} {{Ism|Z}} {{Ism|v}} {{QCF}} {{QCF}} {{punch}} | Guy pummels his opponent high into the air with a series of strikes.}} | ||
| + | {{MoveListRow | Bushin Gourai Kyaku | {{Ism|x}} {{Ism|Z}} {{Ism|v}} {{QCF}} {{QCF}} {{kick}} | Guy dashes toward his opponent and performs a series of punches, ending with a reverse hook kick.}} | ||
| + | {{MoveListRow | Zero Counter | {{Ism|x}} {{Ism|Z}} {{Ism|V}} {{left}} {{downleft}} {{down}} {{punch}} or {{kick}} while blocking}} | ||
| + | }} | ||
}} | }} | ||
{{InfoRow | {{InfoRow | ||
| − | | title= | + | | title=Rolento |
| image= | | image= | ||
| − | | desc= | + | | info1name=Originally appeared in |
| + | | info1=''Final Fight'' | ||
| + | | info2name=Fifth battle | ||
| + | | info2=Sodom | ||
| + | | info3name=Ninth battle | ||
| + | | info3=Cody | ||
| + | | info4name=Final battle | ||
| + | | info4=Juli & Juni, Final Vega | ||
| + | | desc=Rolento | ||
| + | {{MoveListTable | desc=Special moves | | ||
| + | {{MoveListRow | Patriot Circle | {{Ism|X}} {{Ism|Z}} {{Ism|V}} {{QCF}} {{punch}} | Rolento twirls his staff in circles around him.}} | ||
| + | {{MoveListRow | Mekon Delta Air Raid | {{Ism|X}} {{Ism|Z}} {{Ism|V}} {{QCB}} {{punch}} | Rolento rolls backwards. If the player presses {{punch}} again before he finishes his roll, he launches himself across the screen while swinging his staff downward.}} | ||
| + | {{MoveListRow | Mekon Delta Escape | {{Ism|X}} {{Ism|Z}} {{Ism|V}} {{QCB}} {{kick}} | Rolento jumps back to the corner of the screen and then drops back down.}} | ||
| + | {{MoveListRow | Mekon Delta Attack | {{Ism|X}} {{Ism|Z}} {{Ism|V}} All three {{kick}} simultaneously | Rolento performs a backflip. If the player presses {{punch}} again before the backflip is over, he rolls forward in a ball (with the distance depending on the strength of the punch used), which hurts opponents that he rolls into.}} | ||
| + | {{MoveListRow | Stinger | {{Ism|X}} {{Ism|Z}} {{Ism|V}} {{DPF}} {{kick}} | Rolento high into the air. Pressing {{punch}} or {{kick}} before he lands throws a knife at an angle. The angle depends on the button used, with {{button|text=HP}} and {{button|text=HK}} being the closest to 0° and {{button|text=LP}} and {{button|text=LK}} being the closest to 270°.}} | ||
| + | }} | ||
| + | {{MoveListTable | desc=Command normals | | ||
| + | {{MoveListRow | High Jump | {{Ism|x}} {{Ism|Z}} {{Ism|V}} {{down}} {{up}} | Rolento flips high into the air forward (potentially leaping over his opponent).}} | ||
| + | {{MoveListRow | Spike Rod | {{Ism|X}} {{Ism|Z}} {{Ism|V}} {{down}}+{{button|text=MK}} in midair | Rolento jabs his staff downward, which can be used to hit his opponent or bounce slightly off the ground.}} | ||
| + | {{MoveListRow | Fake Rod | {{Ism|X}} {{Ism|Z}} {{Ism|V}} {{right}}+{{button|text=MK}} | Rolento jabs his staff into the ground and uses it to support his weight.}} | ||
| + | }} | ||
| + | {{MoveListTable | desc=Super Combos | | ||
| + | {{MoveListRow | Take No Prisoners | {{Ism|X}} {{Ism|Z}} {{Ism|v}} {{QCF}} {{QCF}} {{punch}} | Rolento pulls a tripwire from the ground, which moves a short distance forward. If the wire catches the opponent, Rolento pulls the opponent onto a hook that appears overhead and drops them onto the ground.}} | ||
| + | {{MoveListRow | Mine Sweeper | {{Ism|x}} {{Ism|Z}} {{Ism|v}} {{QCB}} {{QCB}} {{punch}} | Rolento rolls backwards while dropping several grenades.}} | ||
| + | {{MoveListRow | Steel Rain | {{Ism|x}} {{Ism|Z}} {{Ism|v}} {{QCF}} {{QCF}} {{kick}} | Rolento throws a bundle of knives into the air, which rain down wherever his opponent is standing.}} | ||
| + | {{MoveListRow | Zero Counter | {{Ism|x}} {{Ism|Z}} {{Ism|V}} {{left}} {{downleft}} {{down}} {{punch}} or {{kick}} while blocking}} | ||
| + | }} | ||
}} | }} | ||
{{InfoRow | {{InfoRow | ||
| − | | title= | + | | title=Sodom |
| image= | | image= | ||
| − | | desc= | + | | info1name=Originally appeared in |
| + | | info1=''Final Fight'' | ||
| + | | info2name=Fifth battle | ||
| + | | info2=Rolento | ||
| + | | info3name=Ninth battle | ||
| + | | info3=Chun-Li | ||
| + | | info4name=Final battle | ||
| + | | info4=Final Vega | ||
| + | | desc=Sodom | ||
| + | {{MoveListTable | desc=Special moves | | ||
| + | {{MoveListRow | Jigoku Scrape | {{Ism|X}} {{Ism|Z}} {{Ism|V}} {{QCF}} {{punch}} | Sodom charges forward and performs a strike with his jitte. The strike performed depends on the strength of the punch used.}} | ||
| + | {{MoveListRow | Butsumetsu Buster | {{Ism|X}} {{Ism|Z}} {{Ism|V}} D-Pad in a 360° rotation, then {{punch}} | Sodom grabs his opponent, jumps into the air, and slams them into the ground.}} | ||
| + | {{MoveListRow | Daikyou Burning | {{Ism|X}} {{Ism|Z}} {{Ism|V}} D-Pad in a 360° rotation, then {{kick}} | Sodom impales his opponent with his jitte and runs across the screen while dragging them into the ground.}} | ||
| + | {{MoveListRow | Shiraha Catch | {{Ism|X}} {{Ism|Z}} {{Ism|V}} {{DPF}} {{kick}} | Sodom closes his arms together. If his opponent attacks him while he is doing this, Sodom catches the opponent and throws them across the screen.}} | ||
| + | {{MoveListRow | Kouten Okiagari | {{Ism|X}} {{Ism|Z}} {{Ism|V}} {{right}} {{downright}} {{down}} {{punch}} when knocked down | Sodom rolls away from his opponent.}} | ||
| + | {{MoveListRow | Tengu Walking | {{Ism|X}} {{Ism|Z}} {{Ism|V}} {{left}} {{downleft}} {{down}} {{kick}} when knocked down | Sodom catches himself by sticking his jitte in the ground, then uses them to walk forward.}} | ||
| + | {{MoveListRow | Yagura Reverse| {{Ism|X}} {{Ism|Z}} {{Ism|V}} {{RDP}} {{kick}} | Sodom stands on his jitte. This is a fake version of Tengu Walking, meant to confuse opponents, and cannot do damage unless the opponent is performing a low attack at the same time.}} | ||
| + | }} | ||
| + | {{MoveListTable | desc=Super Combos | | ||
| + | {{MoveListRow | Meido no Miyage | {{Ism|X}} {{Ism|Z}} {{Ism|v}} {{QCF}} {{QCF}} {{punch}} | Sodom performs a series of Jitte Strikes in succession, with multiple hits.}} | ||
| + | {{MoveListRow | Tenchuu Satsu | {{Ism|x}} {{Ism|Z}} {{Ism|v}} D-Pad in a 360° rotation twice, then {{punch}} | Sodom grabs his opponent, jumps into the air, and slams them into the ground twice.}} | ||
| + | {{MoveListRow | Zero Counter | {{Ism|x}} {{Ism|Z}} {{Ism|V}} {{left}} {{downleft}} {{down}} {{punch}} or {{kick}} while blocking}} | ||
| + | }} | ||
}} | }} | ||
{{InfoRow | {{InfoRow | ||
| − | | title= | + | | title=Rose |
| image= | | image= | ||
| − | | desc= | + | | info1name=Originally appeared in |
| + | | info1=''Street Fighter Zero'' | ||
| + | | info2name=Fifth battle | ||
| + | | info2=Guy | ||
| + | | info3name=Ninth battle | ||
| + | | info3=Balrog | ||
| + | | info4name=Final battle | ||
| + | | info4=Juli & Juni, Final Vega | ||
| + | | desc=Rose | ||
| + | {{MoveListTable | desc=Special moves | | ||
| + | {{MoveListRow | Soul Reflect | {{Ism|X}} {{Ism|Z}} {{Ism|V}} {{QCB}} {{punch}} | Rose whips her scarf down in front of her. If it hits an opponent, it does damage directly, but it can also be used to absorb projectiles with {{button|text=LP}} or reflect them back toward her opponent with {{button|text=MP}} or {{button|text=HP}}.}} | ||
| + | {{MoveListRow | Soul Spark | {{Ism|X}} {{Ism|Z}} {{Ism|V}} {{HCF}} {{punch}} | Rose lashes her scarf straight out as a soul sphere shoots down it.}} | ||
| + | {{MoveListRow | Soul Throw | {{Ism|X}} {{Ism|Z}} {{Ism|V}} {{DPF}} {{punch}} | Rose jumps upward at a diagonal angle. If she intercepts an airborne opponent, she grabs and throws them down to the ground.}} | ||
| + | {{MoveListRow | Soul Spiral | {{Ism|X}} {{Ism|Z}} {{Ism|V}} {{QCF}} {{kick}} | Rose steps forward and spins her scarf like a drill.}} | ||
| + | }} | ||
| + | {{MoveListTable | desc=Command normals | | ||
| + | {{MoveListRow | Slide Kick | {{Ism|X}} {{Ism|Z}} {{Ism|V}} {{downright}}+{{button|text=MK}} | Rose does a slide kick forward.}} | ||
| + | {{MoveListRow | Soul-piette | {{Ism|x}} {{Ism|Z}} {{Ism|V}} {{right}}+{{button|text=HK}} | Rose does a rotating high kick while leaning on a hand.}} | ||
| + | }} | ||
| + | {{MoveListTable | desc=Super Combos | | ||
| + | {{MoveListRow | Aura Soul Throw | {{Ism|X}} {{Ism|Z}} {{Ism|v}} {{QCF}} {{QCF}} {{punch}} | Rose pummels her opponent into the air, then throws them back toward the ground.}} | ||
| + | {{MoveListRow | Aura Soul Spark | {{Ism|x}} {{Ism|Z}} {{Ism|v}} {{QCB}} {{QCB}} {{punch}} | Rose does a version of her Soul Spark that can hit multiple times.}} | ||
| + | {{MoveListRow | Soul Illusion | {{Ism|x}} {{Ism|Z}} {{Ism|v}} {{QCF}} {{QCF}} {{kick}} | Rose creates afterimages of herself that mimic her normal attacks. Lasts for a timed duration or until Rose is hit.}} | ||
| + | {{MoveListRow | Zero Counter | {{Ism|x}} {{Ism|Z}} {{Ism|V}} {{left}} {{downleft}} {{down}} {{punch}} or {{kick}} while blocking}} | ||
| + | }} | ||
}} | }} | ||
{{InfoRow | {{InfoRow | ||
| − | | title= | + | | title=Sakura |
| image= | | image= | ||
| − | | | + | | info1name=Originally appeared in |
| + | | info1=''Street Fighter Zero 2'' | ||
| + | | info2name=Fifth battle | ||
| + | | info2=E. Honda | ||
| + | | info3name=Ninth battle | ||
| + | | info3=Ryu | ||
| + | | info4name=Final battle | ||
| + | | info4=Final Vega | ||
| + | | desc=Sakura | ||
| + | {{MoveListTable | desc=Special moves | | ||
| + | {{MoveListRow | Hadouken | {{Ism|X}} {{Ism|Z}} {{Ism|V}} {{QCF}} {{punch}} | Sakura shoots a fireball that travels most of the width of the screen.}} | ||
| + | {{MoveListRow | Shouoken | {{Ism|X}} {{Ism|Z}} {{Ism|V}} {{DPF}} {{punch}} | Sakura dashes forward, then performs a jumping uppercut. She dashes a longer distance when the move is performed with stronger punches.}} | ||
| + | {{MoveListRow | Shunpuu Kyaku | {{Ism|X}} {{Ism|Z}} {{Ism|V}} {{QCB}} {{kick}} | Sakura jumps into the air and spins around an axis with her leg extended, moving forward in an arc.}} | ||
| + | {{MoveListRow | Sakura Otoshi | {{Ism|x}} {{Ism|Z}} {{Ism|V}} {{DPF}} {{kick}} | Sakura leaps high into the air with her arms and legs back. This move can be followed up with {{punch}} to perform a knifehand strike with both hands as she is landing.}} | ||
| + | }} | ||
| + | {{MoveListTable | desc=Command normals | | ||
| + | {{MoveListRow | Flower Kick | {{Ism|X}} {{Ism|Z}} {{Ism|V}} {{right}}+{{button|text=MK}} | Sakura performs a wide overhead kick. This is an overhead strike that can hit characters who are crouch blocking.}} | ||
| + | }} | ||
| + | {{MoveListTable | desc=Super Combos | | ||
| + | {{MoveListRow | Midare Zakura | {{Ism|X}} {{Ism|Z}} {{Ism|v}} {{QCF}} {{QCF}} {{kick}} | Sakura performs a series of low Shouokens while moving across the screen, culminating in a high Shouoken.}} | ||
| + | {{MoveListRow | Shinkuu Hadouken | {{Ism|X}} {{Ism|Z}} {{Ism|v}} {{QCF}} {{QCF}} {{punch}} | Sakura shoots a large fireball that can hit her opponent multiple times. The fireball shrinks as it travels the screen, dissipating completely before it reaches the end. It hits more times and does more damage when it is larger, so the move is most effective when performed near Sakura's opponent.}} | ||
| + | {{MoveListRow | Haru Ichiban | {{Ism|X}} {{Ism|Z}} {{Ism|v}} {{QCB}} {{QCB}} {{kick}} | Sakura advances on her opponent while doing a series of low, sweeping, spinning kicks, ending with a high standing kick.}} | ||
| + | {{MoveListRow | Zero Counter | {{Ism|x}} {{Ism|Z}} {{Ism|V}} {{left}} {{downleft}} {{down}} {{punch}} or {{kick}} while blocking}} | ||
| + | }} | ||
}} | }} | ||
{{InfoRow | {{InfoRow | ||
| title=Karin | | title=Karin | ||
| image= | | image= | ||
| − | | desc= | + | | info1name=Originally appeared in |
| + | | info1=''Street Fighter Zero 3'' | ||
| + | | info2name=Fifth battle | ||
| + | | info2=Blanka | ||
| + | | info3name=Ninth battle | ||
| + | | info3=Sakura | ||
| + | | info4name=Final battle | ||
| + | | info4=Juli & Juni, Final Vega | ||
| + | | desc=Karin | ||
}} | }} | ||
{{InfoRow | {{InfoRow | ||
| − | | title= | + | | title=Dan |
| image= | | image= | ||
| − | | desc= | + | | info1name=Originally appeared in |
| + | | info1=''Street Fighter Zero'' | ||
| + | | info2name=Fifth battle | ||
| + | | info2=Chun-Li | ||
| + | | info3name=Ninth battle | ||
| + | | info3=Sagat | ||
| + | | info4name=Final battle | ||
| + | | info4=Juli & Juni, Final Vega | ||
| + | | desc=Dan | ||
| + | {{MoveListTable | desc=Special moves | | ||
| + | {{MoveListRow | Gadouken | {{Ism|X}} {{Ism|Z}} {{Ism|V}} {{QCF}} {{punch}} | Dan focuses his energy and throws a very short-ranged fireball directly in front of him with a single hand.}} | ||
| + | {{MoveListRow | Kouryuuken | {{Ism|X}} {{Ism|Z}} {{Ism|V}} {{DPF}} {{punch}} | Dan rises off the ground while punching upwards, knocking down his opponent on impact.}} | ||
| + | {{MoveListRow | Dankuukyaku | {{Ism|X}} {{Ism|Z}} {{Ism|V}} {{QCB}} {{kick}} | Dan leaps forward and performs a sequence of three kicks in midair.}} | ||
| + | {{MoveListRow | Zenten Chouhatsu | {{Ism|X}} {{Ism|Z}} {{Ism|V}} {{QCF}} {{button|text=TAUNT}} | Dan rolls forward, then performs his taunt.}} | ||
| + | {{MoveListRow | Kouten Chouhatsu | {{Ism|X}} {{Ism|Z}} {{Ism|V}} {{QCB}} {{button|text=TAUNT}} | Dan rolls backwards, then performs his taunt.}} | ||
| + | }} | ||
| + | {{MoveListTable | desc=Command normals | | ||
| + | {{MoveListRow | Chouhatsu | {{Ism|X}} {{Ism|Z}} {{Ism|V}} {{button|text=TAUNT}} | Dan's taunt uniquely can be performed multiple times per round and increases the power in his Super Combo gauge.}} | ||
| + | {{MoveListRow | Kuuchuu Chouhatsu | {{Ism|X}} {{Ism|Z}} {{Ism|V}} {{button|text=TAUNT}} in midair | Dan can perform his taunt in midair.}} | ||
| + | {{MoveListRow | Shami Chouhatsu | {{Ism|X}} {{Ism|Z}} {{Ism|V}} {{down}}+{{button|text=TAUNT}} | Dan can perform his taunt while crouching.}} | ||
| + | }} | ||
| + | {{MoveListTable | desc=Super Combos | | ||
| + | {{MoveListRow | Hisshou Buraiken | {{Ism|X}} {{Ism|Z}} {{Ism|v}} {{QCB}} {{QCB}} {{kick}} | Dan performs a barrage of punches and kicks right in front of him, ending with a Kouryuuken.}} | ||
| + | {{MoveListRow | Chouhatsu Densetsu | {{Ism|x}} {{Ism|Z}} {{Ism|v}} {{QCF}} {{QCF}} {{button|text=TAUNT}} | Dan rolls forward multiple times, stopping each time to taunt.}} | ||
| + | {{MoveListRow | Chouhatsu Shinwa | {{Ism|x}} {{Ism|Z}} {{Ism|v}} {{QCB}} {{QCB}} {{button|text=TAUNT}} (at max level) | All of Dan's attacks are replaced by taunts. He can roll along the ground with {{downleft}}+{{kick}} or {{downright}}+{{kick}} while this effect is active. Similar to an Original Combo, the taunts cancel into each other so they can be performed more quickly. The Super Combo gauge must be at level 3 to perform this move.}} | ||
| + | {{MoveListRow | Shinkuu Gadouken | {{Ism|x}} {{Ism|Z}} {{Ism|v}} {{QCF}} {{QCF}} {{punch}} | Dan fires a version of the Gadouken Fireball that can hit his opponent multiple times.}} | ||
| + | {{MoveListRow | Kouryuu Rekka | {{Ism|x}} {{Ism|Z}} {{Ism|v}} {{QCF}} {{QCF}} {{kick}} | Dan performs a single low Kouryuuken, followed by a high Kouryuuken.}} | ||
| + | {{MoveListRow | Zero Counter | {{Ism|x}} {{Ism|Z}} {{Ism|V}} {{left}} {{downleft}} {{down}} {{punch}} or {{kick}} while blocking}} | ||
| + | }} | ||
}} | }} | ||
{{InfoRow | {{InfoRow | ||
| − | | title= | + | | title=R. Mika |
| image= | | image= | ||
| − | | | + | | info1name=Originally appeared in |
| + | | info1=''Street Fighter Zero 3'' | ||
| + | | info2name=Fifth battle | ||
| + | | info2=Karin | ||
| + | | info3name=Ninth battle | ||
| + | | info3=Zangief | ||
| + | | info4name=Final battle | ||
| + | | info4=Juli & Juni, Final Vega | ||
| + | | desc=R. Mika | ||
}} | }} | ||
{{InfoRow | {{InfoRow | ||
| − | | title= | + | | title=Juli |
| image= | | image= | ||
| − | | | + | | info1name=Originally appeared in |
| + | | info1=''Street Fighter Zero 3'' | ||
| + | | info2name=Fifth battle | ||
| + | | info2=T. Hawk | ||
| + | | info3name=Ninth battle | ||
| + | | info3=Cammy | ||
| + | | info4name=Final battle | ||
| + | | info4=Final Vega | ||
| + | | desc=Juli | ||
}} | }} | ||
{{InfoRow | {{InfoRow | ||
| − | | title= | + | | title=Juni |
| image= | | image= | ||
| − | | | + | | info1name=Originally appeared in |
| + | | info1=''Street Fighter Zero 3'' | ||
| + | | info2name=Fifth battle | ||
| + | | info2=E. Honda | ||
| + | | info3name=Ninth battle | ||
| + | | info3=Ryu | ||
| + | | info4name=Final battle | ||
| + | | info4=Final Vega | ||
| + | | desc=Juni | ||
}} | }} | ||
{{InfoRow | {{InfoRow | ||
| − | | title= | + | | title=Evil Ryu |
| image= | | image= | ||
| − | | desc= | + | | info1name=Originally appeared in |
| + | | info1=''Street Fighter Zero 2'' | ||
| + | | info2name=Fifth battle | ||
| + | | info2=Sagat | ||
| + | | info3name=Ninth battle | ||
| + | | info3=Vega | ||
| + | | info4name=Final battle | ||
| + | | info4=Shin Gouki | ||
| + | | desc=Evil Ryu | ||
| + | {{MoveListTable | desc=Special moves | | ||
| + | {{MoveListRow | Hadouken | {{Ism|X}} {{Ism|Z}} {{Ism|V}} {{QCF}} {{punch}} | Ryu focuses energy through his palms and fires a surging punch across the screen. When performed with {{button|text=HP}}, it has a fire effect at close range.}} | ||
| + | {{MoveListRow | Shakunetsu Hadouken | {{Ism|X}} {{Ism|Z}} {{Ism|V}} {{HCF}} {{punch}} | Ryu shoots a flaming variant of the Hadouken.}} | ||
| + | {{MoveListRow | Shouryuuken | {{Ism|X}} {{Ism|Z}} {{Ism|V}} {{DPF}} {{punch}} | Ryu rises off the ground while punching upwards, knocking down his opponent on impact.}} | ||
| + | {{MoveListRow | Tatsumaki Senpuukyaku | {{Ism|X}} {{Ism|Z}} {{Ism|V}} {{QCB}} {{kick}} | Ryu jumps into the air and spins around an axis with his leg extended, knocking down his opponent on impact. This move can be performed in midair.}} | ||
| + | {{MoveListRow | Ashura Senkuu Forward | {{Ism|X}} {{Ism|Z}} {{Ism|V}} {{DPF}} + all three {{punch}} or {{kick}} simultaneously | Ryu glides forward. He is invulnerable in this state. He moves across the entire screen with {{punch}} or half the screen with {{kick}}.}} | ||
| + | {{MoveListRow | Ashura Senkuu Backward | {{Ism|X}} {{Ism|Z}} {{Ism|V}} {{RDP}} + all three {{punch}} or {{kick}} simultaneously | Ryu glides backward. He is invulnerable in this state. He moves across the entire screen with {{punch}} or half the screen with {{kick}}.}} | ||
| + | }} | ||
| + | {{MoveListTable | desc=Command normals | | ||
| + | {{MoveListRow | Sakotsu Wari | {{Ism|X}} {{Ism|Z}} {{Ism|V}} {{right}}+{{button|text=MP}} | Ryu pulls his fist back and strikes forward and down, potentially hitting twice. This is an overhead strike that can hit characters who are crouch blocking.}} | ||
| + | {{MoveListRow | Seichuu Nidan Tsuki | {{Ism|x}} {{Ism|Z}} {{Ism|V}} {{right}}+{{button|text=HP}} | Ryu slides forward with an elbow strike, potentially hitting twice.}} | ||
| + | {{MoveListRow | Senpuu Kyaku | {{Ism|X}} {{Ism|Z}} {{Ism|V}} {{right}}+{{button|text=MK}} | Ryu leaps forward, doing a single spinning kick similar to a Hurricane Kick.}} | ||
| + | }} | ||
| + | {{MoveListTable | desc=Super Combos | | ||
| + | {{MoveListRow | Shun Goku Satsu | {{Ism|X}} {{Ism|Z}} {{Ism|v}} {{button|text=LP}} {{button|text=LP}} {{right}} {{button|text=LK}} {{button|text=HP}} (at max level) | Ryu glides to his opponent, then performs a series of attacks that cannot be seen as the screen flashes white. The Super Combo gauge must be at level 3 to perform this move.}} | ||
| + | {{MoveListRow | Shinkuu Hadouken | {{Ism|x}} {{Ism|Z}} {{Ism|v}} {{QCF}} {{QCF}} {{punch}} | Ryu fires a version of the Hadouken Fireball that can hit his opponent multiple times. At its highest level, it has a fire effect.}} | ||
| + | {{MoveListRow | Shinkuu Tatsumaki Senpuukyaku | {{Ism|x}} {{Ism|Z}} {{Ism|v}} {{QCB}} {{QCB}} {{kick}} | Ryu performs a version of the Hurricane Kick that draws his opponent in and potentially hits multiple times.}} | ||
| + | {{MoveListRow | Messatsu Gou Shouryuu | {{Ism|x}} {{Ism|Z}} {{Ism|v}} {{QCF}} {{QCF}} {{kick}} | Ryu performs a series of low Shouryuukens while moving across the screen, culminating in a high Shouryuuken.}} | ||
| + | {{MoveListRow | Zero Counter | {{Ism|x}} {{Ism|Z}} {{Ism|V}} {{left}} {{downleft}} {{down}} {{punch}} or {{kick}} while blocking}} | ||
| + | }} | ||
}} | }} | ||
{{InfoRow | {{InfoRow | ||
| − | | title= | + | | title=Fei Long |
| image= | | image= | ||
| − | | desc= | + | | info1name=Originally appeared in |
| + | | info1=''Super Street Fighter II'' | ||
| + | | info2name=Fifth battle | ||
| + | | info2=M. Bison | ||
| + | | info3name=Ninth battle | ||
| + | | info3=Balrog | ||
| + | | info4name=Final battle | ||
| + | | info4=Final Vega | ||
| + | | desc=Fei Long | ||
}} | }} | ||
{{InfoRow | {{InfoRow | ||
| − | | title= | + | | title=Dee Jay |
| image= | | image= | ||
| − | | desc= | + | | info1name=Originally appeared in |
| + | | info1=''Super Street Fighter II'' | ||
| + | | info2name=Fifth battle | ||
| + | | info2=Adon | ||
| + | | info3name=Ninth battle | ||
| + | | info3=Sagat | ||
| + | | info4name=Final battle | ||
| + | | info4=Final Vega | ||
| + | | desc=Dee Jay | ||
}} | }} | ||
{{InfoRow | {{InfoRow | ||
| − | | title= | + | | title=T. Hawk |
| image= | | image= | ||
| − | | | + | | info1name=Originally appeared in |
| + | | info1=''Super Street Fighter II'' | ||
| + | | info2name=Fifth battle | ||
| + | | info2=Nash | ||
| + | | info3name=Ninth battle | ||
| + | | info3=Juli | ||
| + | | info4name=Final battle | ||
| + | | info4=Final Vega | ||
| + | | desc=T. Hawk | ||
}} | }} | ||
{{InfoRow | {{InfoRow | ||
| − | | title= | + | | title=Guile |
| image= | | image= | ||
| − | | | + | | info1name=Originally appeared in |
| + | | info1=''Street Fighter II'' | ||
| + | | info2name=Fifth battle | ||
| + | | info2=Chun-Li | ||
| + | | info3name=Ninth battle | ||
| + | | info3=Nash | ||
| + | | info4name=Final battle | ||
| + | | info4=Final Vega | ||
| + | | desc=Guile | ||
| + | }} | ||
}} | }} | ||
| + | ====Hidden==== | ||
| + | {{mainArticle|{{PAGENAME}}/Hidden content}} | ||
| + | {{InfoTable| | ||
{{InfoRow | {{InfoRow | ||
| − | | title= | + | | title=Shin Gouki (Shin Akuma) |
| image= | | image= | ||
| − | | desc= | + | | info1name=Originally appeared in |
| + | | info1=''Super Street Fighter II X'' | ||
| + | | info2name=Fifth battle | ||
| + | | info2=Adon | ||
| + | | info3name=Ninth battle | ||
| + | | info3=Guy | ||
| + | | info4name=Final battle | ||
| + | | info4=Final Vega | ||
| + | | desc=Shin Gouki | ||
| + | {{MoveListTable | desc=Special moves | | ||
| + | {{MoveListRow | Gou Hadouken | {{Ism|X}} {{Ism|Z}} {{Ism|V}} {{QCF}} {{punch}} | Gouki focuses energy through his palms and fires a surging punch across the screen.}} | ||
| + | {{MoveListRow | Zankuu Hadouken | {{Ism|X}} {{Ism|Z}} {{Ism|V}} {{QCF}} {{punch}} in midair | Gouki shoots a single-handed Hadouken at a diagonal angle downward in midair. He can fire a second fireball by pressing {{punch}} again in quick succession.}} | ||
| + | {{MoveListRow | Shakunetsu Hadouken | {{Ism|X}} {{Ism|Z}} {{Ism|V}} {{HCB}} {{punch}} | Gouki shoots a flaming variant of the Hadouken.}} | ||
| + | {{MoveListRow | Gou Shouryuken | {{Ism|X}} {{Ism|Z}} {{Ism|V}} {{DPF}} {{punch}} | Gouki rises off the ground while punching upwards. Hits up to two times with a {{button|text=MP}} or three times with {{button|text=HP}}.}} | ||
| + | {{MoveListRow | Tatsumaki Zankuukyaku | {{Ism|X}} {{Ism|Z}} {{Ism|V}} {{QCB}} {{kick}} | Gouki jumps into the air and spins around an axis with his leg extended, knocking down his opponent on impact. This move can be performed in midair.}} | ||
| + | {{MoveListRow | Hyakki Shuu | {{Ism|x}} {{Ism|Z}} {{Ism|V}} {{QCF}} {{upright}} {{punch}} | Gouki somersaults forward. He performs a sliding sweep when he lands. Alternatively, the move can be followed up with {{punch}} for a palm strike or {{kick}} for a falling kick. When Gouki is near his opponent, he can throw them with {{left}}+{{punch}} or {{kick}} or {{right}}+{{punch}} or {{kick}} instead.}} | ||
| + | {{MoveListRow | Zenpou Tenshin | {{Ism|x}} {{Ism|Z}} {{Ism|V}} {{QCB}}+{{punch}} | Gouki jumps forward, then rolls along the ground.}} | ||
| + | {{MoveListRow | Ashura Senkuu Forward | {{Ism|X}} {{Ism|Z}} {{Ism|V}} {{DPF}} + all three {{punch}} or {{kick}} simultaneously | Gouki glides forward. He is invulnerable in this state. He moves across the entire screen with {{punch}} or half the screen with {{kick}}.}} | ||
| + | {{MoveListRow | Ashura Senkuu Backward | {{Ism|X}} {{Ism|Z}} {{Ism|V}} {{RDP}} + all three {{punch}} or {{kick}} simultaneously | Gouki glides backward. He is invulnerable in this state. He moves across the entire screen with {{punch}} or half the screen with {{kick}}.}} | ||
| + | {{MoveListRow | Hadou no Kamae | {{Ism|x}} {{Ism|Z}} {{Ism|V}} {{QCF}} {{button|text=TAUNT}} | Gouki performs the motion for a fireball but does not fire one. The purpose of this move is to confuse opponents. The recovery time for this move is much faster than a real fireball.}} | ||
| + | }} | ||
| + | {{MoveListTable | desc=Command normals | | ||
| + | {{MoveListRow | Tenma Kuujin Kyaku | {{Ism|X}} {{Ism|Z}} {{Ism|V}} {{down}}+{{button|text=MK}} before the apex of the jump while flipping forward in the air | Gouki dive kicks diagonally downward.}} | ||
| + | {{MoveListRow | Zugai Hasatsu | {{Ism|X}} {{Ism|Z}} {{Ism|V}} {{right}}+{{button|text=MP}} | Gouki performs an open-handed chop, potentially hitting twice. This is an overhead strike that can hit characters who are crouch blocking.}} | ||
| + | {{MoveListRow | Senpuu Kyaku | {{Ism|X}} {{Ism|Z}} {{Ism|V}} {{right}}+{{button|text=MK}} | Gouki leaps forward, doing a single spinning kick similar to a Tatsumaki Senpuukyaku.}} | ||
| + | }} | ||
| + | {{MoveListTable | desc=Super Combos | | ||
| + | {{MoveListRow | Shun Goku Satsu | {{Ism|X}} {{Ism|z}} {{Ism|v}} {{button|text=LP}} {{button|text=LP}} {{right}} {{button|text=LK}} {{button|text=HP}} (at max level) | Gouki glides to his opponent, then performs a series of attacks that cannot be seen as the screen flashes white. The Super Combo gauge must be at level 3 to perform this move.}} | ||
| + | {{MoveListRow | Messatsu Gou Hadou | {{Ism|X}} {{Ism|Z}} {{Ism|v}} {{HCB}} {{HCB}} {{punch}} | Gouki fires a version of the Gou Hadouken Fireball that can hit his opponent multiple times.}} | ||
| + | {{MoveListRow | Messatsu Gou Shouryuu | {{Ism|X}} {{Ism|Z}} {{Ism|v}} {{QCF}} {{QCF}} {{punch}} | Gouki performs a series of low Shouryukens while moving across the screen, culminating in a high Shouryuken.}} | ||
| + | {{MoveListRow | Tenma Gou Zankuu | {{Ism|X}} {{Ism|Z}} {{Ism|v}} {{QCF}} {{QCF}} {{punch}} in midair | Gouki fires a larger, more powerful Zankuu Hadouken at his opponent.}} | ||
| + | {{MoveListRow | Zero Counter | {{Ism|x}} {{Ism|Z}} {{Ism|V}} {{left}} {{downleft}} {{down}} {{punch}} or {{kick}} while blocking}} | ||
}} | }} | ||
| − | |||
| − | |||
| − | |||
| − | |||
}} | }} | ||
{{InfoRow | {{InfoRow | ||
| − | | title= | + | | title=Final Vega (Final Bison) |
| image= | | image= | ||
| − | | | + | | info1name=Originally appeared in |
| + | | info1=''Street Fighter Zero 3'' | ||
| + | | info2name=Fifth battle | ||
| + | | info2=Akuma | ||
| + | | info3name=Ninth battle | ||
| + | | info3=Sagat | ||
| + | | info4name=Final battle | ||
| + | | info4=Ryu | ||
| + | | desc=Final Vega | ||
}} | }} | ||
}} | }} | ||
| − | The Saturn | + | ===Stages=== |
| + | Each character has his or her own stage where matches are hosted in single-player games. The stage can be manually chosen in the two-player mode. | ||
| + | {{gallery|widths=200|screens=yes| | ||
| + | {{gitem|Street Fighter Zero 3 Saturn, Stages, Ryu.png|Ryu}} | ||
| + | {{gitem|Street Fighter Zero 3 Saturn, Stages, E. Honda.png|E. Honda}} | ||
| + | {{gitem|Street Fighter Zero 3 Saturn, Stages, Blanka.png|Blanka}} | ||
| + | {{gitem|Street Fighter Zero 3 Saturn, Stages, Chun-Li.png|Chun-Li}} | ||
| + | {{gitem|Street Fighter Zero 3 Saturn, Stages, Zangief.png|Zangief}} | ||
| + | {{gitem|Street Fighter Zero 3 Saturn, Stages, Dhalsim.png|Dhalsim}} | ||
| + | {{gitem|Street Fighter Zero 3 Saturn, Stages, Ken.png|Ken}} | ||
| + | {{gitem|Street Fighter Zero 3 Saturn, Stages, Gouki.png|Gouki}} | ||
| + | {{gitem|Street Fighter Zero 3 Saturn, Stages, Nash.png|Nash}} | ||
| + | {{gitem|Street Fighter Zero 3 Saturn, Stages, Cammy.png|Cammy}} | ||
| + | {{gitem|Street Fighter Zero 3 Saturn, Stages, M. Bison.png|M. Bison}} | ||
| + | {{gitem|Street Fighter Zero 3 Saturn, Stages, Balrog.png|Balrog}} | ||
| + | {{gitem|Street Fighter Zero 3 Saturn, Stages, Sagat.png|Sagat}} | ||
| + | {{gitem|Street Fighter Zero 3 Saturn, Stages, Vega.png|Vega}} | ||
| + | {{gitem|Street Fighter Zero 3 Saturn, Stages, Adon.png|Adon}} | ||
| + | {{gitem|Street Fighter Zero 3 Saturn, Stages, Gen.png|Gen}} | ||
| + | {{gitem|Street Fighter Zero 3 Saturn, Stages, Birdie.png|Birdie}} | ||
| + | {{gitem|Street Fighter Zero 3 Saturn, Stages, Cody.png|Cody}} | ||
| + | {{gitem|Street Fighter Zero 3 Saturn, Stages, Guy.png|Guy}} | ||
| + | {{gitem|Street Fighter Zero 3 Saturn, Stages, Rolento.png|Rolento}} | ||
| + | {{gitem|Street Fighter Zero 3 Saturn, Stages, Sodom.png|Sodom}} | ||
| + | {{gitem|Street Fighter Zero 3 Saturn, Stages, Rose.png|Rose}} | ||
| + | {{gitem|Street Fighter Zero 3 Saturn, Stages, Sakura.png|Sakura}} | ||
| + | {{gitem|Street Fighter Zero 3 Saturn, Stages, Karin.png|Karin}} | ||
| + | {{gitem|Street Fighter Zero 3 Saturn, Stages, Dan.png|Dan}} | ||
| + | {{gitem|Street Fighter Zero 3 Saturn, Stages, R. Mika.png|R. Mika}} | ||
| + | {{gitem|Street Fighter Zero 3 Saturn, Stages, Juli & Juni.png|Juli & Juni}} | ||
| + | {{gitem|Street Fighter Zero 3 Saturn, Stages, Evil Ryu.png|Evil Ryu}} | ||
| + | {{gitem|Street Fighter Zero 3 Saturn, Stages, Fei Long.png|Fei Long}} | ||
| + | {{gitem|Street Fighter Zero 3 Saturn, Stages, Dee Jay.png|Dee Jay}} | ||
| + | {{gitem|Street Fighter Zero 3 Saturn, Stages, T. Hawk.png|T. Hawk}} | ||
| + | {{gitem|Street Fighter Zero 3 Saturn, Stages, Guile.png|Guile}} | ||
| + | {{gitem|Street Fighter Zero 3 Saturn, Stages, Shin Gouki.png|Shin Gouki}} | ||
| + | }} | ||
| − | === | + | ==History== |
| − | + | ===Development=== | |
==Production credits== | ==Production credits== | ||
| Line 256: | Line 969: | ||
*'''Presented by:''' [[Capcom]] | *'''Presented by:''' [[Capcom]] | ||
| source=In-game credits | | source=In-game credits | ||
| − | | pdf= | + | | pdf=SFZ3 Saturn JP SSEnding.pdf |
| console=SAT | | console=SAT | ||
}} | }} | ||
| Line 282: | Line 995: | ||
*'''Presented by:''' [[Capcom]] | *'''Presented by:''' [[Capcom]] | ||
| source=In-game credits | | source=In-game credits | ||
| − | | pdf= | + | | pdf=SFZ2 Saturn JP SSEnding Dramatic.pdf |
| console=SAT | | console=SAT | ||
}} | }} | ||
| Line 311: | Line 1,024: | ||
| front=SFZ3 Saturn JP Box Front 4MB.jpg | | front=SFZ3 Saturn JP Box Front 4MB.jpg | ||
| back=SFZ3 Saturn JP Box Back 4MB.jpg | | back=SFZ3 Saturn JP Box Back 4MB.jpg | ||
| − | | spine= | + | | spine=SFAlpha3 Saturn JP Box Spine 4MBPack.jpg |
| square=yes | | square=yes | ||
| jewelcase=yes | | jewelcase=yes | ||
| jewelcasefront=SFZ3 Saturn JP Box Front 4MB JewelCase.jpg | | jewelcasefront=SFZ3 Saturn JP Box Front 4MB JewelCase.jpg | ||
| − | | jewelcaseback= | + | | jewelcaseback=SFAlpha3 Saturn JP JC Back 4MBPack.jpg |
| disc=Sfzero3 sat jp disc.jpg | | disc=Sfzero3 sat jp disc.jpg | ||
}} | }} | ||
Revision as of 06:38, 12 July 2023
- For the Sega Dreamcast game, see Street Fighter Alpha 3.
| Street Fighter Zero 3 | |||||||||||||||
|---|---|---|---|---|---|---|---|---|---|---|---|---|---|---|---|
| System(s): Sega Saturn | |||||||||||||||
| Publisher: Capcom | |||||||||||||||
| Developer: Mitchell[1] | |||||||||||||||
| Original system(s): Capcom CPS-2 | |||||||||||||||
| Sound driver: SCSP (1Track) | |||||||||||||||
| Peripherals supported: Extended RAM Cartridge (4MB only) | |||||||||||||||
| Genre: Fighting/Taisen Kakutou (対戦格闘)[2], Action[3] | |||||||||||||||
| Number of players: 1-2 | |||||||||||||||
| |||||||||||||||
|

Street Fighter Zero 3 (ストリートファイターZERO 3) is a 1998 fighting game by Capcom originally released for Capcom CPS-2 arcade hardware. It is the third game in the Street Fighter Zero (Street Fighter Alpha in the West) series, following Street Fighter Zero and Street Fighter Zero 2.
This Sega Saturn version of Street Fighter Zero 3 was released in 1999 in Japan only, shortly after a Dreamcast version. It requires the use of the 4MB Extended RAM Cartridge to function.
Contents
Gameplay
The gameplay system from the previous Zero games was given a complete overhaul with the addition of three selectable fighting styles, a much larger roster of characters, and for the first time since the original Street Fighter II, new theme music for all the returning characters.
The controls for several actions has been modified from previous Zero games: the level of a Super Combo move in Z-ism is now determined by the strength of the attack button pressed (i.e. Medium Punch or Kick for a Lv. 2 Super Combo), rather than the number of buttons pushed; and throwing is now done by pressing two punch or kick buttons simultaneously.
The Saturn game contains all of the features added to a previous PlayStation port of the game, save for the usage of polygons and the PocketStation mode. It uses the extra RAM to include more frames of animation than the PlayStation version. Evil Ryu, Shin Akuma and Guile are immediately selectable. While the World Tour and Survival modes are virtually unchanged from the PlayStation version, Dramatic Battle received major improvements with the addition of Reverse Dramatic Battle and allowing three different characters to be used.
ISMs
The most obvious change in Street Fighter Zero 3 is the introduction of three different playing styles known as "ISMs".
| X-ism | |
|---|---|
| Simple style based on Super Street Fighter II Turbo (unusually, even localized versions keep the reference to the Japanese title, Super Street Fighter II X), in which the player has a single-level Super Combo gauge and access to a single (but powerful) Super Combo move, though players cannot air-block or use Zero Counters. | |
| Z-ism | |
| The standard playing style. It based on the previous Zero games, in which the player has a three-level Super Combo gauge with access to various Super Combo moves. | |
| V-ism | |
| It is a unique style that allows the player to perform custom combos similar to Street Fighter Zero 2. Zero 3 also introduces a "Guard Power Gauge" which depletes each time the player blocks - if the gauge is completely depleted, then the player will remain vulnerable for an attack. |
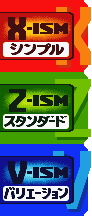
Characters
Move lists assume the player is facing right. If facing left, ![]() and
and ![]() should be reversed. P refers to any of the punch buttons, while K refers to any of the kick buttons.
should be reversed. P refers to any of the punch buttons, while K refers to any of the kick buttons.
All 21 characters from Street Figher Zero 2 return (including Cammy from Street Fighter Zero 2 Dash and the hidden characters Evil Ryu and Shin Gouki). E. Honda, Blanka, M. Bison, Balrog, Fei Long, Dee Jay, T. Hawk, and Guile return from Street Fighter II, completing the roster from that series, and Cody returns from Final Fight. The characters Karin, R. Mika, and the Shadaloo "Dolls," Juli and Juni debut in this game
Evil Ryu, Shin Gouki, Dee Jay, Fei Long, T. Hawk, and Guile were all exclusive to the console releases of the game.
| Ryu | |||||||||||||||||||||||||||||||||||||||||||||||||||||||||||||||
|---|---|---|---|---|---|---|---|---|---|---|---|---|---|---|---|---|---|---|---|---|---|---|---|---|---|---|---|---|---|---|---|---|---|---|---|---|---|---|---|---|---|---|---|---|---|---|---|---|---|---|---|---|---|---|---|---|---|---|---|---|---|---|---|
|
Originally appeared in: Street Fighter Fifth battle: Rose Ninth battle: Ken Final battle: Final Vega | |||||||||||||||||||||||||||||||||||||||||||||||||||||||||||||||
Ryu
| |||||||||||||||||||||||||||||||||||||||||||||||||||||||||||||||
| E. Honda | |||||||||||||||||||||||||||||||||||||||||||||||||||||||||||||||
|
Originally appeared in: Street Fighter II Fifth battle: Ryu Ninth battle: Sodom Final battle: Final Vega | |||||||||||||||||||||||||||||||||||||||||||||||||||||||||||||||
| E. Honda | |||||||||||||||||||||||||||||||||||||||||||||||||||||||||||||||
| Blanka | |||||||||||||||||||||||||||||||||||||||||||||||||||||||||||||||
|
Originally appeared in: Street Fighter II Fifth battle: Dan Ninth battle: Zangief Final battle: Juli & Juni, Final Vega | |||||||||||||||||||||||||||||||||||||||||||||||||||||||||||||||
| Blanka | |||||||||||||||||||||||||||||||||||||||||||||||||||||||||||||||
| Chun-Li | |||||||||||||||||||||||||||||||||||||||||||||||||||||||||||||||
|
Originally appeared in: Street Fighter II Fifth battle: Birdie Ninth battle: Cammy Final battle: Juli & Juni, Final Vega | |||||||||||||||||||||||||||||||||||||||||||||||||||||||||||||||
Chun-Li
| |||||||||||||||||||||||||||||||||||||||||||||||||||||||||||||||
| Zangief | |||||||||||||||||||||||||||||||||||||||||||||||||||||||||||||||
|
Originally appeared in: Street Fighter II Fifth battle: Rolento Ninth battle: Chun-Li Final battle: Final Vega | |||||||||||||||||||||||||||||||||||||||||||||||||||||||||||||||
Zangief
| |||||||||||||||||||||||||||||||||||||||||||||||||||||||||||||||
| Dhalsim | |||||||||||||||||||||||||||||||||||||||||||||||||||||||||||||||
|
Originally appeared in: Street Fighter II Fifth battle: Rose Ninth battle: Birdie Final battle: Juli & Juni, Final Vega | |||||||||||||||||||||||||||||||||||||||||||||||||||||||||||||||
Dhalsim
| |||||||||||||||||||||||||||||||||||||||||||||||||||||||||||||||
| Ken | |||||||||||||||||||||||||||||||||||||||||||||||||||||||||||||||
|
Originally appeared in: Street Fighter Fifth battle: Karin Ninth battle: Sakura Final battle: Final Vega | |||||||||||||||||||||||||||||||||||||||||||||||||||||||||||||||
Ken
| |||||||||||||||||||||||||||||||||||||||||||||||||||||||||||||||
| Gouki (Akuma) | |||||||||||||||||||||||||||||||||||||||||||||||||||||||||||||||
|
Originally appeared in: Super Street Fighter II X Fifth battle: Adon Ninth battle: Guy Final battle: Final Vega | |||||||||||||||||||||||||||||||||||||||||||||||||||||||||||||||
Gouki
| |||||||||||||||||||||||||||||||||||||||||||||||||||||||||||||||
| Nash (Charlie) | |||||||||||||||||||||||||||||||||||||||||||||||||||||||||||||||
|
Originally appeared in: Street Fighter Zero Fifth battle: Cammy Ninth battle: Rolento Final battle: Final Vega | |||||||||||||||||||||||||||||||||||||||||||||||||||||||||||||||
Nash
| |||||||||||||||||||||||||||||||||||||||||||||||||||||||||||||||
| Cammy | |||||||||||||||||||||||||||||||||||||||||||||||||||||||||||||||
|
Originally appeared in: Super Street Fighter II Fifth battle: Dhalsim Ninth battle: Balrog Final battle: Juli & Juni, Final Vega | |||||||||||||||||||||||||||||||||||||||||||||||||||||||||||||||
Cammy
| |||||||||||||||||||||||||||||||||||||||||||||||||||||||||||||||
| M. Bison (Balrog) | |||||||||||||||||||||||||||||||||||||||||||||||||||||||||||||||
|
Originally appeared in: Street Fighter II Fifth battle: Gen Ninth battle: Birdie Final battle: Final Vega | |||||||||||||||||||||||||||||||||||||||||||||||||||||||||||||||
| M. Bison | |||||||||||||||||||||||||||||||||||||||||||||||||||||||||||||||
| Balrog (Vega) | |||||||||||||||||||||||||||||||||||||||||||||||||||||||||||||||
|
Originally appeared in: Street Fighter II Fifth battle: Zangief Ninth battle: Cammy Final battle: Final Vega | |||||||||||||||||||||||||||||||||||||||||||||||||||||||||||||||
| Balrog | |||||||||||||||||||||||||||||||||||||||||||||||||||||||||||||||
| Sagat | |||||||||||||||||||||||||||||||||||||||||||||||||||||||||||||||
|
Originally appeared in: Street Fighter Fifth battle: Dan Ninth battle: Ryu Final battle: Final Vega | |||||||||||||||||||||||||||||||||||||||||||||||||||||||||||||||
Sagat
| |||||||||||||||||||||||||||||||||||||||||||||||||||||||||||||||
| Vega (M. Bison) | |||||||||||||||||||||||||||||||||||||||||||||||||||||||||||||||
|
Originally appeared in: Street Fighter II Fifth battle: Gouki Ninth battle: Sagat Final battle: Ryu | |||||||||||||||||||||||||||||||||||||||||||||||||||||||||||||||
Vega
| |||||||||||||||||||||||||||||||||||||||||||||||||||||||||||||||
| Adon | |||||||||||||||||||||||||||||||||||||||||||||||||||||||||||||||
|
Originally appeared in: Street Fighter Fifth battle: Ken Ninth battle: Rose Final battle: Final Vega | |||||||||||||||||||||||||||||||||||||||||||||||||||||||||||||||
Adon
| |||||||||||||||||||||||||||||||||||||||||||||||||||||||||||||||
| Gen | |||||||||||||||||||||||||||||||||||||||||||||||||||||||||||||||
|
Originally appeared in: Street Fighter Fifth battle: Ryu Ninth battle: Gouki Final battle: Final Vega | |||||||||||||||||||||||||||||||||||||||||||||||||||||||||||||||
| Gen
Gen has two fighting stances with entirely different movesets that he can switch between at any time. The Mantis stance is a more defensive stance with faster but lighter attacks.
The Crane stance is a more offensive stance with slower but stronger attacks. His normals are complex but generally have superior reach and often can hit multiple times.
| |||||||||||||||||||||||||||||||||||||||||||||||||||||||||||||||
| Birdie | |||||||||||||||||||||||||||||||||||||||||||||||||||||||||||||||
|
Originally appeared in: Street Fighter Fifth battle: E. Honda Ninth battle: Blanka Final battle: Juli & Juni, Final Vega | |||||||||||||||||||||||||||||||||||||||||||||||||||||||||||||||
Birdie
| |||||||||||||||||||||||||||||||||||||||||||||||||||||||||||||||
| Cody | |||||||||||||||||||||||||||||||||||||||||||||||||||||||||||||||
|
Originally appeared in: Final Fight Fifth battle: Birdie Ninth battle: Guy Final battle: Final Vega | |||||||||||||||||||||||||||||||||||||||||||||||||||||||||||||||
| Cody | |||||||||||||||||||||||||||||||||||||||||||||||||||||||||||||||
| Guy | |||||||||||||||||||||||||||||||||||||||||||||||||||||||||||||||
|
Originally appeared in: Final Fight Fifth battle: Karin Ninth battle: Gen Final battle: Final Vega | |||||||||||||||||||||||||||||||||||||||||||||||||||||||||||||||
Guy
| |||||||||||||||||||||||||||||||||||||||||||||||||||||||||||||||
| Rolento | |||||||||||||||||||||||||||||||||||||||||||||||||||||||||||||||
|
Originally appeared in: Final Fight Fifth battle: Sodom Ninth battle: Cody Final battle: Juli & Juni, Final Vega | |||||||||||||||||||||||||||||||||||||||||||||||||||||||||||||||
Rolento
| |||||||||||||||||||||||||||||||||||||||||||||||||||||||||||||||
| Sodom | |||||||||||||||||||||||||||||||||||||||||||||||||||||||||||||||
|
Originally appeared in: Final Fight Fifth battle: Rolento Ninth battle: Chun-Li Final battle: Final Vega | |||||||||||||||||||||||||||||||||||||||||||||||||||||||||||||||
Sodom
| |||||||||||||||||||||||||||||||||||||||||||||||||||||||||||||||
| Rose | |||||||||||||||||||||||||||||||||||||||||||||||||||||||||||||||
|
Originally appeared in: Street Fighter Zero Fifth battle: Guy Ninth battle: Balrog Final battle: Juli & Juni, Final Vega | |||||||||||||||||||||||||||||||||||||||||||||||||||||||||||||||
Rose
| |||||||||||||||||||||||||||||||||||||||||||||||||||||||||||||||
| Sakura | |||||||||||||||||||||||||||||||||||||||||||||||||||||||||||||||
|
Originally appeared in: Street Fighter Zero 2 Fifth battle: E. Honda Ninth battle: Ryu Final battle: Final Vega | |||||||||||||||||||||||||||||||||||||||||||||||||||||||||||||||
Sakura
| |||||||||||||||||||||||||||||||||||||||||||||||||||||||||||||||
| Karin | |||||||||||||||||||||||||||||||||||||||||||||||||||||||||||||||
|
Originally appeared in: Street Fighter Zero 3 Fifth battle: Blanka Ninth battle: Sakura Final battle: Juli & Juni, Final Vega | |||||||||||||||||||||||||||||||||||||||||||||||||||||||||||||||
| Karin | |||||||||||||||||||||||||||||||||||||||||||||||||||||||||||||||
| Dan | |||||||||||||||||||||||||||||||||||||||||||||||||||||||||||||||
|
Originally appeared in: Street Fighter Zero Fifth battle: Chun-Li Ninth battle: Sagat Final battle: Juli & Juni, Final Vega | |||||||||||||||||||||||||||||||||||||||||||||||||||||||||||||||
Dan
| |||||||||||||||||||||||||||||||||||||||||||||||||||||||||||||||
| R. Mika | |||||||||||||||||||||||||||||||||||||||||||||||||||||||||||||||
|
Originally appeared in: Street Fighter Zero 3 Fifth battle: Karin Ninth battle: Zangief Final battle: Juli & Juni, Final Vega | |||||||||||||||||||||||||||||||||||||||||||||||||||||||||||||||
| R. Mika | |||||||||||||||||||||||||||||||||||||||||||||||||||||||||||||||
| Juli | |||||||||||||||||||||||||||||||||||||||||||||||||||||||||||||||
|
Originally appeared in: Street Fighter Zero 3 Fifth battle: T. Hawk Ninth battle: Cammy Final battle: Final Vega | |||||||||||||||||||||||||||||||||||||||||||||||||||||||||||||||
| Juli | |||||||||||||||||||||||||||||||||||||||||||||||||||||||||||||||
| Juni | |||||||||||||||||||||||||||||||||||||||||||||||||||||||||||||||
|
Originally appeared in: Street Fighter Zero 3 Fifth battle: E. Honda Ninth battle: Ryu Final battle: Final Vega | |||||||||||||||||||||||||||||||||||||||||||||||||||||||||||||||
| Juni | |||||||||||||||||||||||||||||||||||||||||||||||||||||||||||||||
| Evil Ryu | |||||||||||||||||||||||||||||||||||||||||||||||||||||||||||||||
|
Originally appeared in: Street Fighter Zero 2 Fifth battle: Sagat Ninth battle: Vega Final battle: Shin Gouki | |||||||||||||||||||||||||||||||||||||||||||||||||||||||||||||||
Evil Ryu
| |||||||||||||||||||||||||||||||||||||||||||||||||||||||||||||||
| Fei Long | |||||||||||||||||||||||||||||||||||||||||||||||||||||||||||||||
|
Originally appeared in: Super Street Fighter II Fifth battle: M. Bison Ninth battle: Balrog Final battle: Final Vega | |||||||||||||||||||||||||||||||||||||||||||||||||||||||||||||||
| Fei Long | |||||||||||||||||||||||||||||||||||||||||||||||||||||||||||||||
| Dee Jay | |||||||||||||||||||||||||||||||||||||||||||||||||||||||||||||||
|
Originally appeared in: Super Street Fighter II Fifth battle: Adon Ninth battle: Sagat Final battle: Final Vega | |||||||||||||||||||||||||||||||||||||||||||||||||||||||||||||||
| Dee Jay | |||||||||||||||||||||||||||||||||||||||||||||||||||||||||||||||
| T. Hawk | |||||||||||||||||||||||||||||||||||||||||||||||||||||||||||||||
|
Originally appeared in: Super Street Fighter II Fifth battle: Nash Ninth battle: Juli Final battle: Final Vega | |||||||||||||||||||||||||||||||||||||||||||||||||||||||||||||||
| T. Hawk | |||||||||||||||||||||||||||||||||||||||||||||||||||||||||||||||
| Guile | |||||||||||||||||||||||||||||||||||||||||||||||||||||||||||||||
|
Originally appeared in: Street Fighter II Fifth battle: Chun-Li Ninth battle: Nash Final battle: Final Vega | |||||||||||||||||||||||||||||||||||||||||||||||||||||||||||||||
| Guile |
Hidden
- Main article: Street Fighter Zero 3/Hidden content.
| Shin Gouki (Shin Akuma) | |||||||||||||||||||||||||||||||||||||||||||||||||||||||||||||||
|---|---|---|---|---|---|---|---|---|---|---|---|---|---|---|---|---|---|---|---|---|---|---|---|---|---|---|---|---|---|---|---|---|---|---|---|---|---|---|---|---|---|---|---|---|---|---|---|---|---|---|---|---|---|---|---|---|---|---|---|---|---|---|---|
|
Originally appeared in: Super Street Fighter II X Fifth battle: Adon Ninth battle: Guy Final battle: Final Vega | |||||||||||||||||||||||||||||||||||||||||||||||||||||||||||||||
Shin Gouki
| |||||||||||||||||||||||||||||||||||||||||||||||||||||||||||||||
| Final Vega (Final Bison) | |||||||||||||||||||||||||||||||||||||||||||||||||||||||||||||||
|
Originally appeared in: Street Fighter Zero 3 Fifth battle: Akuma Ninth battle: Sagat Final battle: Ryu | |||||||||||||||||||||||||||||||||||||||||||||||||||||||||||||||
| Final Vega |
Stages
Each character has his or her own stage where matches are hosted in single-player games. The stage can be manually chosen in the two-player mode.


History
Development
Production credits
- Producer: Noritaka Funamizu
- Director: Naoto Ohta, Mamoru Ohhashi, Buruma, Ohko Zero5
- Visual Planner: Haruo Murata
- Programmer: Cham, Hard.YAS ~?-ISM~, PON, Hyper Shinchan, 24 ~Nishi~, Minomi ~RockMan-ISM~, Reiko Toh, Senor, Knight Rider Giu, Ittetsu
- Character Design: Akiman, Osusi
- Title Design: Shoei
- Object Design: Eri-N, Fujihara, Mizuho, Takemoto, Hitoshi Igarashi, Mizupyon, Kimo Kimo Jinzin, Ball Boy, Yuesuke, D-Kurita, A.Iwasaki, Kaname, Fuzii & Peliko, Chimorin Shogun, Sagata, Ikusan Z, Kitasan, Yu-Ten.Nakano, Tomohiko Ohsumi, Hiro, Rumichan, Reiko Komatsu, Kozuchi Tamura, Youichi Matsuo, Makoto Ishii
- Scroll Design: Asae Nisituji-Ba, S.Mukai (Jijii), H.Yonezuka, Kohama Ake&Kuro, Y.Tanoue (Tanopu), Ryo Uno, Yoko.Fukumoto, Takako Nakamura, Kazu.T, A.Ohnishi, N.Niiyama, C.Iwai, Sawatch, K.Yamahashi, H.Ohnishi
- Main Music Compose: Anarchy Takapon
- Sub Music Compose: Yuki Iwai, Isao Abe, Hideki Okugawa, Tetsuya Shibata
- Sound Direction: Hiroaki "X68K" Kondo
- Sound design: Moe.T, Satoshi Ise
- Voice Actor: Tetsuya Iwanaga, Yuji Ueda, Akiko Kohmoto, Yuko Sasamoto, Masashi Sugawara, Wataru Takagi, Junko Takeuchi, Tomomichi Nishimura, Michiko Neya, Osamu Hosoi, Shinichiro Miki, Yuko Miyamura, Tomoyuki Morikawa, Miho Yamada, Yoshiharu Yamada, Kouichi Yamadera, Jin Yamanoi, Greg Irwin
- Test Player: Nuki, M.P Oni-Suzuki, Skill Smith-Bug, Skill Smith-TTK, M Kunishige, Miura.F.Katsusuke, Yoshihiro Tomita, Akinori Murata
- Special Thanks: Sakomizu, Neo_G (Ishizawa), Spp Iorya, Satsuma, Takuya Shiraiwa, Erik Suzuki, Dan Okada, Chris Tang, Miki Takano, Maki Yoshiura, The Edge, Super Sailor, and, All Capcom Staff
- Market Producer: Kouji Nakajima
- General Producer: Noritaka Funamizu, Yoshiki Okamoto
- Presented by: Capcom
- Producer: Noritaka Funamizu
- Planner: Ohko 06, Bu Ru Ma
- Visual Planner: Haruo Murata
- Programer: Hiro, Chips, Y.Tsunazaki, T J, T.Furuko, M.Nakanowatari, Unamuji, M.Kataoka, T.Ueda, H.Kuramoto, T.Umezu TypeR, A.Kashimoto, Cham-Z, Hard.Yas -Adj-, Reiko Toh, Minomie Mouse, 24., Hyper Shin, K.R.Giu, Senor, Ittetsu
- Character Design: Wsu, Edayan, Harumaru
- Object Design: Makoto Ishii, A.Kurihara, H.Fujihara, Mizuho, Mizupyon, Takemoto, Igarashi, Rinboku, Tagirin, Hideya.Takada, SagataKafumi, E-Nakamura, A.Iwasaki, Kimo Kimo, Ball Boy, Fujii & Peliko
- Scroll Design: H.Yonezuka, H.Ohnishi, Kazu.T, Yoko.Fukumoto, Megumi.N, Akiko.Hongo, Tama, Tokio.N, T.Ishikawa, Asae.Nisituji
- Music Compose: Anarchy.T, Yuki Iwai, Isao Abe
- Sound Design: Hiroaki Kondo
- Voice Actor: Syozo Iizuka, Tetsuya Iwanaga, Yuji Ueda, Yoshitada Ohtsuka, Akiko Kohmoto, Yuko Sasamoto, Masashi Sugawara, Wataru Takagi, Junko Takeuchi, Toshihide Tsuchiya, Kousuke Toriumi, Tomomichi Nishimura, Michiko Neya, Osamu Hosoi, Shin'ichiroh Miki, Yuko Miyamura, Tomoyuki Morikawa, Miho Yamada, Yoshiharu Yamada, Kouichi Yamadera, Jin Yamanoi, Greg Irwin
- Software Manual Design: A.Iwasaki, M.Toyonaga
- Test Player: Miura Staroon, Motoyama, Akinori Murata, W.Kusunoki MS, Kazin, Nose
- IMA ADPCM Algorithm: Copyright 1992 by Stichting Mathematisch Centrum, Amsterdam, The Netherlands All Rights Reserved.
- Special Thanks: Bamboo, Neo_G (Ishizawa), Naoto Ohta, Sasaki-F, Araki -Tim2, Dezaki-Man2, M.Takemura, Y.Sudo, M.Aoki, K.Kubota, H.Ojima, A.Terada, S.Tanaka, and All Capcom Staff
- Market Producer: Kouji Nakajima
- General Producer: Noritaka Funamizu, Yoshiki Okamoto
- Presented by: Capcom
Magazine articles
- Main article: Street Fighter Zero 3/Magazine articles.
Artwork

Physical scans
| Sega Retro Average | |||||||||||||||||||||||||||||
|---|---|---|---|---|---|---|---|---|---|---|---|---|---|---|---|---|---|---|---|---|---|---|---|---|---|---|---|---|---|
|
| 84 | |
|---|---|
| Based on 5 reviews | |
| Saturn, JP |
|---|
  Cover
|
Spinecard  Disc  Manual |
| Saturn, JP (4MB RAM Pack) |
|---|
  Cover
|
 Disc   Jewel Case |
Technical information
- Main article: Street Fighter Zero 3/Technical information.
References
- ↑ https:/twitter.com/gdri/status/548176421311348737 (Wayback Machine: 2018-05-18 22:01)
- ↑ File:Sfzero3 sat jp backcover.jpg
- ↑ 3.0 3.1 https://sega.jp/history/hard/segasaturn/software_l.html#tab04 (Wayback Machine: 2019-12-07 02:59)
- ↑ File:SFZ3 Saturn JP SSEnding.pdf
- ↑ File:SFZ2 Saturn JP SSEnding Dramatic.pdf
- ↑ Consoles +, "Août 1999" (FR; 1999-0x-xx), page 78
- ↑ Dreamcast Magazine, "1999-25 (1999-08-13,20)" (JP; 1999-07-30), page 19
- ↑ Famitsu, "1999-08-13" (JP; 1999-07-30), page 1
- ↑ GameFan, "Volume 7, Issue 11: November 1999" (US; 1999-xx-xx), page 20
- ↑ Sega Saturn Magazine, "Readers rating final data" (JP; 2000-03), page 12
| Street Fighter Zero 3 | |
|---|---|
|
Main page | Comparisons | Magazine articles | Reception | Technical information | |
